ROS 2 SDK
RBQ Introduction
Welcome to the RBQ ROS 2 SDK Manual.
- This guide will help you quickly get started with controlling and visualizing the RBQ robot through ROS 2, both in simulation and on real hardware.
What This SDK Provides
This SDK enables the following key features:
- Robot Control: Execute posture commands, gait switching, and position-based navigation.
- Sensor Feedback Streaming: Continuously stream IMU, foot contact, battery state, and more.
- Vision Data Streaming: Provides visual information from front, rear, and downward-facing cameras for perception and navigation.
- RViz2 Visualization: Visualize robot state and sensors like LiDAR in real-time.
System requirements
| Component | Require Setting |
|---|---|
| Operating System | |
| ROS 2 Distro | |
| Python Version |
Installation
📝 Instructions assume that the CLI terminal commands are all input in the main directory.
Clone the RBQ repository to your workspace:
bashgit clone https://github.com/RainbowRobotics/RBQ.git
System Setup
This "System Setup" process should be executed on the 'developer PC'. This package is tested for
Ubuntu 22.04 and ROS 2 Humble.
Install
ROS Humble— follow the official Ubuntu install guide, or run:bashsudo apt update && sudo apt install -y software-properties-common curl sudo curl -sSL https://raw.githubusercontent.com/ros/rosdistro/master/ros.key \ -o /usr/share/keyrings/ros-archive-keyring.gpg echo "deb [arch=$(dpkg --print-architecture) signed-by=/usr/share/keyrings/ros-archive-keyring.gpg] \ http://packages.ros.org/ros2/ubuntu $(. /etc/os-release && echo $UBUNTU_CODENAME) main" \ | sudo tee /etc/apt/sources.list.d/ros2.list > /dev/null sudo apt update && sudo apt install -y ros-humble-desktop \ python3-colcon-common-extensions python3-rosdep \ ros-humble-rmw-cyclonedds-cpp ros-humble-cyclonedds sudo rosdep init && rosdep updateSource
ROS Humblebashsource /opt/ros/humble/setup.bash
Package Installation
Go-to the
ros2directory andinstall ros dependenciesbashcd ros2 rosdep install --from-paths src -y --ignore-srcBuild rbq_ros2packagesbashcolcon build --symlink-install
▶ Run nodes
Go to your workspace directory first:
cd <your workspace>/RBQ- To Run
rbq_driveron 'real robot', execute the following command:
This section explains how to operate the real RBQ robot.
📖 For detailed operation steps, refer to the Operation Guide
1. Connect your PC to the robot's Wi-Fi
📝 Wi-Fi SSID: RBQ_xxxx.
2. Connect to robot pc via SSH
ssh rbq@192.168.0.10⚠️ Make sure the robot is Auto Started before running control or policy examples (e.g. rbq_low_level).
3. Run the process on robot pc
To run the process on the robot PC, follow these steps in order.
- Connect the network on the robot PC using a C to LAN hub.
- Connect to the robot PC via SSH (see step 2 above:
ssh rbq@192.168.0.10). - On the connected robot PC, clone the repository and run the same setup as on the developer PC.
- In your working directory (e.g.
cd ~), rungit clone https://github.com/RainbowRobotics/RBQ.git, then go into the cloned RBQ directory and perform system setup (ROS Humble install, sourcing, rosdep init, etc.) and package installation (cd ros2, thenrosdep install,colcon build) as in the 🛠️ Installation section.
- In your working directory (e.g.
- If you get permission errors, run the command again after entering
sudo.
Note: The commands below must be run on the real robot (the robot PC you connected to via SSH), not on the developer PC.
To use ROS with the real robot from your 'developer PC', run:
bashcd <your workspace>/RBQ source ros2/install/local_setup.bash ./scripts/start_ros_driver.bashNote: The commands below must be run on the developer PC, not on the real robot (robot PC).
To use ROS in simulation on your 'developer PC', run:
bashcd <your workspace>/RBQ source ros2/install/local_setup.bash ./scripts/sim.bash
4. DDS setup on developer PC (when sending topics to robot PC)
On the developer PC, in the terminal where you send DDS traffic to the robot PC, set the following environment variables. Use this terminal for ros2 topic list, ros2 topic pub, etc.
- Domain ID is fixed at
0. - Network interface must match your PC.
wlp4s0is an example; replace it with the interface name you get fromifconfig.
export CYCLONEDDS_URI='<CycloneDDS><Domain><Id>0</Id><General><Interfaces><NetworkInterface name="wlp4s0"/></Interfaces></General></Domain></CycloneDDS>'
export RMW_IMPLEMENTATION=rmw_cyclonedds_cpp
Identify the interface to use from the ifconfig output below (e.g. Wi‑Fi wlp4s0, wired eth0), then change the name="wlp4s0" part in CYCLONEDDS_URI to that name.
To check your interfaces:
ifconfig5. Test list of active topics
Robot PC: If the driver was started in a terminal with the step 3 environment variables set, you can run ros2 topic list in that same terminal.
Developer PC: To send or inspect topics to/from the robot PC, run the following in a terminal where step 4 DDS setup (domain 0, Cyclone DDS) is applied:
source ros2/install/local_setup.bash
ros2 topic list- The RBQ driver includes all topics needed to control the RBQ over ROS 2.
The rbq_driver process starts the following nodes:
- Robot state publisher
- Sensor feedback publishers (IMU, battery, foot contact)
- Command subscriber
- Vision data publishers (front, rear, and bottom camera streams)
Quick Start
This section walks you through the essential commands to get the robot moving via ROS 2 topics.
1. Switch to HighLevel Command Mode
NOTE
Mode Switch Required
To move the robot via HighLevelCommand, you must set rbq/motion/switchControlMode to true first.
true | HighLevel Mode — accepts commands from rbq/motion/cmd_highLevel |
false | JoyStick Mode — robot controlled by joystick (default) |
ros2 topic pub --once /rbq/motion/switchControlMode std_msgs/msg/Bool "{data: true}"2. Auto Start (initialize joints and start control)
CAUTION
Before running autoStart, ensure the robot is in the correct initial posture on a flat surface. For testing, sit the robot first (switchGait gait_id: 0).
ros2 topic pub --once /rbq/motion/autoStart std_msgs/msg/Bool "{data: true}"3. Gait Transition (Sit → Stand → Walk)
Use rbq/motion/switchGait with the target gait_id to change the robot's gait state.
Sit (gait_id: 0)
ros2 topic pub --once /rbq/motion/switchGait std_msgs/msg/Int8 "{data: 0}"Stand (gait_id: 1)
ros2 topic pub --once /rbq/motion/switchGait std_msgs/msg/Int8 "{data: 1}"Walk (gait_id: 3)
ros2 topic pub --once /rbq/motion/switchGait std_msgs/msg/Int8 "{data: 3}"Available Gait States :
| State ID | Name | Description |
|---|---|---|
| -2 | Fall Mode | Triggered upon unexpected loss of balance |
| -1 | Control Off | All actuators disabled |
| 0 | Sitting | Low posture, resting on the ground |
| 1 | Standing | Neutral posture, ready to walk |
| 2 | Aim Mode | Aiming posture for targeting |
| 3 | Walk Mode | walking Trot gait |
| 4 | Stairs Mode | Stair-adaptive gait using camera sensor |
| 5 | Wave Mode | walking Walk gait |
| 6 | Run Mode | High-speed gait (if supported) |
| 30 | RL Trot | Reinforcement Learning Trot gait |
| 31 | RL Front Walk | Reinforcement Learning Front Walk gait |
| 33 | RL Left Walk | Reinforcement Learning Left Walk gait |
| 34 | RL Right Walk | Reinforcement Learning Right Walk gait |
| 35 | RL Bound | Reinforcement Learning Bound gait |
| 36 | RL Pace | Reinforcement Learning Pace gait |
| 37 | RL Pronk | Reinforcement Learning Pronk gait |
| 38-41 | RL 3Leg | Reinforcement Learning 3-Leg gaits (HR, HL, FR, FL) |
| 42 | RL Trot Vision | Reinforcement Learning Trot with Vision |
| 45 | RL Trot Run | Reinforcement Learning Trot Run gait |
| 46 | RL Silent | Reinforcement Learning Silent gait |
4. Send Velocity Commands
Once the robot is in Walk Mode (gait_id: 3), use rbq/motion/cmd_highLevel to send velocity commands.
Move forward at 0.3 m/s
ros2 topic pub --once /rbq/motion/cmd_highLevel rbq_msgs/msg/HighLevelCommand \
'{header: {stamp: {sec: 0, nanosec: 0}, frame_id: "base"},
  identifier: "walk_fwd",
  roll: 0.0,
  pitch: 0.0,
  yaw: 0.0,
  vel_x: 0.3,
  vel_y: 0.0,
  omega_z: 0.0,
  delta_body_h: 0.0,
  delta_foot_h: 0.0,
  gait_state: 3,
  gait_transition: false}'
Move diagonally at 45° (forward + lateral)
ros2 topic pub --once /rbq/motion/cmd_highLevel rbq_msgs/msg/HighLevelCommand \
'{header: {stamp: {sec: 0, nanosec: 0}, frame_id: "base"},
  identifier: "walk_diag",
  roll: 0.0,
  pitch: 0.0,
  yaw: 0.0,
  vel_x: 0.3,
  vel_y: 0.3,
  omega_z: 0.0,
  delta_body_h: 0.0,
  delta_foot_h: 0.0,
  gait_state: 3,
  gait_transition: false}'
💡 For 45° diagonal movement, set the same
vel_xandvel_y(0.3 × cos45° ≈ 0.212 m/s).
HighLevelCommand message definition :
std_msgs/Header header         # ROS message header with timestamp and frame_id
string identifier              # Command identifier for tracking/logging purposes
float64 roll                   # Body roll angle in degrees (ZYX Euler angles)
float64 pitch                  # Body pitch angle in degrees (ZYX Euler angles)
float64 yaw                    # Body yaw angle in degrees (ZYX Euler angles)
float64 vel_x                  # Linear velocity in X direction (m/s)
float64 vel_y                  # Linear velocity in Y direction (m/s)
float64 omega_z                # Angular velocity around Z axis (deg/s)
float64 delta_body_h           # Body height adjustment from default (m)
float64 delta_foot_h           # Foot height adjustment from default (m)
int8	gait_state             # Target gait state (use constants defined above)
bool	gait_transition        # Enable(true)/disable(false) gait transition during command execution
Topics
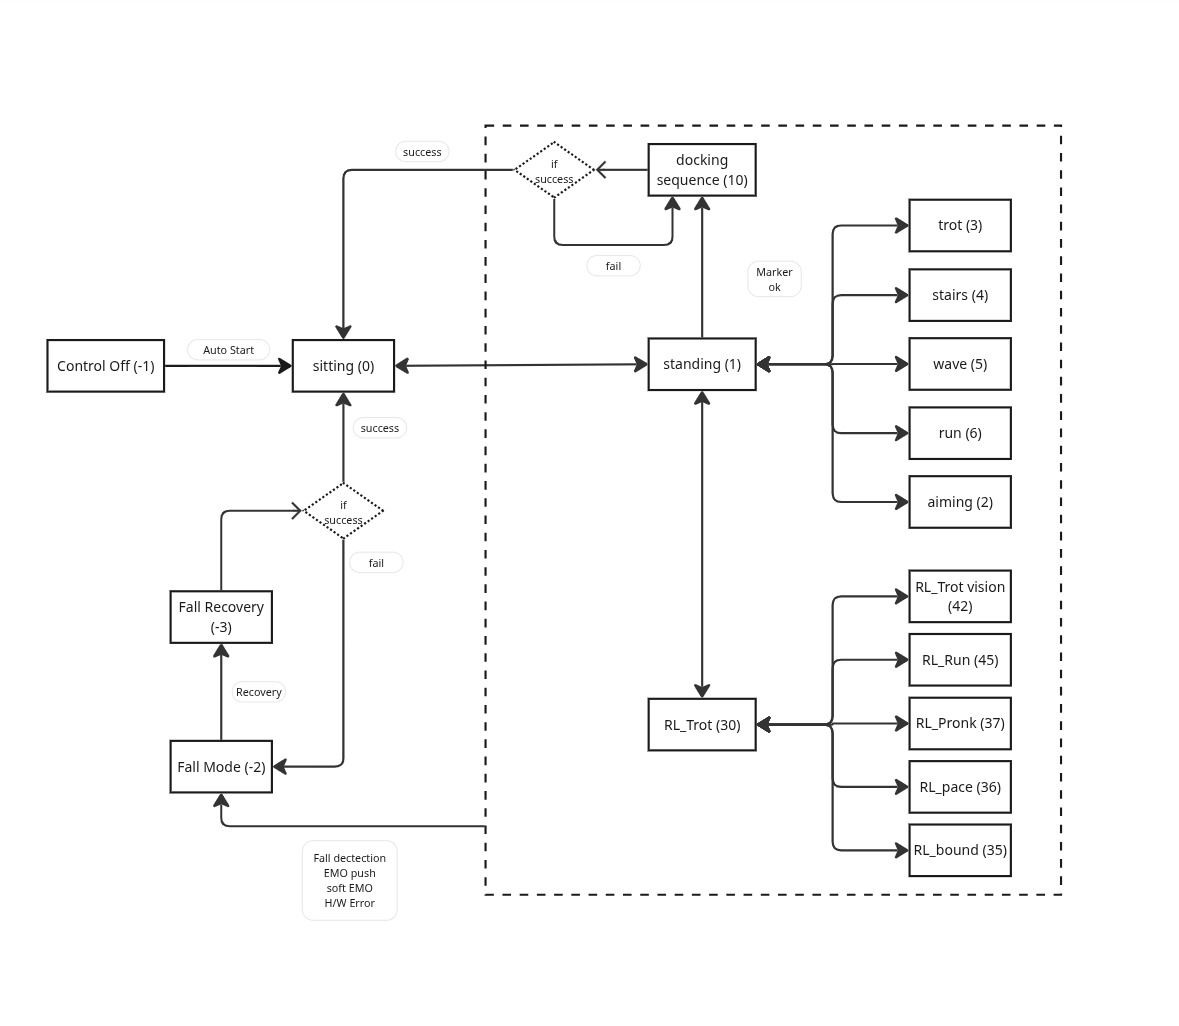
1. Gait State Topics
Gait state refers to the robot's current motion or posture mode.
Transitions between these states are triggered by incoming high-level commands, sensor conditions, or internal logic.
Available Gait States :
| State ID | Name | Description |
|---|---|---|
| -2 | Fall Mode | Triggered upon unexpected loss of balance |
| -1 | Control Off | All actuators disabled |
| 0 | Sitting | Low posture, resting on the ground |
| 1 | Standing | Neutral posture, ready to walk |
| 2 | Aim Mode | Aiming posture for targeting |
| 3 | Walk Mode | walking Trot gait |
| 4 | Stairs Mode | Stair-adaptive gait using camera sensor |
| 5 | Wave Mode | walking Walk gait |
| 6 | Run Mode | High-speed gait (if supported) |
| 30 | RL Trot | Reinforcement Learning Trot gait |
| 31 | RL Front Walk | Reinforcement Learning Front Walk gait |
| 33 | RL Left Walk | Reinforcement Learning Left Walk gait |
| 34 | RL Right Walk | Reinforcement Learning Right Walk gait |
| 35 | RL Bound | Reinforcement Learning Bound gait |
| 36 | RL Pace | Reinforcement Learning Pace gait |
| 37 | RL Pronk | Reinforcement Learning Pronk gait |
| 38-41 | RL 3Leg | Reinforcement Learning 3-Leg gaits (HR, HL, FR, FL) |
| 42 | RL Trot Vision | Reinforcement Learning Trot with Vision |
| 45 | RL Trot Run | Reinforcement Learning Trot Run gait |
| 46 | RL Silent | Reinforcement Learning Silent gait |
The Available Commands in the second column show which commands can be used in each gait state. In contrast, Common Commands and Power Control are always available regardless of the gait state.
Note: All gait transitions use the unified
rbq/motion/switchGaittopic with specificgait_idvalues.
Check Gait State table above for available gait_id values at "Available Gait States"
| Gait State | Available Commands | Common Commands | Power Control |
|---|---|---|---|
| Control Off | rbq/motion/autoStart | rbq/powerControl/setPortState # PDU Port ID int8 PDU_PORT_48V_LEG = 0x00 int8 PDU_PORT_48V_ADD = 0x01 int8 PDU_PORT_48V_EXT = 0x02 int8 PDU_PORT_12V_VisionPC = 0x10 int8 PDU_PORT_12V_COMM = 0x11 int8 PDU_PORT_12V_Lidar = 0x12 int8 PDU_PORT_12V_CCTV = 0x13 int8 PDU_PORT_12V_THER = 0x14 int8 PDU_PORT_12V_IRLed = 0x15 int8 PDU_PORT_12V_Speaker = 0x16 int8 PDU_PORT_5V_CAMERAS = 0x20 int8 PDU_PORT_5V_AUDIO_SIDE_CAM_USBHUB = 0x21 | |
| Sitting Mode | rbq/motion/canCheck | rbq/motion/switchGait (gait_id: 0-46) rbq/motion/cmd_highLevel rbq/motion/emergency rbq/motion/staticLock rbq/motion/staticReady rbq/motion/staticGround rbq/motion/switchControlMode (true:HighLevel Mode, false:JoyStick Mode) | |
| Standing Mode | rbq/motion/cmd_navigateTo rbq/stateEstimation/comEstimationCompensation rbq/motion/docking rbq/motion/docking_mode | ||
| Walk Mode | - | ||
| Stairs Mode | - | ||
| Run Mode | - | ||
| Wave Mode | rbq/motion/cmd_navigateTo | ||
| RL Mode | - | ||
| Fall Mode | rbq/motion/recoveryFlex rbq/motion/switchGait (gait_id: 1) | ||
2. Low-level State Topics
These topics provide real-time feedback about the robot's internal state, such as posture, sensor readings, and system status.
| Topics | Data Structure | Description |
|---|---|---|
| rbq/status/robot_status | std_msgs/Header header bool con_start bool ready_pos bool ground_pos bool force_con bool ext_joy bool is_standing bool can_check bool find_home int8 gait_id bool is_fall int8 docking_state bool imu_success | This message contains robot status information and is published at 50Hz. Contains motor control status, position states, communication status, gait information, and docking state. Check Gait State table above for available gait_id values at "Available Gait States" # Docking States int8 DOCKING_MAX_FAIL_CNT_REACHED = -6 int8 DOCKING_MARKER_POS_INVALID_ROTATION = -5 int8 DOCKING_MARKER_POS_INVALID_TOO_FAR = -4 int8 DOCKING_MARKER_POS_INVALID_WRONG_DIR = -3 int8 DOCKING_MARKER_NOT_FOUND = -2 int8 DOCKING_FAILED = -1 int8 DOCKING_OPERATION_MODE = 0 int8 DOCKING_APPROACH_OFFSET = 1 int8 DOCKING_APPROACH = 2 int8 DOCKING_APPROACH_WIDE = 3 int8 DOCKING_SIT_DOWN = 4 int8 DOCKING_SUCCESS = 5 int8 DOCKING_SUCCESS_CHARGING = 6 int8 DOCKING_SUCCESS_NO_CHARGING = 7 |
| rbq/powerControl/battery_status | std_msgs/Header header string identifier float64 charge_percentage float64 current float64 voltage float64[] temperatures uint8 status | # Status uint8 STATUS_UNKNOWN = 0 uint8 STATUS_MISSING = 1 uint8 STATUS_CHARGING = 2 uint8 STATUS_DISCHARGING = 3 uint8 STATUS_BOOTING = 4 |
| rbq/stateEstimation/footStates | std_msgs/Header header geometry_msgs/Point[] foot_position_rt_body geometry_msgs/Point[] foot_velocity_rt_body uint8[] contact | Foot position/velocity with respect to the local body frame. The origin of the body frame is at the center of the robot body, with the front direction as +x, the left direction as +y, and the upward direction as +z. All arrays contain 4 elements (one for each leg). # Contact uint8 CONTACT_UNKNOWN = 0 uint8 CONTACT_MADE = 1 uint8 CONTACT_LOST = 2 # Leg number Leg num 0 : Right-Hind leg (RH) Leg num 1 : Left-Hind Leg (LH) Leg num 2 : Right-Front Leg (RF) Leg num 3 : Left-Front Leg (LF) |
| rbq/joint/joint_status | std_msgs/Header header bool[] connected int8[] temperature int8[] motor_temp bool[] status_fet bool[] status_run bool[] status_init bool[] status_mod bool[] status_non_ctr bool[] status_bat bool[] status_calib bool[] status_mt_err bool[] status_jam bool[] status_cur bool[] status_big bool[] status_inp bool[] status_flt bool[] status_tmp bool[] status_ps1 bool[] status_ps2 bool[] status_rsvd float32[] position_ref float32[] position_enc float32[] velocity float32[] torque_ref float32[] current float32[] kp float32[] kd int32[] owner | This message contains detailed joint information including connection status, temperature, motor status flags, and control data. Published at 50Hz for each joint. |
💡 Examples : Subscribe to each state topic
Robot Status
ros2 topic echo --once rbq/status/robot_statusJoint Status
ros2 topic echo --once rbq/joint/joint_statusBattery Status
ros2 topic echo --once rbq/powerControl/battery_statusFoot States
ros2 topic echo --once rbq/stateEstimation/footStatesThe msg about state is defined as :
- RobotStatus
# DOCKING_STATE
int8 DOCKING_MAX_FAIL_CNT_REACHED = -6           # (ABORT SEQENCE) MAX Docking retry count rechead (10 times)
int8 DOCKING_MARKER_POS_INVALID_ROTATION  = -5   # (ABORT SEQENCE) Marker rotation angle is more than +-40 degree
int8 DOCKING_MARKER_POS_INVALID_TOO_FAR   = -4   # (ABORT SEQENCE) Marker is too far more than 5m
int8 DOCKING_MARKER_POS_INVALID_WRONG_DIR = -3   # (ABORT SEQENCE) Marker is detected on front side of robot
int8 DOCKING_MARKER_NOT_FOUND = -2               # (ABORT SEQENCE) Marker not found
int8 DOCKING_FAILED           = -1               # docking failed --> Auto retry
int8 DOCKING_OPERATION_MODE   = 0                # robot is on normal operation
int8 DOCKING_APPROACH_OFFSET  = 1                # 1st reach to charger by offset
int8 DOCKING_APPROACH         = 2                # 2nd reach to charger
int8 DOCKING_APPROACH_WIDE    = 3                # 3rd reach to charger with wide stance
int8 DOCKING_SIT_DOWN         = 4                # sitting down to charger
int8 DOCKING_SUCCESS          = 5                # docking success : charger connected
int8 DOCKING_SUCCESS_CHARGING = 6                # docking success : charging
int8 DOCKING_SUCCESS_NO_CHARGING = 7             # docking success : no_charging

# gait_state constants
int8 STATE_FALL                = -2    # Fall Mode - Triggered upon unexpected loss of balance
int8 STATE_OFF                 = -1    # Control Off - All actuators disabled
int8 STATE_SIT                 = 0     # Sitting - Low posture, resting on the ground
int8 STATE_STAND               = 1     # Standing - Neutral posture, ready to walk
int8 STATE_AIM                 = 2     # Aim Mode - Aiming posture for targeting
int8 STATE_WALK                = 3     # Walk Mode - walking Trot gait
int8 STATE_STAIRS              = 4     # Stairs Mode - Stair-adaptive gait using camera sensor
int8 STATE_WAVE                = 5     # Wave Mode - walking Walk gait
int8 STATE_RUN                 = 6     # Run Mode - High-speed gait (if supported)
int8 STATE_RL_TROT             = 30    # RL Trot - Reinforcement Learning Trot gait
int8 STATE_RL_FRONT_WALK       = 31    # RL Front Walk - Reinforcement Learning Front Walk gait
int8 STATE_RL_LEFT_WALK        = 33    # RL Left Walk - Reinforcement Learning Left Walk gait
int8 STATE_RL_RIGHT_WALK       = 34    # RL Right Walk - Reinforcement Learning Right Walk gait
int8 STATE_RL_BOUND            = 35    # RL Bound - Reinforcement Learning Bound gait
int8 STATE_RL_PACE             = 36    # RL Pace - Reinforcement Learning Pace gait
int8 STATE_RL_PRONK            = 37    # RL Pronk - Reinforcement Learning Pronk gait
int8 STATE_RL_3LEG_HR          = 38    # RL 3Leg HR - Reinforcement Learning 3-Leg gait (Hind Right)
int8 STATE_RL_3LEG_HL          = 39    # RL 3Leg HL - Reinforcement Learning 3-Leg gait (Hind Left)
int8 STATE_RL_3LEG_FR          = 40    # RL 3Leg FR - Reinforcement Learning 3-Leg gait (Front Right)
int8 STATE_RL_3LEG_FL          = 41    # RL 3Leg FL - Reinforcement Learning 3-Leg gait (Front Left)
int8 STATE_RL_TROT_VISION      = 42    # RL Trot Vision - Reinforcement Learning Trot with Vision
int8 STATE_RL_TROT_RUN         = 45    # RL Trot Run - Reinforcement Learning Trot Run gait
int8 STATE_RL_SILENT           = 46    # RL Silent - Reinforcement Learning Silent gait

std_msgs/Header header
bool con_start          # Motor control enabled (1 = enabled, 0 = not enabled)
bool ready_pos          # Robot is in ready position (1 = ready, 0 = not ready)
bool ground_pos         # Robot is in ground/sitting position (1 = sitting, 0 = not sitting)
bool force_con          # Force control mode enabled (1 = enabled, 0 = disabled)
bool ext_joy            # External joystick connected (1 = connected, 0 = not connected)
bool is_standing        # Robot is standing (1 = standing, 0 = not standing)
bool can_check          # CAN communication check (1 = success, 0 = failure)
bool find_home          # Encoder homing status (1 = success, 0 = failure)
int8 gait_id            # Current gait mode identifier (returns value defined GAIT_STATE enum)
bool is_fall            # Fall detection status (1 = robot has fallen, 0 = normal)
int8 docking_state      # Docking process status (returns value defined in DOCKING_STATE enum)
bool imu_success # IMU connection status (1 = success, 0 = failure)- JointStatus
std_msgs/Header header

# Joint Detail Information
# Connection and Temperature Status
bool[] connected          # Joint connection status (true = connected, false = disconnected)
int8[] temperature        # Board temperature in Celsius
int8[] motor_temp         # Motor temperature in Celsius

# Motor Status Flags
bool[] status_fet         # FET (Field Effect Transistor) status (true = ON, false = OFF)
bool[] status_run         # Motor running status (true = running, false = stopped)
bool[] status_init        # Initialization status (true = initialized, false = not initialized)
bool[] status_mod         # Control mode status (true = position control, false = torque control)
bool[] status_non_ctr     # Nonius count error (true = error, false = normal)
bool[] status_bat         # Battery status (true = low battery, false = normal)
bool[] status_calib       # Calibration status (true = in calibration mode, false = normal)
bool[] status_mt_err      # Motor error status (true = error, false = normal)
bool[] status_jam         # JAM error status (true = jammed, false = normal)
bool[] status_cur         # Over current error (true = over current, false = normal)
bool[] status_big         # Big position error (true = large error, false = normal)
bool[] status_inp         # Input error (true = input error, false = normal)
bool[] status_flt         # FET driver fault error (true = fault, false = normal)
bool[] status_tmp         # Temperature error (true = over temperature, false = normal)
bool[] status_ps1         # Position limit error - lower bound (true = limit reached, false = normal)
bool[] status_ps2         # Position limit error - upper bound (true = limit reached, false = normal)
bool[] status_rsvd        # Reserved status bit

# Control Data
float32[] position_ref    # Reference position in radians
float32[] position_enc    # Encoder position in radians
float32[] velocity        # Joint velocity in deg/s
float32[] torque_ref      # Reference torque in Nm
float32[] current         # Motor current in Amperes
float32[] kp              # Proportional gain (P gain)
float32[] kd              # Derivative gain (D gain)
int32[] owner # Joint owner ID (which controller owns this joint)- BatteryState
# Status
uint8 STATUS_UNKNOWN = 0
uint8 STATUS_MISSING = 1
uint8 STATUS_CHARGING = 2
uint8 STATUS_DISCHARGING = 3
uint8 STATUS_BOOTING = 4

std_msgs/Header header
string identifier
float64 charge_percentage
float64 current
float64 voltage
float64[] temperatures
uint8 status- FootStates
# Contact constants
uint8 CONTACT_UNKNOWN = 0
uint8 CONTACT_MADE = 1
uint8 CONTACT_LOST = 2

std_msgs/Header header

# Arrays for 4 legs (FL, FR, RL, RR)
geometry_msgs/Point[] foot_position_rt_body    # Foot position relative to body frame (4 elements)
geometry_msgs/Point[] foot_velocity_rt_body    # Foot velocity relative to body frame (4 elements)
uint8[] contact                                 # Contact state for each foot (4 elements)
3. Command Topics
The following topics are used to send high-level and navigation commands to the RBQ robot.
All commands follow standard ROS 2 message types or custom rbq_msgs definitions.
Command topics are defined as :
| Topics | Description |
|---|---|
| rbq/motion/autoStart | Initialize Joint position and start joint control AutoStart process can be checked by 'RobotStatus' topic CAN check -> Find Home -> Control Start flags will be on |
| rbq/motion/emergency | Emergency stop - sets all leg joints to high damping mode. This action may cause a shock to the robot. |
| rbq/motion/switchGait | Switch robot gait mode using gait_id parameter. Check Gait State table above for available gait_id values at "Available Gait States". |
| rbq/motion/recoveryFlex rbq/motion/switchGait (gait_id: 1) | The 'recoveryFlex' topic is accepted only when the robot is in Fall mode. It commands the robot to return to sitting mode through specific joint movements. Alternatively, you can use 'switchGait' topic with gait_id: 1 (Standing) to recover from Fall mode. |
| rbq/motion/switchControlMode | Enable or disable HighLevel Command mode. When set to `true`, HighLevel Command mode is enabled and the robot accepts commands from `rbq/motion/cmd_highLevel` topic. When set to `false`, Joystick control mode is enabled instead. |
| rbq/motion/docking | Start the auto docking sequence to the charging station with default options (wave gait, no vision feedback). The robot must be in Standing Mode and the charging station marker must be visible to the rear camera. Docking progress can be monitored via the docking_state field of rbq/status/robot_status. |
| rbq/motion/docking_mode | Start the auto docking sequence with explicit options.std_msgs/Int8MultiArray with data of length 2:data[0] = walk mode 0: wave (default, same as rbq/motion/docking)1: trot / stair-style approach data[1] = vision mode0: blind walking (default) 1: vision feedback for ground height changes (currently supported only with trot) |
💡 Examples : Publish to each command topic
Auto Start (initialize joints and start control)
CAUTION
Before running autoStart, make sure the robot is in the correct initial pose on a flat surface. If you are testing, sit the robot down first (switchGait gait_id: 0).
ros2 topic pub --once /rbq/motion/autoStart std_msgs/msg/Bool "{data: true}"Emergency Stop
CAUTION
This command sets all leg joints to high damping mode - the robot will collapse immediately. If you are testing, sit the robot down first (switchGait gait_id: 0) before using this command.
ros2 topic pub --once /rbq/motion/emergency std_msgs/msg/Bool "{data: true}"Switch Gait (e.g. to Walk Mode, gait_id: 3)
ros2 topic pub --once /rbq/motion/switchGait std_msgs/msg/Int8 "{data: 3}"Recovery from Fall Mode
ros2 topic pub --once /rbq/motion/recoveryFlex std_msgs/msg/Bool "{data: true}"Switch to HighLevel Command Mode
ros2 topic pub --once rbq/motion/switchControlMode std_msgs/msg/Bool '{data: true}'Switch to JoyStick Mode
ros2 topic pub --once rbq/motion/switchControlMode std_msgs/msg/Bool '{data: false}'Static Lock (lock joints in current position)
ros2 topic pub --once /rbq/motion/staticLock std_msgs/msg/Bool "{data: true}"Static Ready
ros2 topic pub --once /rbq/motion/staticReady std_msgs/msg/Bool "{data: true}"Static Ground
ros2 topic pub --once /rbq/motion/staticGround std_msgs/msg/Bool "{data: true}"Docking (default: wave gait + blind walking)
NOTE
The robot must already be in Standing Mode and positioned so the rear camera can see the docking station's ArUco marker (within ~5 m). Docking is rejected otherwise. Watch rbq/status/robot_status for the docking_state result codes.
ros2 topic pub --once /rbq/motion/docking std_msgs/msg/Bool "{data: true}"Docking with mode selection (walk gait + vision feedback)
data[0] selects the gait used to approach the dock (0: wave, 1: trot / stair-style), and data[1] selects whether to use vision feedback for ground height changes (0: blind, 1: vision; currently supported only with trot).
# wave gait + blind walking (equivalent to /rbq/motion/docking)
ros2 topic pub --once /rbq/motion/docking_mode std_msgs/msg/Int8MultiArray "{data: [0, 0]}"

# trot gait + blind walking
ros2 topic pub --once /rbq/motion/docking_mode std_msgs/msg/Int8MultiArray "{data: [1, 0]}"

# trot gait + vision feedback (only valid with trot)
ros2 topic pub --once /rbq/motion/docking_mode std_msgs/msg/Int8MultiArray "{data: [1, 1]}"
High-level command topics are defined as :
| Topics | Data Structure | Description |
|---|---|---|
| rbq/motion/cmd_highLevel | std_msgs/Header header string identifier float64 roll float64 pitch float64 yaw float64 vel_x float64 vel_y float64 omega_z float64 delta_body_h float64 delta_foot_h int8 gait_state bool gait_transition | High-level command topic for robot control based on current gait state. (Check Gait State table and gait_id values at "Available Gait States") • Standing Mode: Adjusts robot body posture based on roll, pitch, yaw (ZYX Euler angles) , The parameter body_H specifies the height of the robot's body Range: Roll: -25~25°, Pitch: -20~20°, Yaw: -25~25°, Delta_body_h: -0.15~0.05m • Walk Mode: Set movement speed of the robot in the local coordinate system while in the trotting gait state. Vx, Vy represents the forward speed, lateral speed and Wz represents rotational speed. During trotting, delta_body_H is used to set the height of the body from its default body height, foot_H is used to set the foot lifting height, and pitch is used to set the pitch angle of the body. Range: Vx: -1.0~1.2m/s, Vy: -0.4~0.4m/s, Wz: -75~75°/s Delta_body_h: -0.15~+0.05m, Delta_foot_h: -0.06~+0.04m • Stairs Mode: Forward, lateral, rotational speeds for stairs navigation Range: Vx: -1.0~1.0m/s, Vy: -0.4~0.4m/s, Wz: -17~17°/s • Run Mode: Forward, lateral, rotational speeds for High-speed movement control Range: Vx: -1.0~1.8m/s, Vy: -0.6~0.6m/s, Wz: -75~75°/s • Wave Mode: Forward, lateral, rotational speeds for Slow movement control Range: Vx: -0.3~0.3m/s, Vy: -0.2~0.2m/s, Wz: -20~20°/s • RL TROT Mode: Reinforcement Learning Trot gait with enhanced speed control Range: Vx: -1.5~2.0m/s, Vy: -1.0~1.0m/s, Wz: -75~75°/s • RL TROT VISION Mode: Reinforcement Learning Trot with Vision integration Range: Vx: -1.5~2.0m/s, Vy: -1.0~1.0m/s, Wz: -75~75°/s • RL Walk / RL Walk Vision Mode: RL-based walk (gait_id 49 / 48). Velocity control plus body height and pitch adjustment (supported in this mode); the Vision variant adds terrain height feedback. Range: Vx: -1.5~2.5m/s, Vy: -1.0~1.0m/s, Wz: -86~86°/s, Pitch: -25~25°, Delta_body_h: -0.25~+0.10m |
| rbq/motion/cmd_navigateTo | geometry_msgs/Pose pose uint8 mode | Navigation command to move robot to specified position: # Approach Modes: 0: Rotate to target → straight walk → rotate to target yaw 1: Rotate to target yaw → diagonal walk to target 2: Diagonal walk to target → rotate to target yaw 3: Rotate to target yaw and diagonal walk simultaneously 4: Approach mode 3 with wide leg walking |
💡 Examples : High-level and navigation commands
Walk forward at 0.5 m/s (Walk Mode)
ros2 topic pub --once /rbq/motion/cmd_highLevel rbq_msgs/msg/HighLevelCommand '{header: {stamp: {sec: 0, nanosec: 0}, frame_id: "base"},
  identifier: "walk_fwd",
  roll: 0.0,
  pitch: 0.0,
  yaw: 0.0,
  vel_x: 0.5,
  vel_y: 0.0,
  omega_z: 0.0,
  delta_body_h: 0.0,
  delta_foot_h: 0.0,
  gait_state: 3,
  gait_transition: false}'
Turn 30°/s (Walk Mode)
ros2 topic pub --once /rbq/motion/cmd_highLevel rbq_msgs/msg/HighLevelCommand '{header: {stamp: {sec: 0, nanosec: 0}, frame_id: "base"},
  identifier: "turn",
  roll: 0.0,
  pitch: 0.0,
  yaw: 0.0,
  vel_x: 0.0,
  vel_y: 0.0,
  omega_z: 30.0,
  delta_body_h: 0.0,
  delta_foot_h: 0.0,
  gait_state: 3,
  gait_transition: false}'
Stop in place (zero velocity)
ros2 topic pub --once /rbq/motion/cmd_highLevel rbq_msgs/msg/HighLevelCommand '{header: {stamp: {sec: 0, nanosec: 0}, frame_id: "base"},
  identifier: "stop",
  roll: 0.0,
  pitch: 0.0,
  yaw: 0.0,
  vel_x: 0.0,
  vel_y: 0.0,
  omega_z: 0.0,
  delta_body_h: 0.0,
  delta_foot_h: 0.0,
  gait_state: 3,
  gait_transition: false}'
Navigate to World Coordinate position (x: 20cm, y: 10cm)
ros2 topic pub --once /rbq/motion/cmd_navigateTo geometry_msgs/msg/PoseStamped "
header:
  frame_id: map
pose:
  position:
    x: 0.2
    y: 0.1
    z: 0.0
  orientation:
    x: 0.0
    y: 0.0
    z: 0.0
    w: 1.0
"
PDU port control mapping (port_id for setPortState)
The port IDs used by the rbq/powerControl/setPortState topic match the enum below.
enum PDU_PORT_IDs_e : unsigned char {
    PDU_PORT_48V_LEG                    = 0x00,
    PDU_PORT_48V_ADD                    = 0x01,
    PDU_PORT_48V_EXT                    = 0x02,

    PDU_PORT_12V_VisionPC               = 0x10,
    PDU_PORT_12V_COMM                   = 0x11,
    PDU_PORT_12V_Lidar                  = 0x12,
    PDU_PORT_12V_CCTV                   = 0x13,
    PDU_PORT_12V_THER                   = 0x14,
    PDU_PORT_12V_IRLed                  = 0x15,
    PDU_PORT_12V_Speaker                = 0x16,

    PDU_PORT_5V_CAMERAS                 = 0x20,
    PDU_PORT_5V_AUDIO_SIDE_CAM_USBHUB   = 0x21,
};
PDU port control (e.g. turn on 12V LiDAR port)
12V LiDAR is PDU_PORT_12V_Lidar = 0x12 (18).
ros2 topic pub --once /rbq/powerControl/setPortState std_msgs/msg/Int8MultiArray "{data: [18, 1]}"The msg of High-Level command is defined as :
- HighLevelCommand
std_msgs/Header header         # ROS message header with timestamp and frame_id
string identifier              # Command identifier for tracking/logging purposes
float64 roll                   # Body roll angle in degrees (ZYX Euler angles)
float64 pitch                  # Body pitch angle in degrees (ZYX Euler angles)
float64 yaw                    # Body yaw angle in degrees (ZYX Euler angles)
float64 vel_x                  # Linear velocity in X direction (m/s)
float64 vel_y                  # Linear velocity in Y direction (m/s)
float64 omega_z                # Angular velocity around Z axis (deg/s)
float64 delta_body_h           # Body height adjustment from default (m)
float64 delta_foot_h           # Foot height adjustment from default (m)
int8	gait_state             # Target gait state (use constants defined above)
bool	gait_transition        # Enable(true)/disable(false) gait transition during command execution
💡 Example: Standing mode with custom pose (roll: 15°, pitch: 30°, yaw: 20°)
ros2 topic pub --once rbq/motion/cmd_highLevel rbq_msgs/msg/HighLevelCommand \
'{header: {stamp: {sec: 0, nanosec: 0}, frame_id: "base"}, identifier: "standing_pose", roll: 15.0, pitch: 30.0, yaw: 20.0, vel_x: 0.0, vel_y: 0.0, omega_z: 0.0, delta_body_h: 0.0, delta_foot_h: 0.0, gait_state: 1, gait_transition: true}'
4. Vision Topics
- PTZ Camera Control Topics
| Topic | Description |
|---|---|
| rbq/ptzCamera/setPanTiltZoom | PTZ camera control command using Float32MultiArray [pan, tilt, zoom] |
💡 example:
ros2 topic pub --once rbq/ptzCamera/setPanTiltZoom std_msgs/msg/Float32MultiArray "{data: [0.0, 0.0, 1.0]}"- Camera Sensor Topics
Camera sensors provide RGB, IR, and depth images from multiple positions around the robot. Images are published in both raw and compressed formats with corresponding camera calibration information.
📍 Hardware Information: For camera specifications, FOV, and transformation matrices, see Cameras, LiDAR, and PTZ Camera under Manual.
| Camera | Image Type | Format | Topic Name |
|---|---|---|---|
| Bottom (0-3) | IR | Raw | rbq/vision/sensor_bottom_0/ir rbq/vision/sensor_bottom_1/ir rbq/vision/sensor_bottom_2/ir rbq/vision/sensor_bottom_3/ir |
| Compressed | rbq/vision/sensor_bottom_0/ir/compressed rbq/vision/sensor_bottom_1/ir/compressed rbq/vision/sensor_bottom_2/ir/compressed rbq/vision/sensor_bottom_3/ir/compressed | ||
| Camera Info | rbq/vision/sensor_bottom_0/ir/camera_info rbq/vision/sensor_bottom_1/ir/camera_info rbq/vision/sensor_bottom_2/ir/camera_info rbq/vision/sensor_bottom_3/ir/camera_info | ||
| Depth | Raw | rbq/vision/sensor_bottom_0/depth rbq/vision/sensor_bottom_1/depth rbq/vision/sensor_bottom_2/depth rbq/vision/sensor_bottom_3/depth | |
| Compressed | rbq/vision/sensor_bottom_0/depth/compressed rbq/vision/sensor_bottom_1/depth/compressed rbq/vision/sensor_bottom_2/depth/compressed rbq/vision/sensor_bottom_3/depth/compressed | ||
| Camera Info | rbq/vision/sensor_bottom_0/depth/camera_info rbq/vision/sensor_bottom_1/depth/camera_info rbq/vision/sensor_bottom_2/depth/camera_info rbq/vision/sensor_bottom_3/depth/camera_info | ||
| Front/Rear | RGB | Raw | rbq/vision/sensor_front/rgb rbq/vision/sensor_rear/rgb |
| Compressed | rbq/vision/sensor_front/rgb/compressed rbq/vision/sensor_rear/rgb/compressed | ||
| Camera Info | rbq/vision/sensor_front/rgb/camera_info rbq/vision/sensor_rear/rgb/camera_info | ||
| IR | Raw | rbq/vision/sensor_front/ir rbq/vision/sensor_rear/ir | |
| Compressed | rbq/vision/sensor_front/ir/compressed rbq/vision/sensor_rear/ir/compressed | ||
| Camera Info | rbq/vision/sensor_front/ir/camera_info rbq/vision/sensor_rear/ir/camera_info | ||
| Depth | Raw | rbq/vision/sensor_front/depth rbq/vision/sensor_rear/depth | |
| Compressed | rbq/vision/sensor_front/depth/compressed rbq/vision/sensor_rear/depth/compressed | ||
| Camera Info | rbq/vision/sensor_front/depth/camera_info rbq/vision/sensor_rear/depth/camera_info |
RViz Visualization
Launch RViz2 with GUI
You can simultaneously visualize and send commands to the robot through the GUI on the left side of RViz.
Go to your workspace directory first:
bashcd <your workspace>/RBQThen launch RViz:
source ros2/install/local_setup.bash
./scripts/start_rviz.bash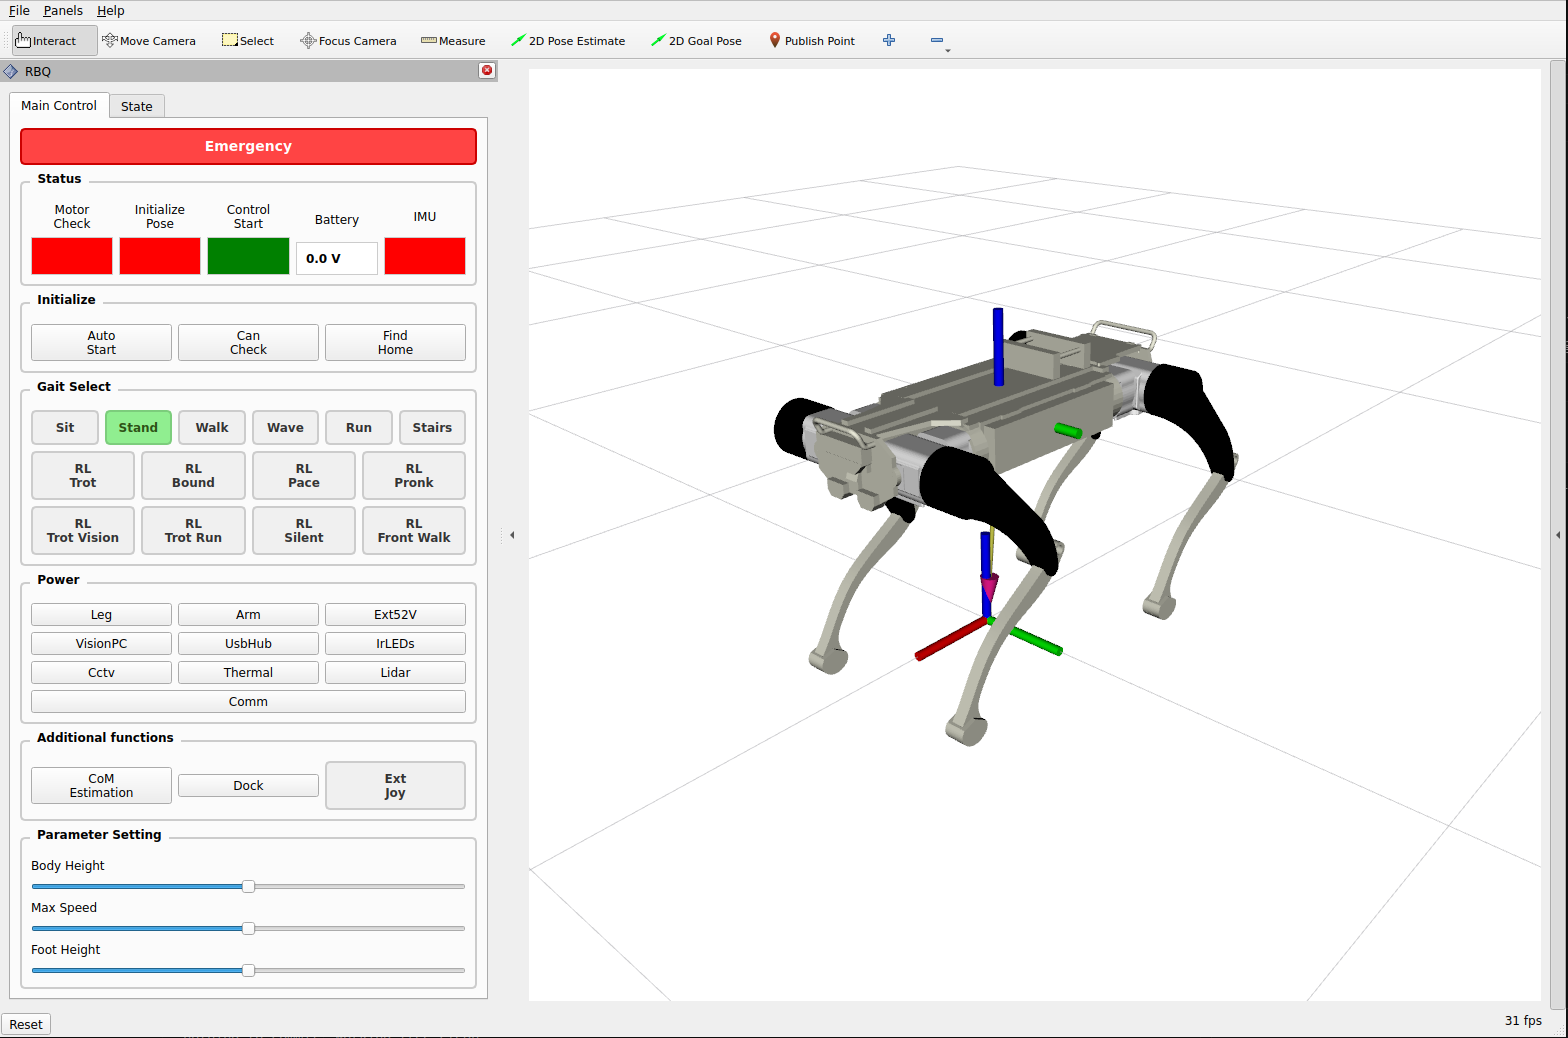
Help
If you encounter problems when using this repository, feel free to open an issue.
Contributors
This project is provided by the Rainbow-Robotics.
Rainbow-Robotics contributors:
Gurbann
Jinwon Seo