Developer's Guide
Introduction
Welcome to the RBQ simulation, command, and deploy/update manual
This manual provides a comprehensive guide on how to simulate the RBQ robot, command it, and deploy your own algorithms to the real robot.
Ready-to-use Simulator and Graphical User Interface for developers
The RBQ robot can be simulated accurately using MuJoCo: "A fast and accurate physics engine suitable for advanced robotics simulation."
📝 Developers can modify the simulation environment "playground" by editing the file:
resources/model/rbq_environment.xmlThe RBQ GUI is designed to provide users with an intuitive interface for commanding and monitoring the robot.
- It provides visual feedback of the robot status, sensor states, and allows both keyboard and joystick inputs for commands.
GUI Overview
- This section explains how to use the RBQ GUI, including its key features and interface layout.
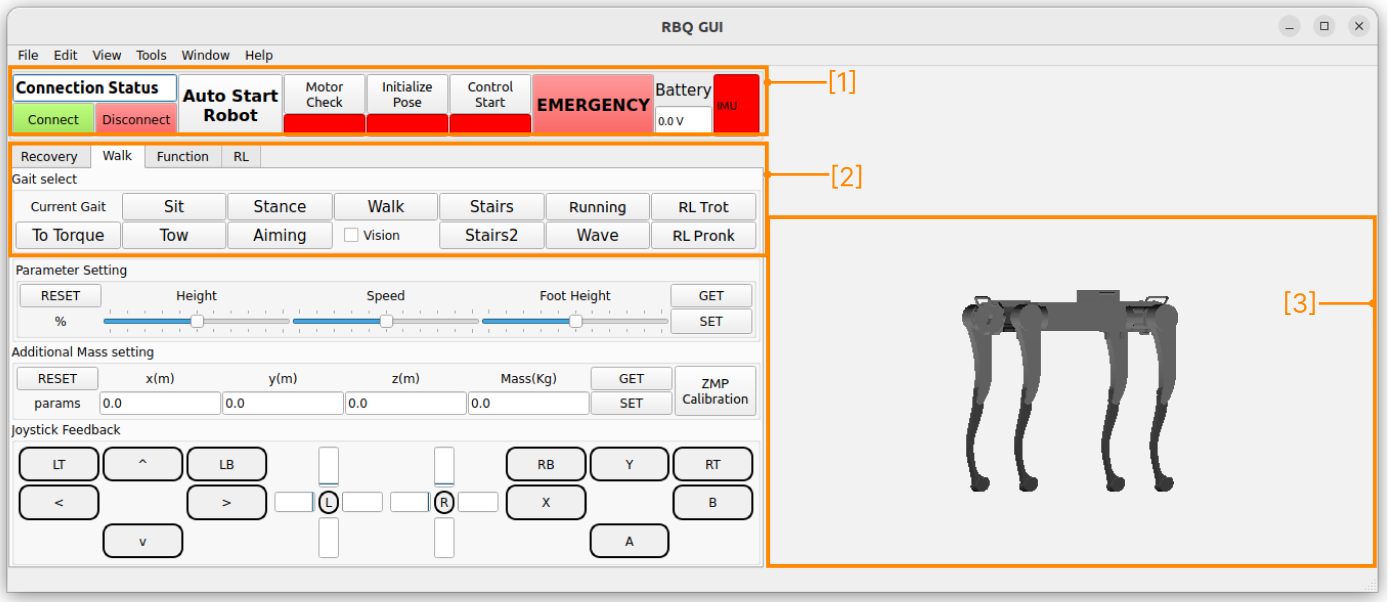
- [1] : TOP Panel
- [2] : Central Panel
- [3] : 3D Panel
Top Panel
The top panel provides the core functionality for connecting to the robot, initializing its pose, and checking motor status. It also includes a button for emergency stops and indicators for battery voltage and IMU sensor status.
Connection Status and Buttons: Shows whether the robot is connected. You can connect or disconnect using these buttons.
Auto Start Robot button: Automatically initiates the robot [Motor Check --> Initialize Pose --> Control Start] sequentially and prepares the system for control.
Motor Check / Initialize Pose / Control Start buttons: Perform key startup actions separately. Although it's recommended to use the Auto Start Robot button instead.
📝 In simulation: only Control Start shows green. Meanwhile, on the real robot: all three button indicators turn green when ready.EMERGENCY button: Immediately halts all robot actions so the robot will softly fall down.
To resume operation after an emergency stop, press the Stance button from the Gait select group box.
📝 The system enters automatic RECOVERY mode (yellow light) before transitioning to stance motion (green light).
Central Panel
The central panel includes tabs with buttons for sending various commands to the robot.
📝 On a real robot, additional Joint, Firmware, Power tabs are available, although it is not recommended to use them.
[ Walk tab ] commands the robot's walking behavior and transitions between gaits.
✅ Button Action Sit Stance Walk Stairs Running RL-Trot RL-Pronk ⌨️ Keyboard key 1 2 3 4 5 R F
3D Panel
- This panel displays a 3D rendered digital twin of the current posture of the connected robot.
Installation
- This section explains how to install and set up the RBQ robot simulation and development environment from scratch.
Requirements
To run the RBQ simulation and deployment environment smoothly, the following requirements are recommended:
OS: Ubuntu 22.04 (x86)

Minimum PC specs:
- CPU: Intel Core i7 - 12th Gen
- RAM: 16 GB
- Storage: 25 GB
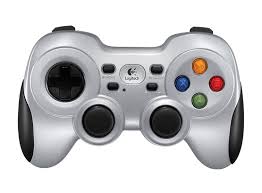
Control Devices
- Keyboard: W, A, S, D, Q, E, R, F, [1-5] keys
- Joystick: Logitech Wireless Gamepad F710 (Recommended)
1. Download the RBQ Repository
- Clone the repository and navigate to the open-source package:
git clone https://github.com/RainbowRobotics/RBQ.git
cd RBQ
All scripts, binaries, and SDK code are inside
RBQ/. Run all commands from this directory.
Note: Pre-built binaries are already included in
bin/. No compilation step is required.
▶ Simulation
- Start the RBQ Control Modules, MuJoCo simulator, and GUI together from
RBQ/:
bash scripts/sim.bash --visionNOTE: ARGUMENTS:
--help: Display help message and exit.--vision: Run vision modules (e.g., vision sensors, climb stairs enabled).If prompted, type your
user passwordin the newly opened CLIterminalsto start the processes.
Initialize - Connect and Start the Simulated Robot
In the
RBQ GUI, click the Connect button to establish the connection.- If successful, the
connection indicatorwill change to Simulator Connected text and color blue.
- If successful, the
In the
RBQ GUI, click the Auto Start Robot button to initiate control.- If successful, the
control indicatorwill change to color green.
- If successful, the
Stance - Command the Robot to Stand Up
- Path:
"Walk" tab --> "Gait select" group-box --> "Stance" buttonor simply press keyboard button2 - Once commanded, the robot will start moving into a standing posture. After it is done, it will respond to further commands.
- 📝 It might take a second to transition into a standing posture, depending on the current posture.
| 🕹️ Joystick | Command | Keyboard key | Robot Action |
|---|---|---|---|
| L Stick | Forward / Backward | W / S | Nose up / down |
| L Stick | Left / Right | Q / E | Roll Left / Right |
| R Stick | Forward / Backward | Height up / down | |
| R Stick | Left / Right | A / D | Turn Left / Right |
| Shift | Full range of motion |
- 📝 If a gamepad is detected, only the number keys of the keyboard are bound.
Walk - Command the Robot to Walk
- Path:
"Walk" tab --> "Gait select" group-box --> "Walk" buttonor simply press keyboard button3 - Once commanded, the robot will transition to a walking gait. After it is done, it will respond to further commands.
| 🕹️ Joystick | Command | Keyboard key | Robot Action |
|---|---|---|---|
| L Stick | Forward / Backward | W / S | Go Forward / Backward |
| L Stick | Left / Right | Q / E | Go Left / Right |
| R Stick | Forward / Backward | Pitch Forward / Backward | |
| R Stick | Left / Right | A / D | Turn Left / Right |
| Shift | Full speed of motion |
- 📝 If a gamepad is detected, only the number keys of the keyboard are bound.
Stairs - Command the Robot to Climb Stairs
- Path:
"Walk" tab --> "Gait select" group-box --> "Stairs" buttonor simply press keyboard button4 - The robot utilizes its vision capabilities to climb stairs.
| 🕹️ Joystick | Command | Keyboard key | Robot Action |
|---|---|---|---|
| L Stick | Forward / Backward | W / S | Go Forward / Backward |
| L Stick | Left / Right | Q / E | Go Left / Right |
| R Stick | Forward / Backward | ||
| R Stick | Left / Right | A / D | Turn Left / Right |
| Shift | Full speed of motion |
- 📝 If a gamepad is detected, only the number keys of the keyboard are bound.
Running - Command the Robot to Run
- Path:
"Walk" tab --> "Gait select" group-box --> "Run" buttonor simply press keyboard button5 - The robot performs rapid and agile movements.
- 📝 Before transitioning into RUN, transitioning to the STANCE posture might be necessary, depending on the current posture and gait.
| 🕹️ Joystick | Command | Keyboard key | Robot Action |
|---|---|---|---|
| L Stick | Forward / Backward | W / S | Go Forward / Backward |
| L Stick | Left / Right | Q / E | Go Left / Right |
| R Stick | Forward / Backward | ||
| R Stick | Left / Right | A / D | Turn Left / Right |
| Shift | Full speed of motion |
- 📝 If a gamepad is detected, only the number keys of the keyboard are bound.
Wave Walking - Command the Robot to Walk Smoothly
- Path:
"Walk" tab --> "Gait select" group-box --> "Wave" button - The robot walks smoothly with a wave gait pattern.
| 🕹️ Joystick | Command | Keyboard key | Robot Action |
|---|---|---|---|
| L Stick | Forward / Backward | W / S | Go Forward / Backward |
| L Stick | Left / Right | Q / E | Go Left / Right |
| R Stick | Forward / Backward | Pitch Forward / Backward | |
| R Stick | Left / Right | A / D | Turn Left / Right |
| Shift | Full speed of motion |
- 📝 If a gamepad is detected, only the number keys of the keyboard are bound.
Aim - Command the Robot to Aim at a Target
- Path:
"Walk" tab --> "Gait select" group-box --> "Aiming" button
- Use this mode to aim the robot precisely toward a specific target or direction.
| 🕹️ Joystick | Command | Keyboard key | Robot Action |
|---|---|---|---|
| L Stick | Forward / Backward | W / S | Nose up / down |
| L Stick | Left / Right | Q / E | |
| R Stick | Forward / Backward | ||
| R Stick | Left / Right | A / D | Turn Left / Right |
| Shift | Full speed of motion |
- 📝 If a gamepad is detected, only the number keys of the keyboard are bound.
RL-Trot - Command the Robot to RL-Trot
- Path:
"Walk" tab --> "Gait select" group-box --> "RL-Trot" buttonor simply press keyboard buttonR - This mode activates a trot gait generated by a reinforcement learning policy. The robot transitions into the RL-based walking gait and becomes responsive to user commands afterward.
| 🕹️ Joystick | Command | Keyboard key | Robot Action |
|---|---|---|---|
| L Stick | Forward / Backward | W / S | Go Forward / Backward |
| L Stick | Left / Right | Q / E | Go Left / Right |
| R Stick | Forward / Backward | Pitch Forward / Backward | |
| R Stick | Left / Right | A / D | Turn Left / Right |
| Shift | Full speed of motion |
- 📝 If a gamepad is detected, only the number keys of the keyboard are bound.
RL-Pronk - Command the Robot to RL-Pronk
- Path:
"Walk" tab --> "Gait select" group-box --> "RL-Pronk" buttonor simply press keyboard buttonF - This mode activates a pronk gait generated by a reinforcement learning policy. The robot transitions into the RL-based pronking gait and becomes responsive to user commands afterward.
| 🕹️ Joystick | Command | Keyboard key | Robot Action |
|---|---|---|---|
| L Stick | Forward / Backward | W / S | Go Forward / Backward |
| L Stick | Left / Right | Q / E | Go Left / Right |
| R Stick | Forward / Backward | Pitch Forward / Backward | |
| R Stick | Left / Right | A / D | Turn Left / Right |
| Shift | Full speed of motion |
- 📝 If a gamepad is detected, only the number keys of the keyboard are bound.
Sit - Command the Robot to Sit Down
- Path:
"Walk" tab --> "Gait select" group-box --> "Sit" buttonor simply press keyboard button1 - Command the robot to smoothly transition into a sitting posture.
- 📝 It might take a second to transition into a sitting posture, depending on the current posture.
Real Robot
This section explains how to operate the real RBQ robot.
📖 For detailed operation steps, refer to the Operation Guide
1. Connect to the Robot
Connect your PC to the robot's Wi-Fi.
📝 Wi-Fi SSID:
RBQ_xxxx.
2. Launch the GUI and Set Robot Control
Start the GUI from RBQ/:
cd <your workspace>/RBQ./bin/GUIClick the Connect button.
- If successful, the
connection indicatorwill change to Robot Connected text and color green.
- If successful, the
Click the Auto Start button.
- If successful, the
control indicatorwill change to color green, indicating that the robot has been successfully activated and is now ready for operation.
- If successful, the
3. Commands are exactly the same as in simulation
- 📝 It is strongly recommended to practice commanding the robot in the simulator first.
Deploy Applications (Binaries) to the Robot
- From
RBQ/, run on your development PC:
NOTE: ARGUMENTS:
--help: Display help message and exit.--device[USER@IP] : Set the remote device (default:rbq@192.168.0.10).--pro[FILES...] : Specify binary names for selective deployment.--local: Deploy files locally on the same PC instead of remote transfer.
bash scripts/deploy.bash --device rbq@<robot-ip>You will be prompted for an SSH password.
- Password: Please ask the person in charge for the SSH password.
- ⚠️ Important: Once
deploy.bashhas completed, restart the robot by turning it off and on to run with the newly deployed binaries.