Skip to content

Payload configuration ​

Anything you mount on the robot shifts its center of mass, and the walk gets unsteady. Register the mass and center of mass of the load in Payload Configuration under Robot settings › Payload setup, and the walking dynamics account for it.

NOTE

Enter an approximate mass and center-of-mass height (Z) even when you do not know the exact figures. A rough value visibly steadies the walk, and leaving it empty is the worst case.

Before you start ​

  • Put the robot on flat, stable ground.
  • The app must be connected to the robot — without a connection it cannot read the slots.
  • Know the load's mass and where its center of mass sits (X/Y/Z) relative to the robot body.

What is on the screen ​

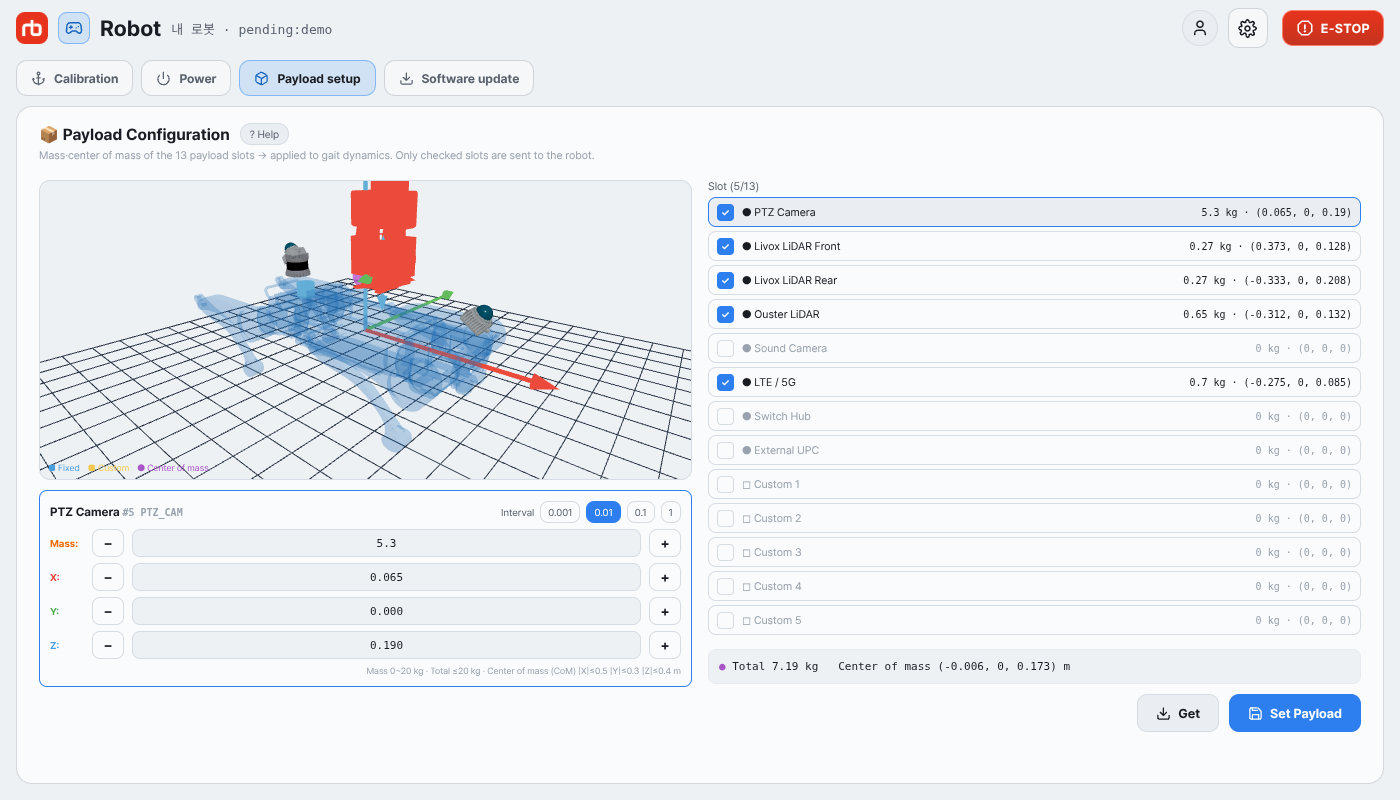
Robot parameters — Payload Configuration

Wide screens show two columns; narrow ones stack them.

AreaContents
Top left3D preview — registered payloads appear as markers. Tap a marker to select that slot; drag the X/Y/Z arrows to move it
Bottom leftEditor for the selected slot — Mass, X, Y, Z. With nothing selected it edits the first slot
Top rightSlot table — the slots the robot reports. ● is a fixed payload, ◻ a user slot
Bottom rightTotal, plus the Get and Set Payload buttons

Procedure ​

  1. Pick a slot. Tap the slot you want in the table on the right. Ticking its checkbox marks it as mounted and fills in the catalogue defaults the robot holds for it.
  2. Enter the values. In the editor on the left, set Mass (kg) and X, Y, Z (m). Tap a field to type a number, or use − and +. The Interval chips at the top right of the editor (0.001, 0.01, 0.1, 1) set how much each press moves the value.
  3. Check the total. The total box below the editor shows the combined mass and center of mass. If the total goes over the limit it turns red and Set Payload is disabled.
  4. Press Set Payload, then confirm with Apply. The confirmation repeats the number of mounted slots and the totals. Unticked slots are sent with mass 0, which clears them.
  5. Once applied the app re-reads the robot and shows Applied (re-confirmed with robot values). The new values reach the walking dynamics immediately and are ramped in over one to two seconds.

Get re-reads the slots stored on the robot — any edits in progress are discarded.

Allowed ranges ​

The bottom line of the editor always shows the range the connected robot allows. Robots whose software does not report its limits fall back to the values below.

ItemRange
Mass per slot0 – 20 kg
Total20 kg or less
Center of mass|X| ≤ 0.5 m, |Y| ≤ 0.3 m, |Z| ≤ 0.4 m

CAUTION

After changing mass or center of mass, run the center-of-mass (ZMP) calibration again. The calibration is stored against the load that was on the robot at the time, so an earlier calibration no longer fits once the load changes. It lives under Robot settings › Calibration.

When it does not work ​

Message on screenWhat it means and what to do
Read failed — check robot connectionThere is no connection to the robot. Check Connection
Legacy robot — 13 slots unsupportedThe robot software predates the slot API. Run a robot software update and try again
Total exceeds the 20 kg limitRemove a slot or lower a mass. Nothing is sent while the total is over
Apply failed — out of range or disconnectedA value is outside the ranges above, or the connection dropped mid-send

Some robots already account for their fixed equipment in the robot-side configuration and therefore expose only one user slot. A slot count that differs from what you expect is normal — use it as is.

Still stuck ​

Tell us which slots you filled in with what, the total you had, and the message shown on screen.

→ Support

This user manual is intended for RBQ users.