Skip to content

Settings ​

Settings come in two sets. Each one lays its sections out as chips across the top — icons only on a phone.

  • Robot settings belong to the selected robot. Open them with the Robot settings tile on the hub. Sections: Calibration, Power, Payload setup, Software update. The title reads Robot with the robot's name and serial.
  • App settings belong to this device. Open them with the gear button at the top right of the hub or any sub-screen. Sections: Gamepad, App settings. The title reads App with the device and app version.

On every settings screen the logo at the top left returns to the hub, and the gamepad button next to it goes straight to the control screen. That button works only while a robot is connected or the sim is running.

This page covers the remaining four sections. Operators can use all of them, and rows that need developer mode are marked.

Calibration ​

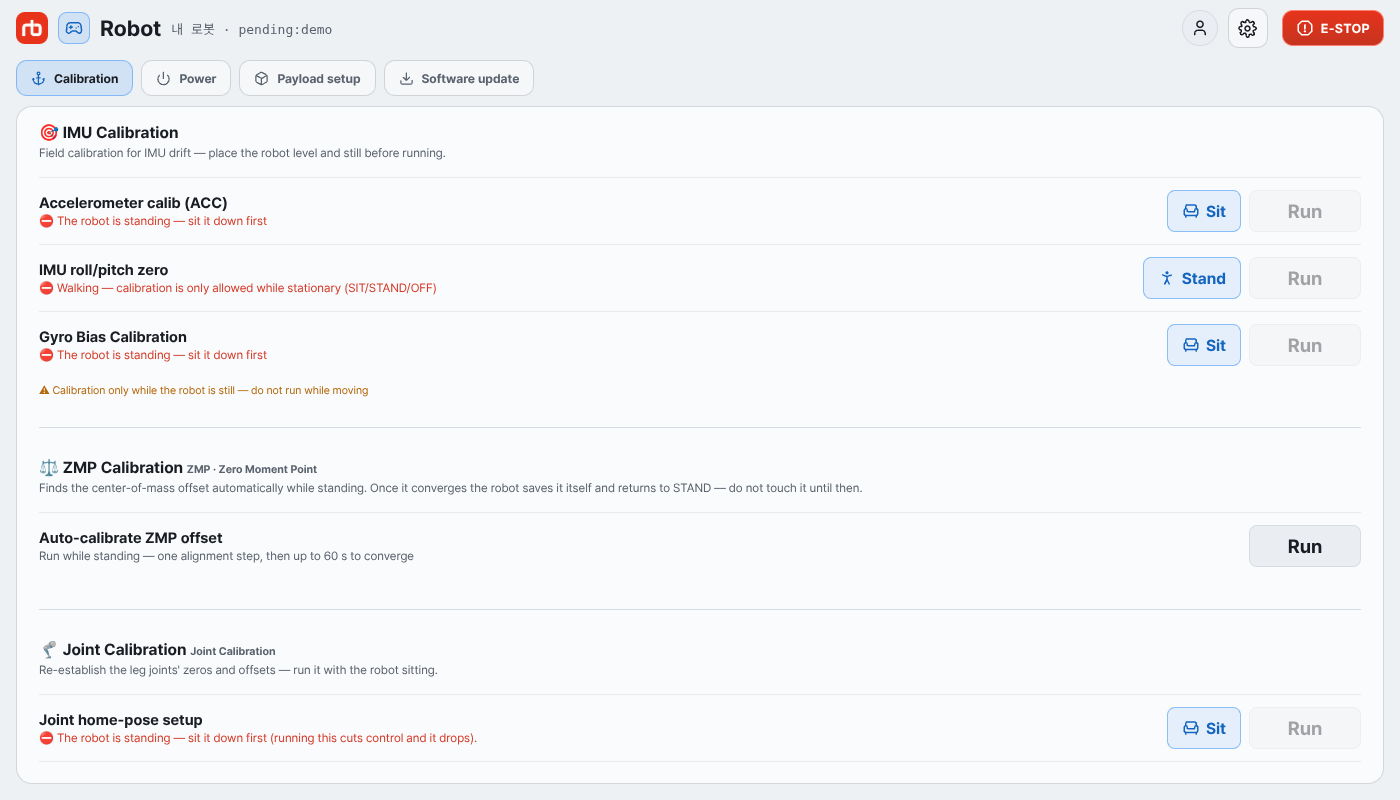
Calibration section

WARNING

Every calibration here must be run with the robot on flat ground and stationary. The IMU and ZMP rows are blocked while the robot is walking, has fallen, or is not reporting its state, and each one asks Run calibration? before it sends the command. Joint home-pose setup has its own confirmation. Do not touch the robot until the calibration has finished.

IMU Calibration ​

RowWhat it does
Accelerometer calib (ACC)Field correction of accelerometer drift. Run it while the robot is sitting, on level ground; it averages the gravity magnitude for about 2 s and stores the factor.
IMU roll/pitch zeroMakes the current posture the level reference. Takes about half a second — if the robot is tilted when you run it, all later control will be off.
Gyro Bias CalibrationResets the IMU, waits for the values to settle, then measures the gyro again — about 5 s, while the robot is sitting. When it finishes it reports all three axes and whether each one is within the limit. If the bias is still over the limit, hold the robot completely still and run it again.

Press Run, then confirm Run in the dialog. When a row is blocked, the app tells you why, and if it can clear the block itself, a button appears next to Run: Sit when the robot needs to sit, Stand when it needs to stand, and Auto Start when control is off, which asks first. You get no such button while the robot has fallen, is docking, or is not reporting.

IMU roll/pitch zero shows the current roll and pitch under the level in its dialog. A progress dialog follows while it runs. It ends with Success only when roll and pitch both come back within 1° — if the robot is still tilted, it reads The zero may not have taken effect instead, and you put the robot on flat ground and run it again.

ZMP Calibration ​

Auto-calibrate ZMP offset finds the center-of-mass offset automatically. The robot must be in STAND on flat ground. It walks one step to square up its legs, then takes up to 60 s to converge. Once the offset converges, the robot saves it on its own and returns to STAND. The panel shows the progress and a completion message.

Joint Calibration ​

Re-establishes the leg joints' zeros and offsets. Run it with the robot sitting.

RowWhat it does
Joint home-pose setupHold the home pose with the jig, then store it as the joint zero — four legs
DQ offset calibrationNot available yet — the row is reserved and cannot be pressed

Joint home-pose setup opens two dialogs: first the notice (This rewrites the joint zeros — running it without the jig, or with the pose off, leaves the robot booting on wrong zeros), then the per-leg screen. On that screen, pick the joints you want to set; the ones you pick move to the target pose in the 3D view on the left. Fit the jig, hold that pose, and press Save LEG{n} {g} home pose. Writing the zero switches control off (BOARD_RESET), so sit the robot down first — it will collapse if it is standing. The jig is required.

If the motor boards do not answer, the row is blocked with No communication with the motor boards — turn the 48 V drive (LEGS) power on and run it again; that rail is in Maintenance.

Camera Calibration ​

What developer mode adds here is collected on Developer mode.

Docking calibration ​

The bottom of the Calibration section holds the auto-docking alignment parameters: Offset X (m), Offset Y (m), Req Count, Try Count.

  • Reload re-reads the values from the robot.
  • Defaults fills the fields with factory defaults — nothing is saved until you press Apply.
  • Apply writes the values to the robot and reads them back.

Power ​

This section switches the auxiliary rails you use day to day. The toggles show the actual PDU state the robot reports, so a change can take about a second to show up. Until the first rail state arrives, the toggles stay disabled.

12 V toggles (one tap): Speaker amp (12V), CCTV (12V), Thermal (12V), IR LED (12V).

48 V rails (two-step): ARM · ADDON (48V) and EXTERN (48V) each show the live voltage and a Turn off / Turn on button. Pressing it opens Turn this off? or Turn this on?. Confirm to switch.

WARNING

ARM · ADDON (48V) is one PDU port shared by the arm and the add-on. Turning it off also cuts arm power — make sure the arm is stopped first.

Camera, comm, Vision PC, and LEGS (48 V) power, along with LiDAR and system reboot, are not here — switching any of them off breaks the connection or drops the robot. They live in Maintenance (developer mode).

Payload setup ​

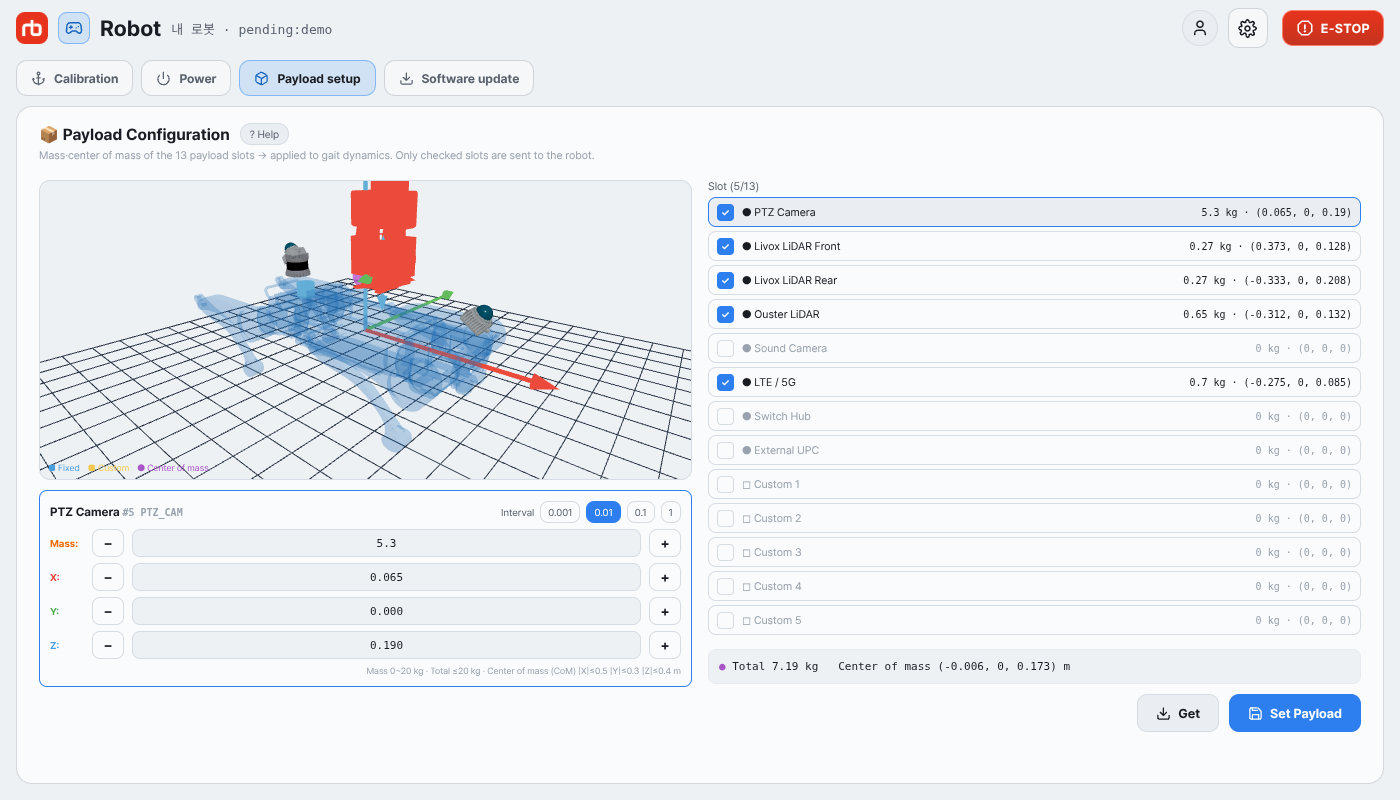
Robot parameters section

Payload Configuration describes what is mounted on the robot so the walking dynamics can account for it.

  1. The robot reports 13 payload slots. Check a slot to mark it as mounted and enter its mass and center of mass (X, Y, Z).
  2. The footer shows the total mass and combined center of mass, and warns when the total exceeds the limit.
  3. Press Set Payload and confirm with Apply (Get re-reads the slots from the robot and discards your edits). The confirmation shows the number of mounted slots and the totals; unchecked slots are sent with mass 0. The new values reach the walking dynamics right away, ramped in over one to two seconds.

Help expands a short guide above the table. Robots without the payload slot API show a notice asking for a robot software update instead.

App settings ​

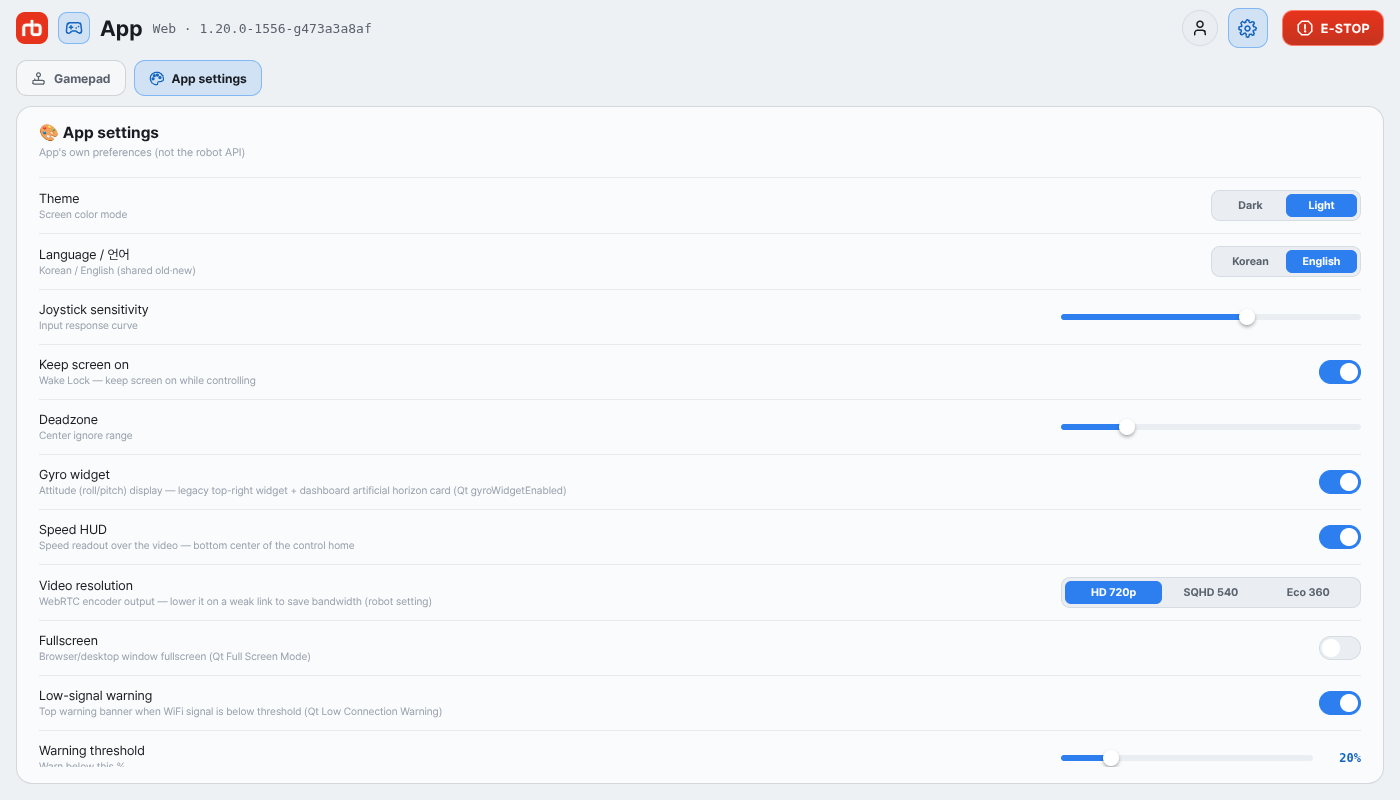
App settings section

These settings belong to the app, not the robot.

RowOptions
ThemeDark / Light
Language / 언어Korean / English — applies immediately
Joystick sensitivitySlider — input response curve
Keep screen onToggle — keeps the screen awake while controlling
DeadzoneSlider — center range ignored by the joystick
Gyro widgetToggle — roll/pitch attitude display
FullscreenToggle — browser only
Low-signal warningToggle — top warning banner when Wi-Fi signal drops below Warning threshold (slider, shown while enabled)
Warning beep (Notify BEEP)Toggle — short beep on warnings (web only)
Low battery beepToggle — beeps when the robot battery is low; Warning beep (Notify BEEP) must be on (web only)
UI scaleDesktop app only — Auto, 100 % to 200 %

Developer mode ​

The Developer mode toggle is in the profile menu — the round button at the top right, next to the gear. As a guest, turn on Developer mode and enter the password. Turning it off puts you back at the operator level. While you are logged in with an access code (Log in with access code in the same menu) the toggle is not shown, because the account decides the level.

Developer mode adds the Maintenance tile on the hub, the developer rows above, and the AI motion and Position control groups in the Select motion grid.

This user manual is intended for RBQ users.