Start User Guide v240227
Safety marks in this guide
DANGER
Failure to comply with instructions marked with this symbol can lead to serious accidents, potentially resulting in the death or severe injury of operators or users.
WARNING
Noncompliance with instructions marked with this symbol can lead to accidents, potentially causing serious injury to operators or users.
CAUTION
Failure to comply with instructions marked with this symbol may damage the product or injure operators or users.
General safety warnings and precautions
WARNING
- Robot application system manufacturers or robot users should familiarize themselves with the contents of this guide and the user manual and complete operational training.
- You must secure enough space for the robot arm to move freely.
- Do not wear loose clothing or jewelry when using the robot. If you have long hair, take care not to get it caught in the robot's joints or other parts by tying it back.
- Never use a damaged robot.
- If a critical error occurs in the software, immediately activate emergency stop and contact the product supplier or Rainbow Robotics.
- Check whether the values for robot installation angle, tool settings, safety instructions, etc., have been correctly entered.
- Do not connect safety equipment to general I/O ports. Safety equipment should only be used with safety-related I/O ports.
- Pay attention to the robot's movements when using a tablet PC for teaching.
- Do not enter the robot's operating range while in use or touch the robot.
- Never modify a robot. Rainbow Robotics (“manufacturer”) is not responsible for any issues arising from changes or modifications made arbitrarily by the user to the product.
- The robot arm and controller generate heat when used for a long time. Do not touch the robot with your hands after using it for a long time. If you need to touch the robot, turn off the controller's power and wait for it to cool down sufficiently before handling it.
- When the robot collides with an external object, a significant level of impact occurs in proportion to speed and payload.
- Verify that you are using the recommended settings for the robot installation. If you do not accurately enter the direction of installation of the robot arm, weight of the tool, center of gravity, length, safety of the tool, etc., the direct teaching or collision detection function may not work properly.
- The direct teaching function should be used in a safe environment. Do not use it if the tool or surrounding fixtures or parts have sharp edges or if they can cause pinching.
- Before using the direct teaching function, make sure that all tool-related information (such as the tool's length, weight, and center of gravity) are accurately entered. Entering information different from the actual tool specifications can cause malfunctions when using the direct teaching function.
- When using the direct teaching function, the joints may be emergency-stopped for the user's safety if operated above a certain speed.
- The robot arm and control box generate heat during operation. Continuous contact with the robot arm can cause malfunctions, so do not handle or touch the robot arm with your hands during or immediately after the operation. Before manipulating or touching the robot arm, check the temperature on the UI screen or turn off the power of the robot arm and wait for more than one hour to allow it to cool sufficiently before handling.
CAUTION
- When using the robot with machines or other robots that could potentially cause damage to the robot, we recommend testing all functions separately before use. The manufacturer is not responsible for any damage to other machines or robots caused by an error in programming or a robot malfunction.
- Do not expose the robot to strong magnetic fields (may damage the robot).
WARNING
- Attach warning signs in places with risk of electric shock due to electrical devices.
- Do not tear, damage, or remove the signs. Be careful when handling the parts or devices to which the signs are attached and the surrounding parts.
- Do not touch the electrical components inside.
1. Components
A total of two boxes containing the robot and system components are provided, and the system components provided within them are as follows.
- Robot Arm

※ Items marked with ( ) are optional products.
| Robot | 1 | Robot Arm |
|---|---|---|
| Tool Box | 2 | Bolt, washers, wrenches |
| (3) | ※ Tools dedicated to NSF models – Base fixing tool | |
| (4) | Tool I/O Cable |
TIP
※ Tools specific to the NSF model are only applicable to the components of the NSF model.
※ The components may vary depending on the robot's specifications.
※ Product images in this manual are for illustration purposes only and may be different from the actual product.
- Control Box

※ Items marked with ( ) are optional products.
| System Components | 1 | Control Box |
|---|---|---|
| Accessory Box | 2 | AC Power Cable |
| 3 | Robot - Control Box Connection Cable | |
| 4 | Emergency stop/jog interface | |
| 5 | Control box key (included in some models) | |
| 6 | I/O terminal block (spare), Fuse | |
| (7) | Tablet, Short USB Cable, Long USB Cable | |
| 8 | For Service Provision (Examples: USB, Velcro for external cable fixing, etc.) |
TIP
※ Regarding the control box above, its appearance may change depending on the robot's specifications.
※ It is recommended to use the 5m cables provided by the manufacturer for the power cable and robot arm-control box. For the emergency stop/jog interface cable, it is recommended to use the cable less than 3m provided by the manufacturer.
※ For shielded LAN cables, I/O port connection cables, USB cables, and external wire lines for use with the through-wire model, it is recommended to use the wire less than 3m.
※ The items and configuration for service provision are subject to change without notice.
2. Installing the Robot
2.1 Installing the Robot
- After unboxing the robot, place it aligned to the hole position of the bolt that will secure the robot.

- Secure the robot using the provided wrench and bolts.
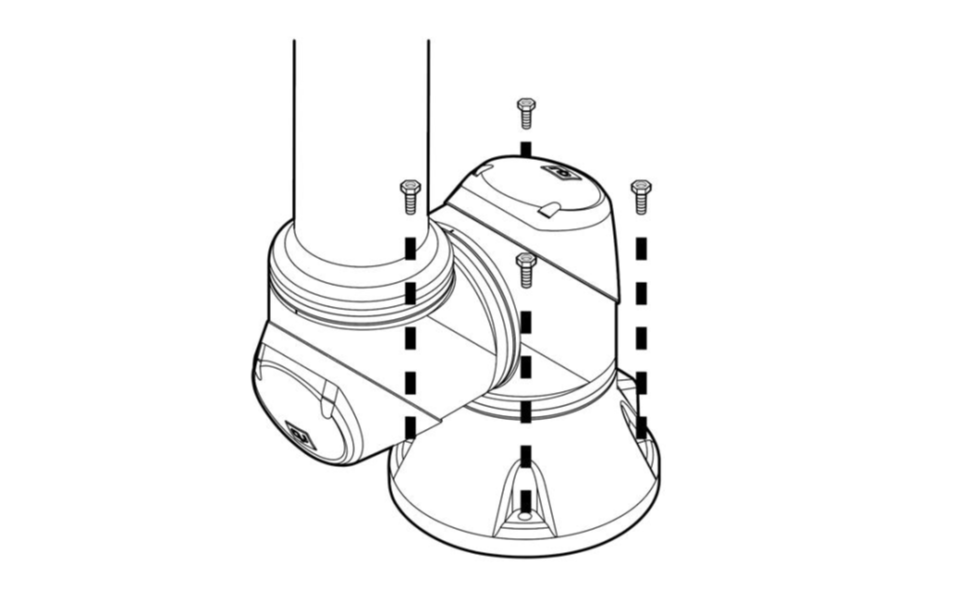
WARNING
- When securing the robot, make sure that the bolts are tightly fastened to prevent them from loosening.
- Install the robot on a sturdy surface that can withstand its weight and the load that occurs when it operates.
- Make sure that the robot mounting surface is fully in contact with the base surface.
- Never arbitrarily disassemble the bolts assembled on the robot. Before operating the robot arm, make sure that all bolts are securely fastened.
- Using the robot with the bolts disassembled or installing brackets or other components using the bolt assembly area may cause product damage or seriously affect safety.
2.2 Connecting the Control Box
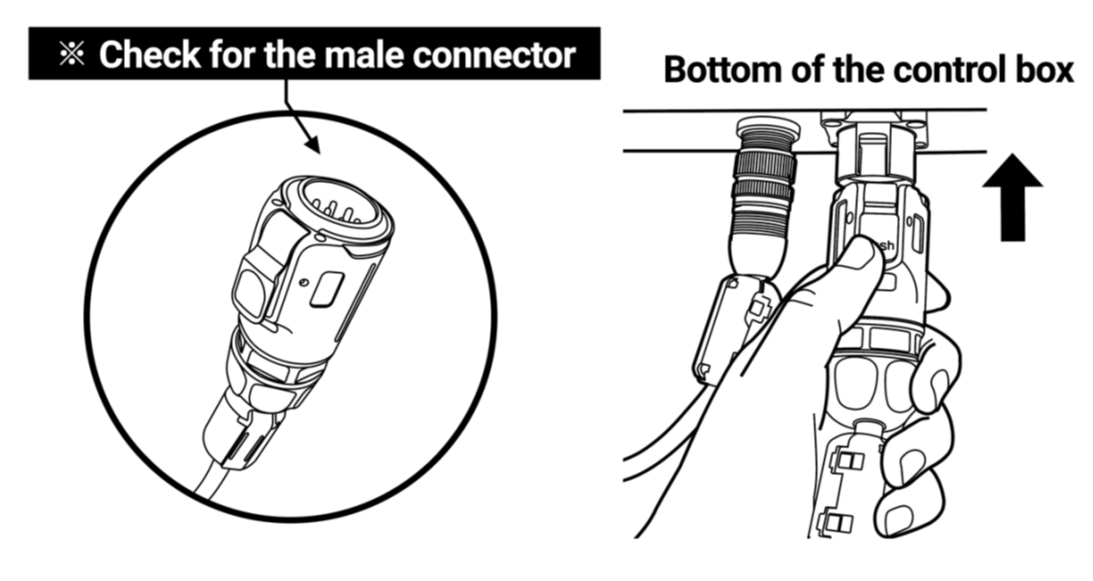
Connect the cables included in the components to the respective connectors at the bottom of the control box.
TIP
※ The control box below may change in appearance depending on your robot's specifications.
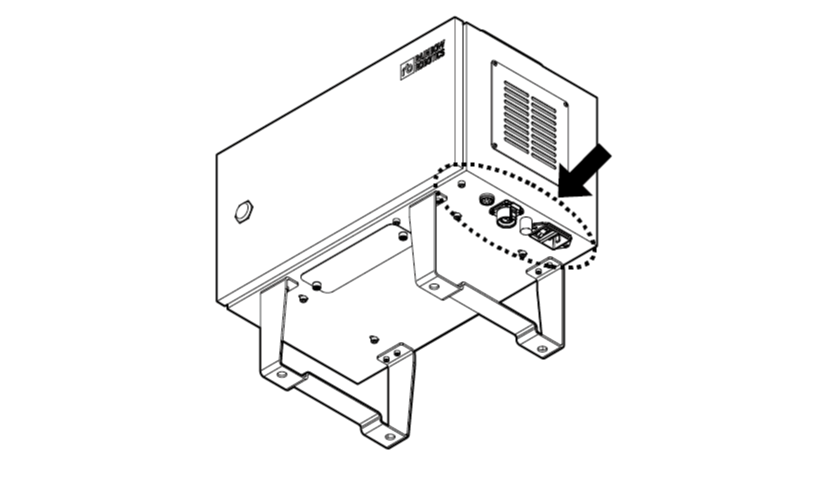
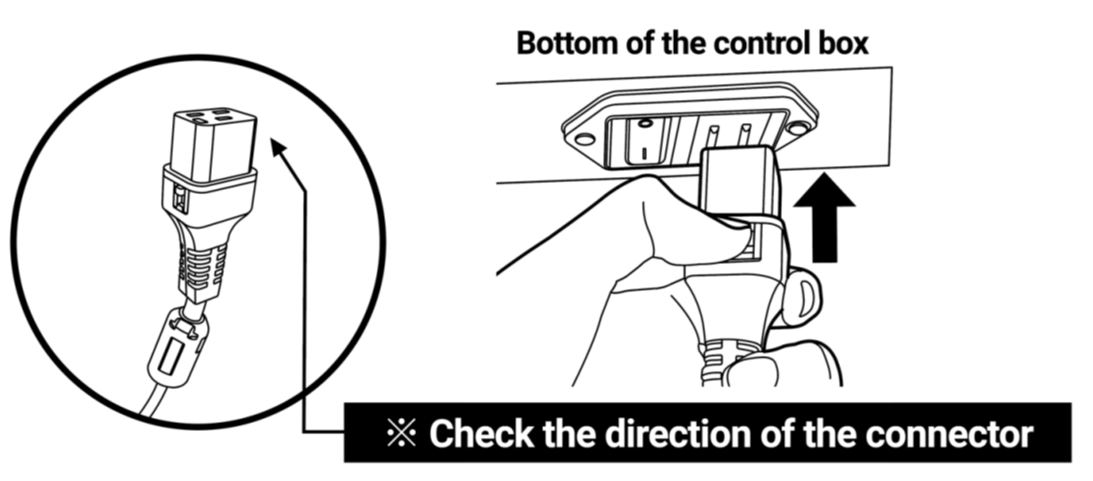
- AC Power Cable
Plug the AC power cable into the correct position on the control box. (AC Power)- The power supply should be AC220/110V single-phase.
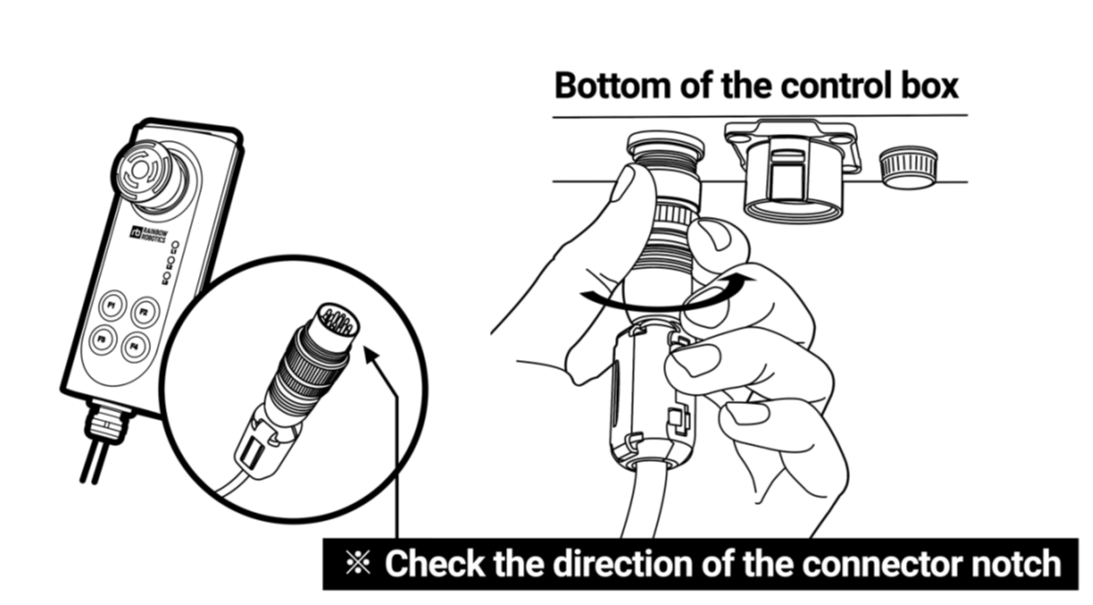
- Emergency Stop/Jog Interface (Male)
Plug the emergency stop/jog interface into the correct position on the control box and then turn clockwise to tighten. (E-STOP/JOG)
- Robot-Control Box Connection Cable (Male)
Plug the robot - control box connection cable (male) into the correct position on the control box. (ROBOT)
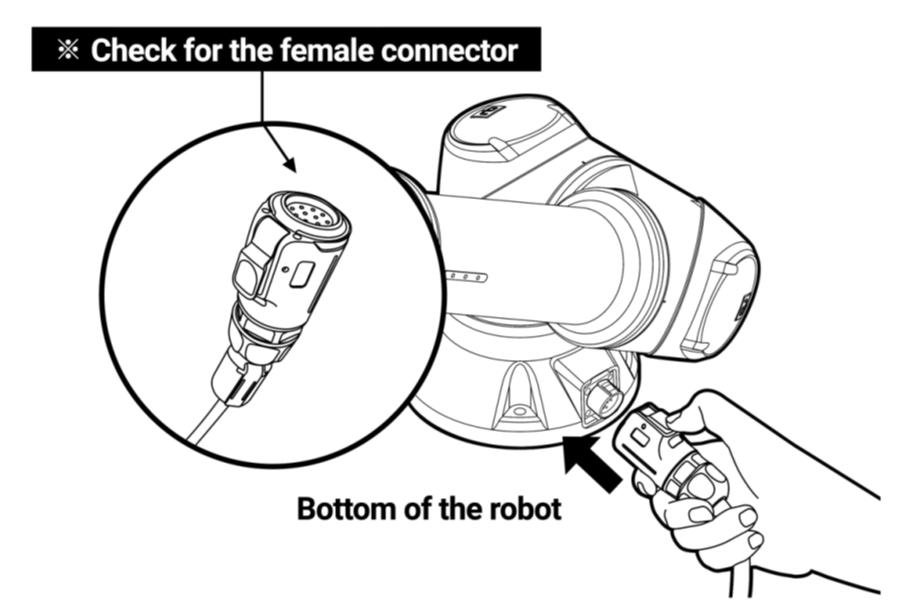
- Robot-Control Box Connection Cable (Female)
Plug the robot - control box connection cable (female) into the correct position on the robot.- When plugging the cable, take note of the direction of the pin.
CAUTION
- Do not unplug the AC power cable, robot-control box connection cable, tablet PC connector, etc., while the robot is powered on.
- The AC power must be grounded.
3. Operating the Robot
3.1 Powering On
- Turn on the AC power switch on the control box.

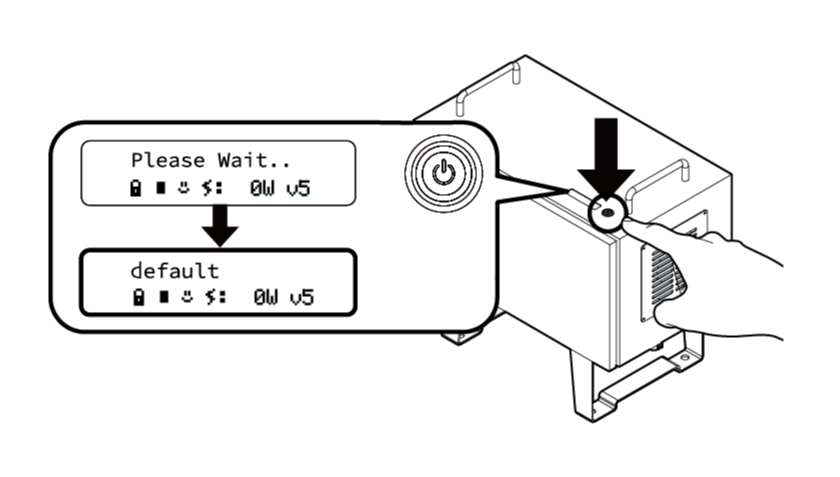
- Press the power button on top of the control box to boot up the main PC.
※ While the main PC is booting, “Please Wait” will be displayed on the LCD panel. Once the main PC is ready to operate, “default” (or the name of the basic operation program file) will be displayed on the LCD panel.
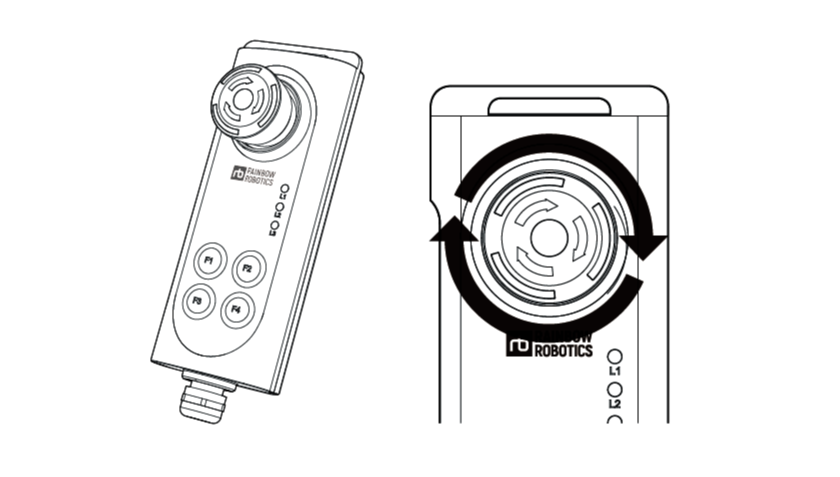
- Unlock the emergency switch of the emergency stop/jog interface by turning clockwise.
- Connect the tablet PC to the control box.
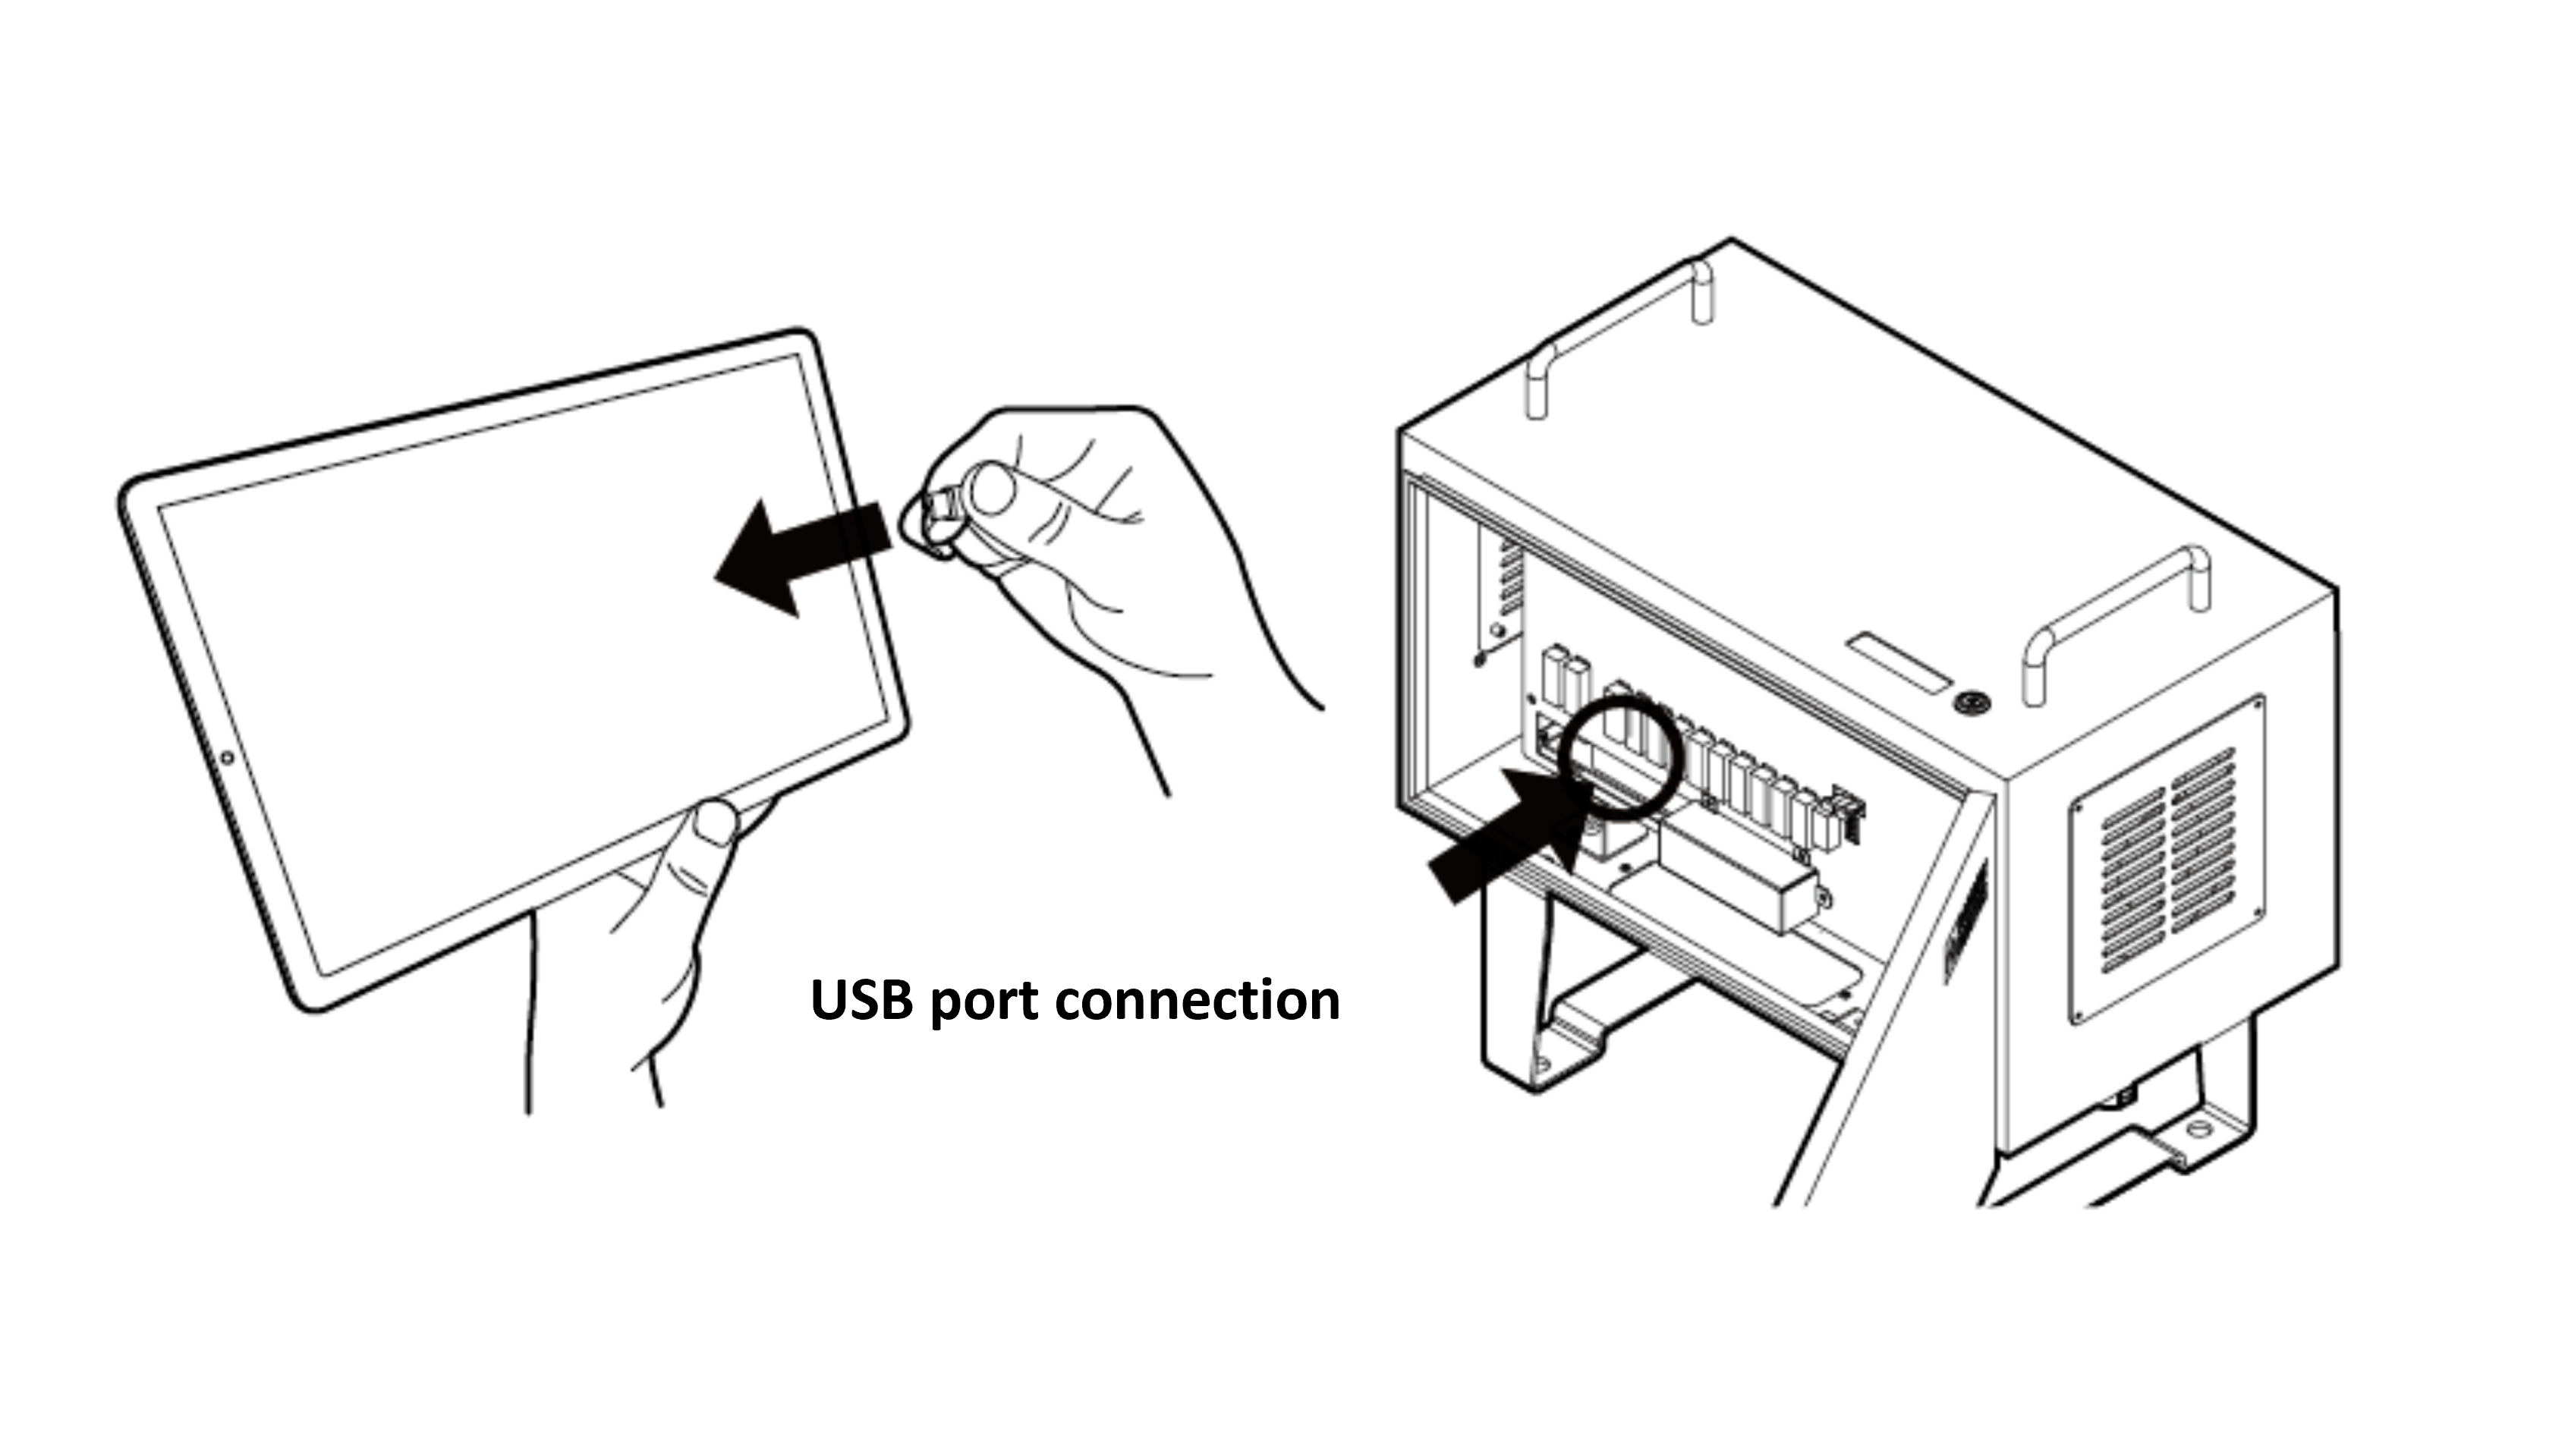
3.2 Connecting the UI Robot
- Click the “Rainbow-RB” app on the pendant to execute the UI.
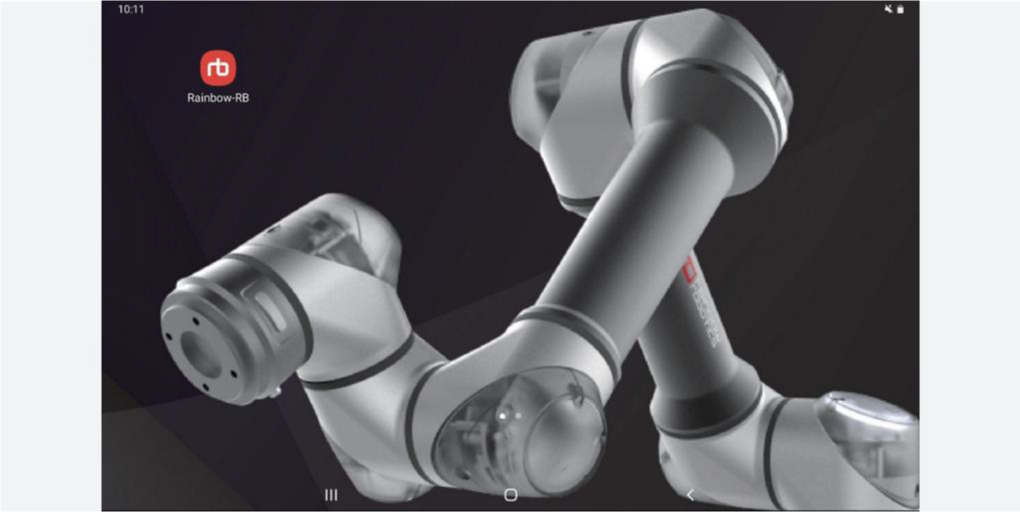
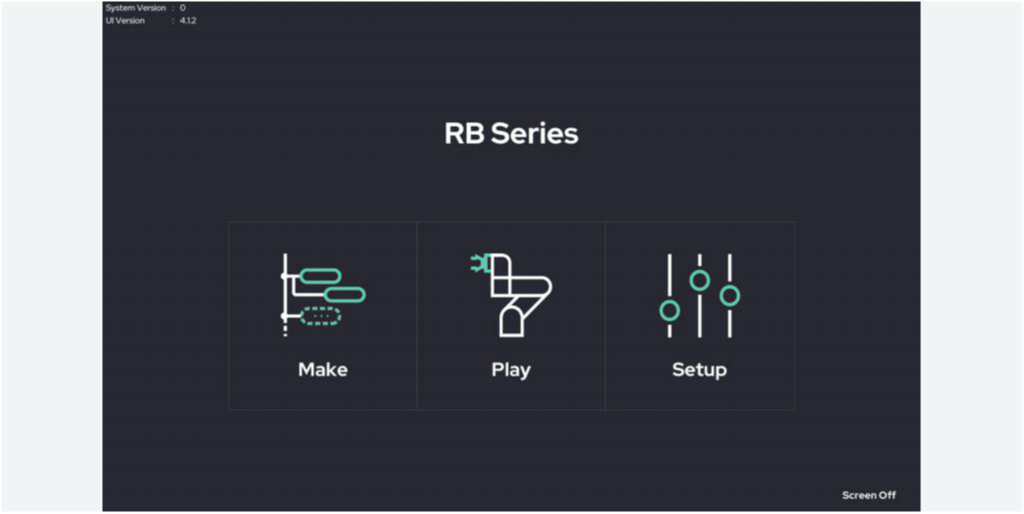
With three(3) menus on the main screen, you can enter three stages: creating the robot's movements (Make), actually moving it (Play), and setting up the work environment (Set-up).
- Click the “Make” button.
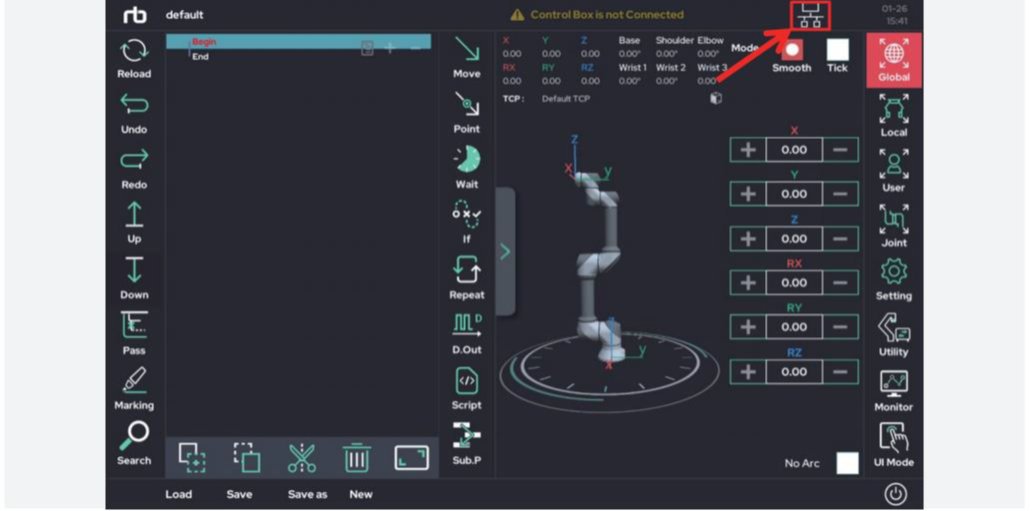
- Click the icon in the red box shown in the picture.
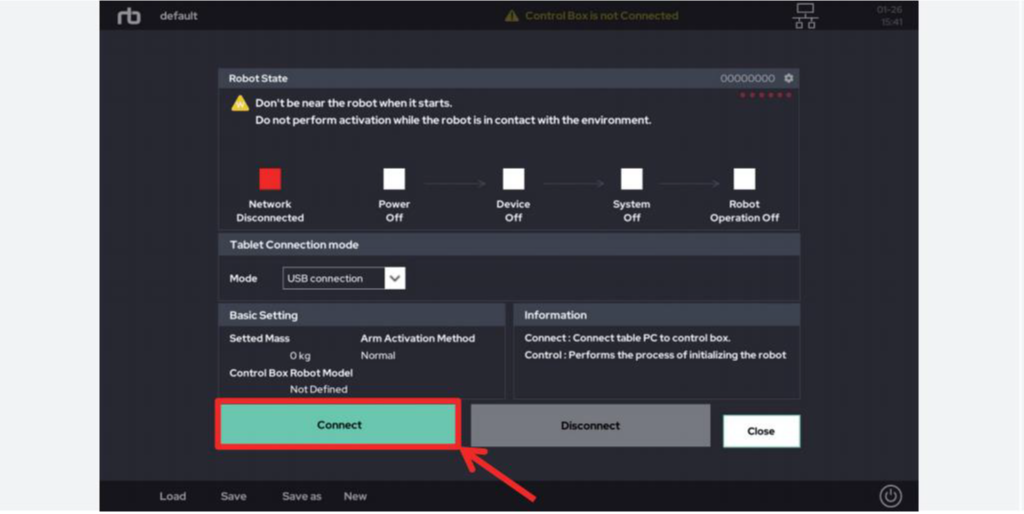
- Press the “Connect” button to connect the control box and the tablet PC when the Robot State screen appears.
CAUTION
- Make sure that the control box is turned on and the emergency stop switch is turned off before attempting to connect. If the control box is not turned on, the “Device Off” lights up in red, and the screen returns to the screen above.
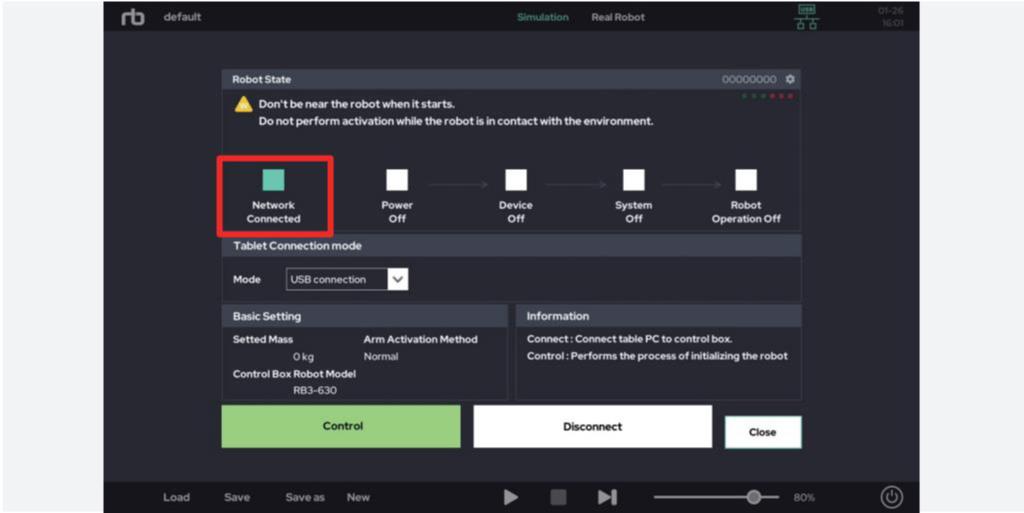
- When it is properly connected to the robot, the LED indicator in the red box will change to green as shown in the picture.
TIP
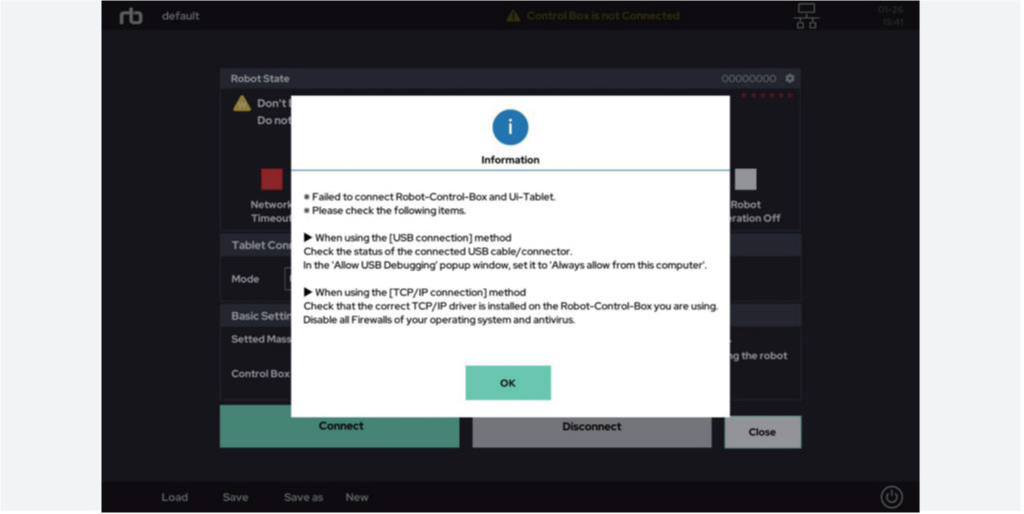
※ If you encounter network connection problems while connecting to the network, please refer to Appendix A
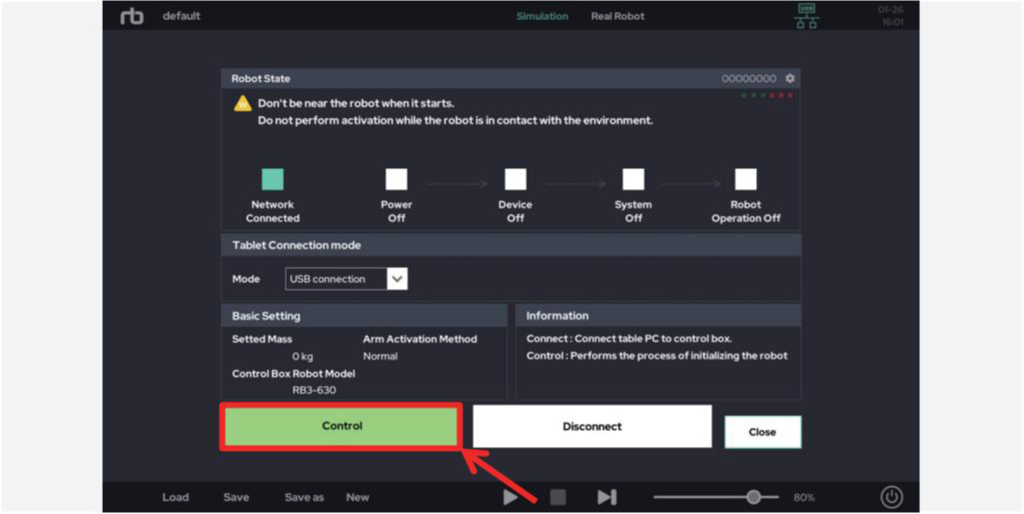
- Click “Control” to manipulate the robot physically.
Clicking the “Control” button will initialize the robot arm to a controllable state.
At this time, the brakes in the joints are released, and sounds are sequentially made from the robot arm.
TIP
※ If you encounter problems while activating the robot, please refer to Appendix B
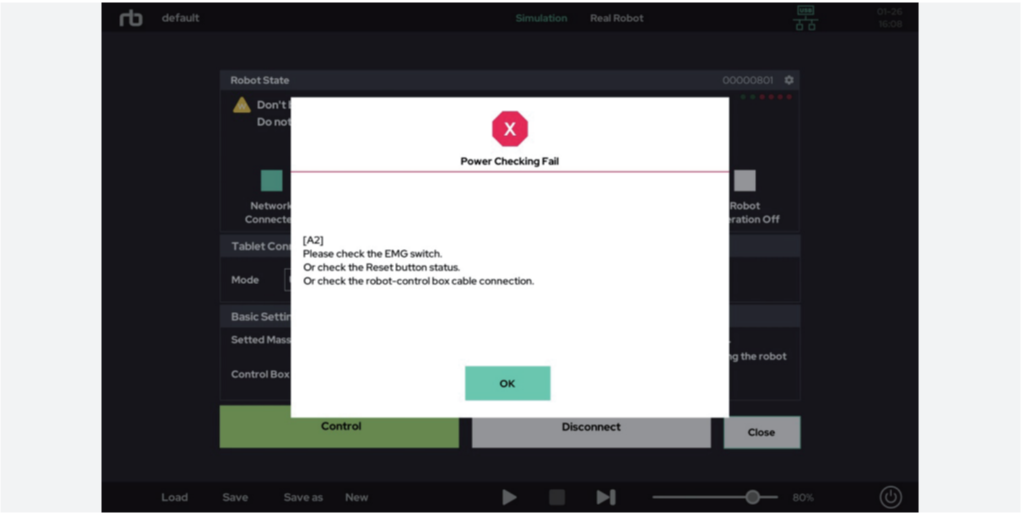
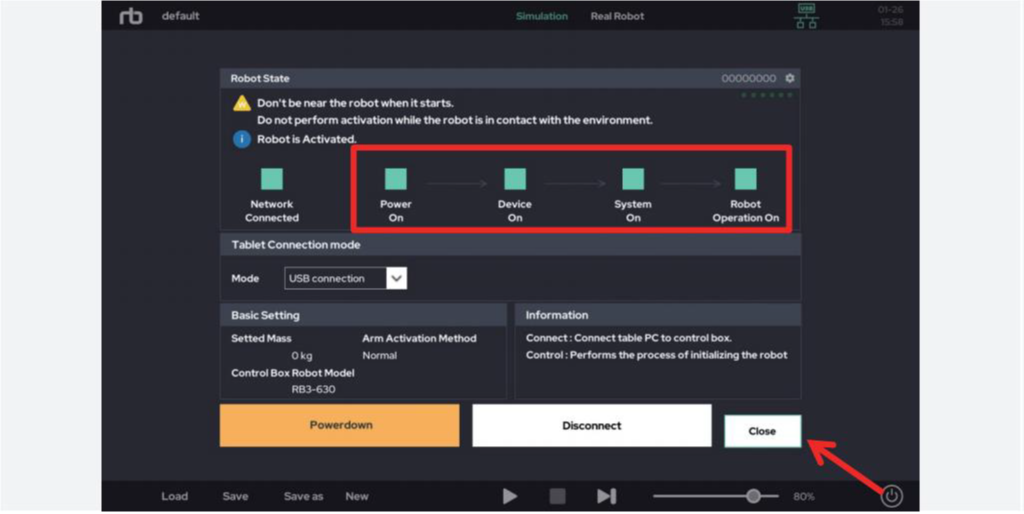
- All LED indicators must be green (otherwise, an error code will be displayed), then click the “Close” button.
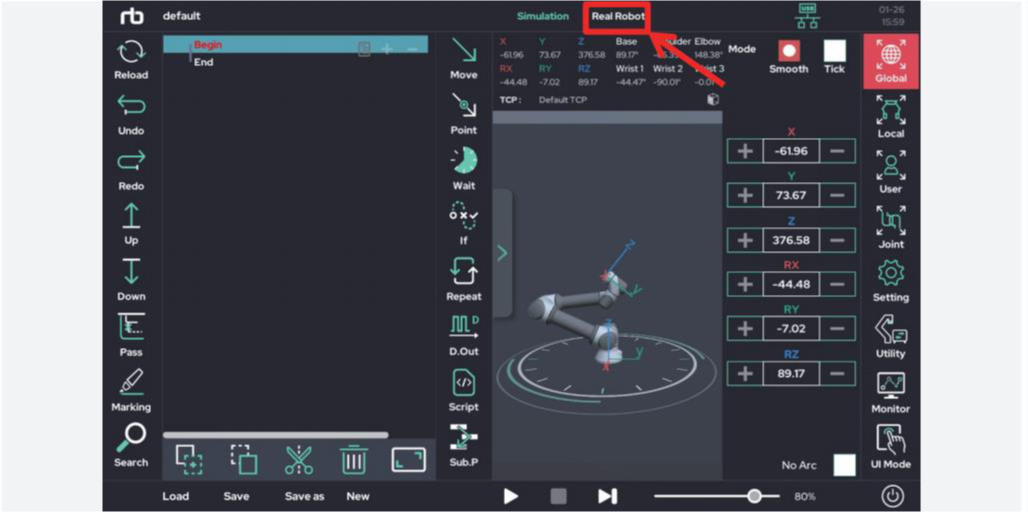
- Click “Real Robot” in the red box shown in the picture.
“Real Robot” mode is a mode that moves not only the robot on the UI screen but also the actual robot.
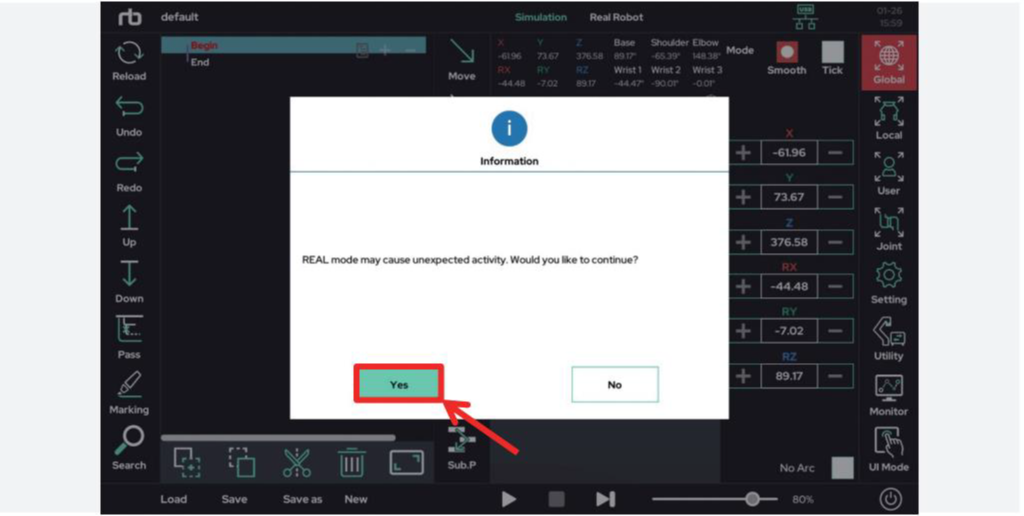
- When a message box appears, click the “Yes” button.
- You can move the robot using the jog in the red box shown in the picture. Please refer to the user manual for more information.
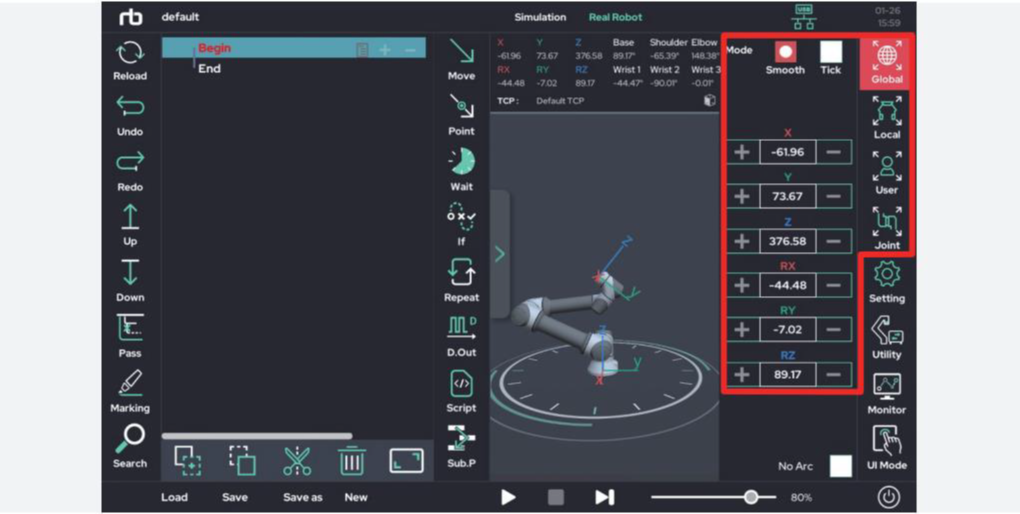
WARNING
- When moving the robot using the emergency stop/jog interface, make sure that there are no obstacles or people around you before operating.
3.3 Powering Off
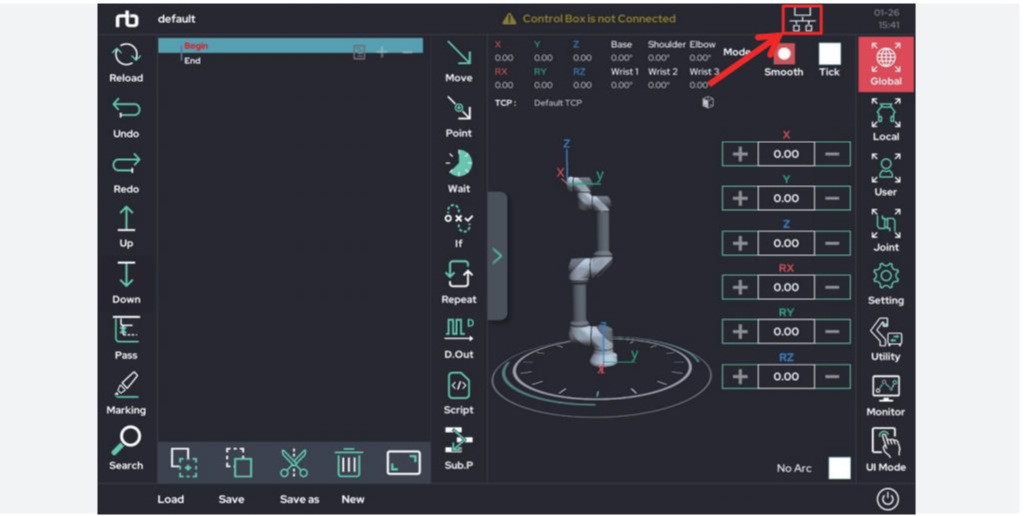
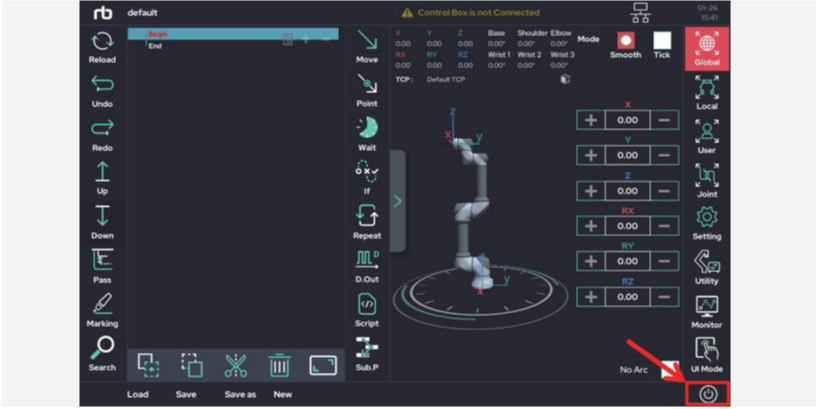
- Click the icon in the red box shown in the picture.
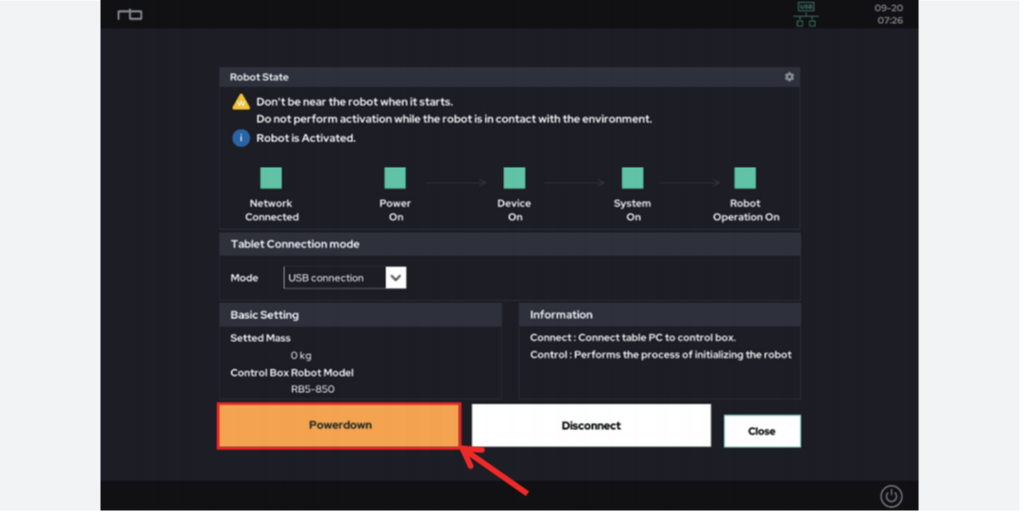
- Click “Powerdown” to turn off the robot. At this time, the joint brakes are applied, and sounds are sequentially made from the robot arm.
- Click the “Disconnect” button.
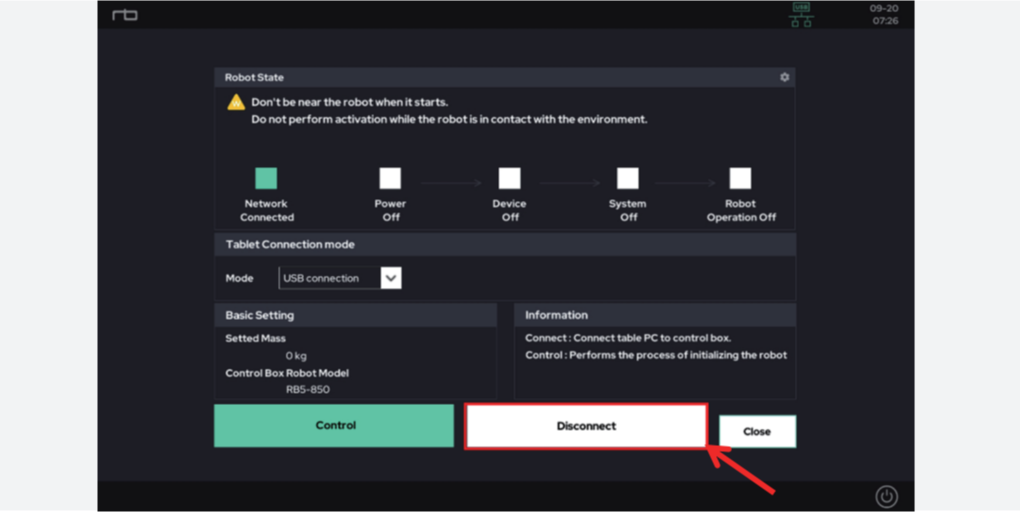
※ If you want to shut down the robot and the UI simultaneously, click the power button at the bottom right, followed by the UI+Robot Shut Down button.
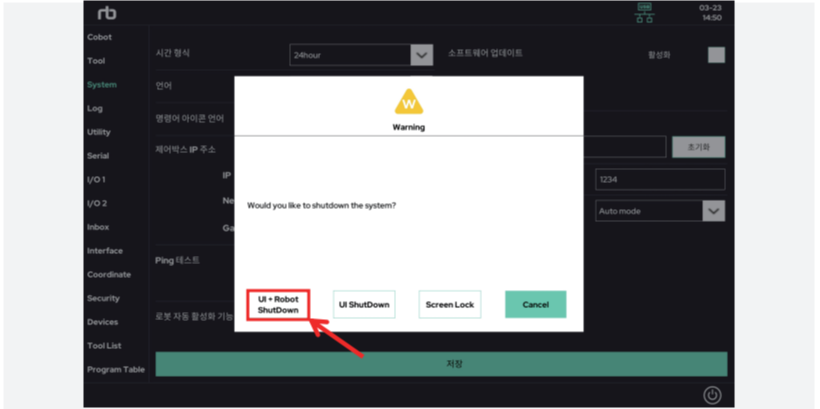
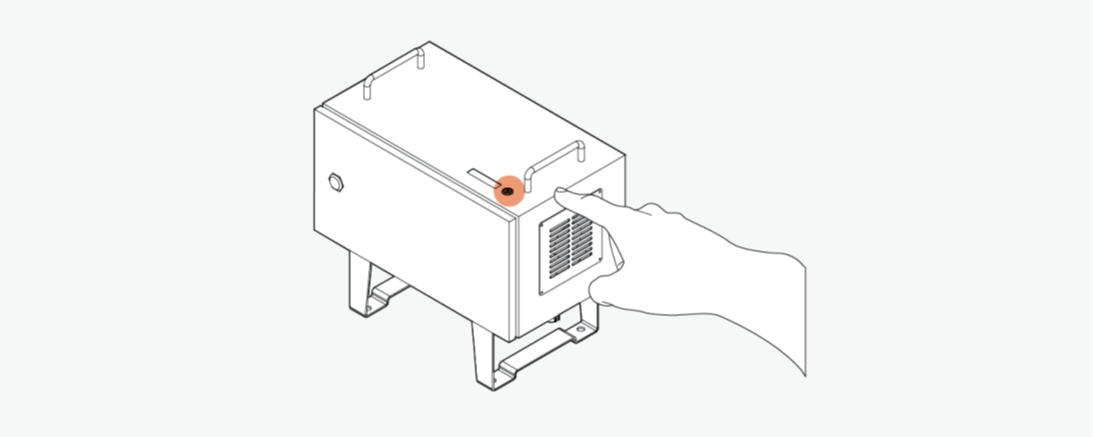
- Press and hold down the power button at the top of the control box for more than 3 seconds to turn off the main PC.
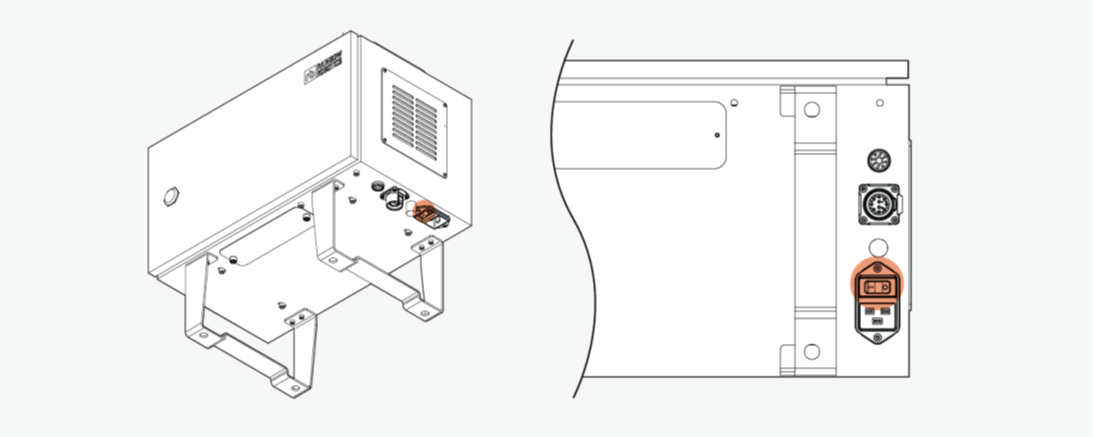
- Press the AC power switch at the bottom of the control box to turn off power.
4. Appendix (Troubleshooting)
A. Network Connection Issues
- Disconnect the USB-C type cable connected to the tablet.

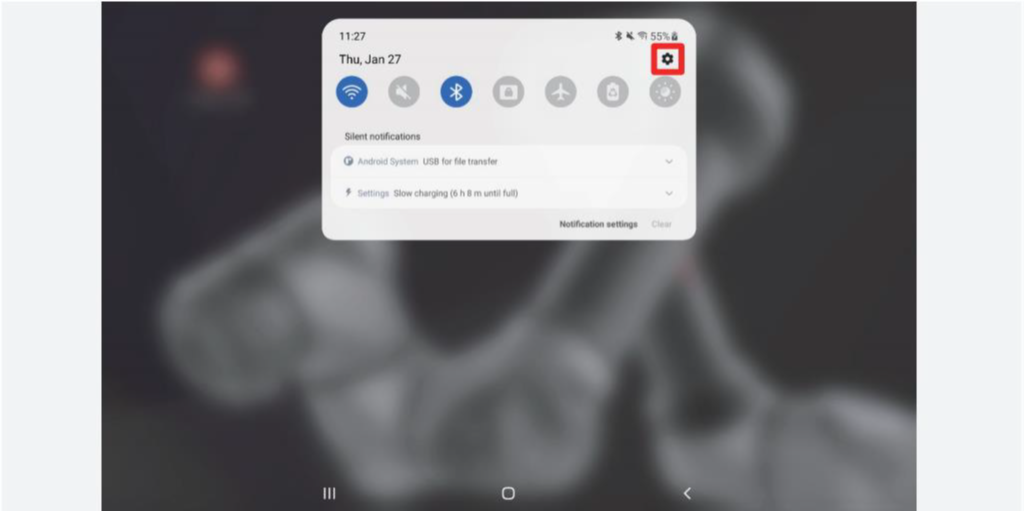
- Go to tablet settings.
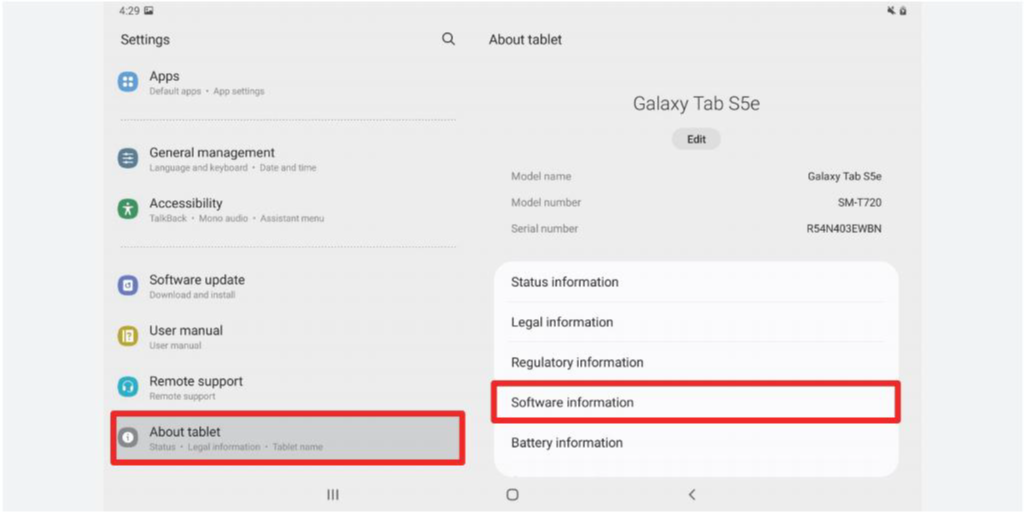
- Go to Tablet Information at the bottom -> Software Information.
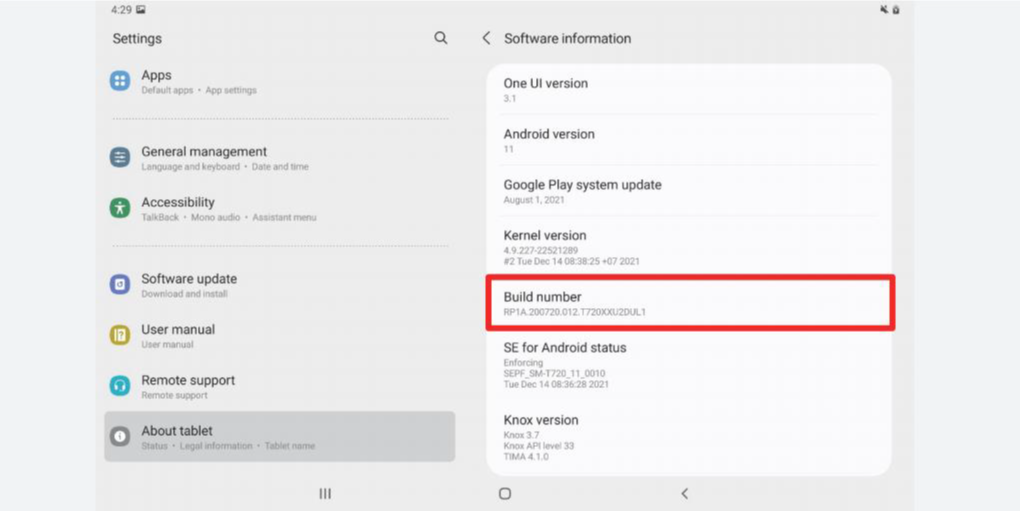
- Click the build number in succession.
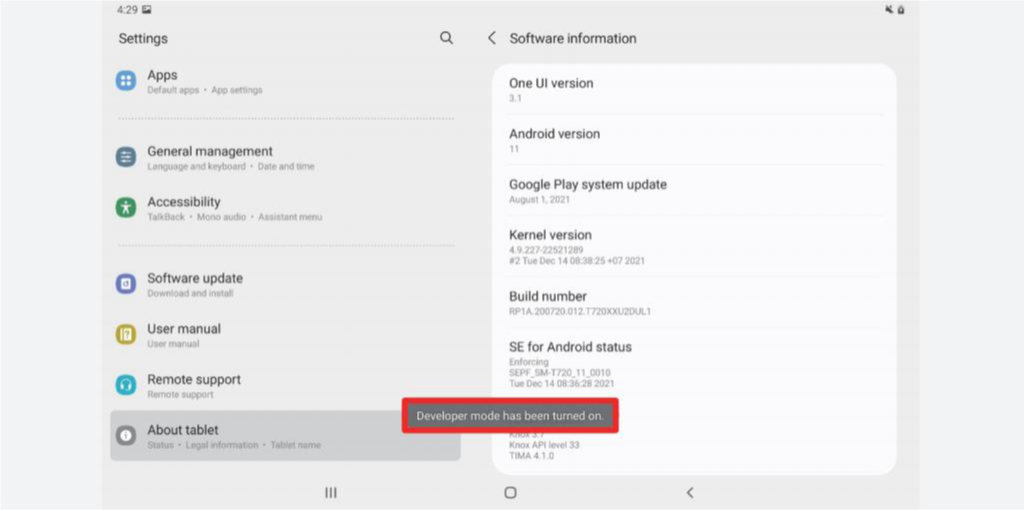
- When the following pop-up appears, turning on developer mode is complete.
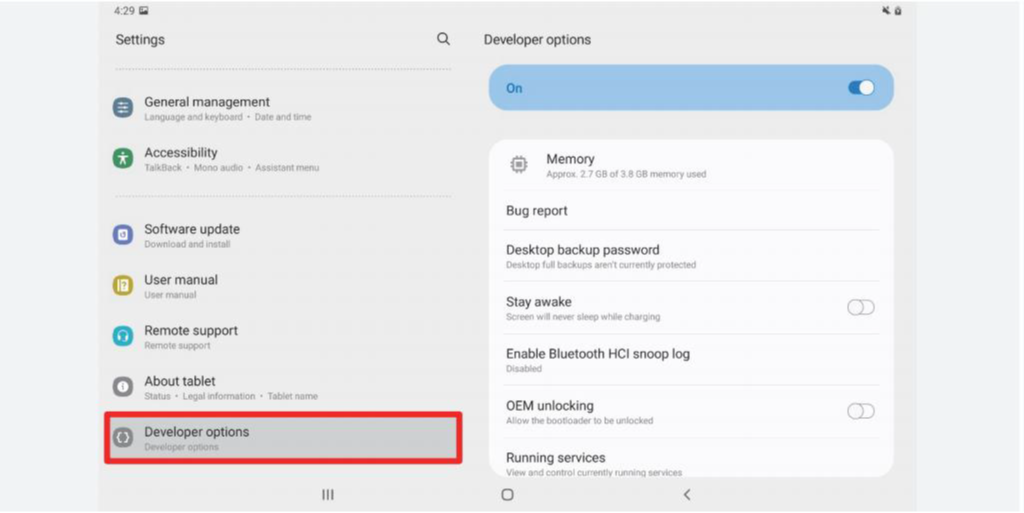
- Shift to Developer mode.
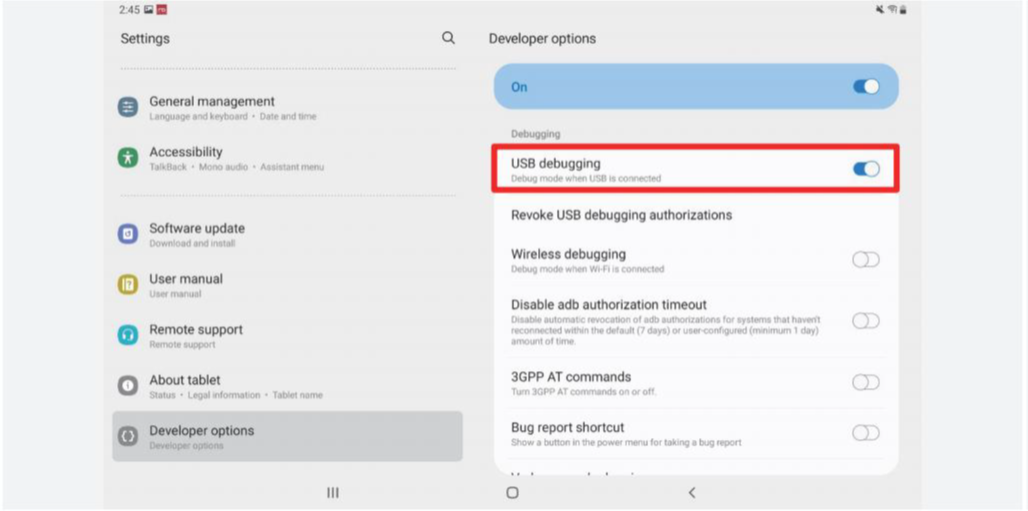
- If USB debugging is on, turn it of.
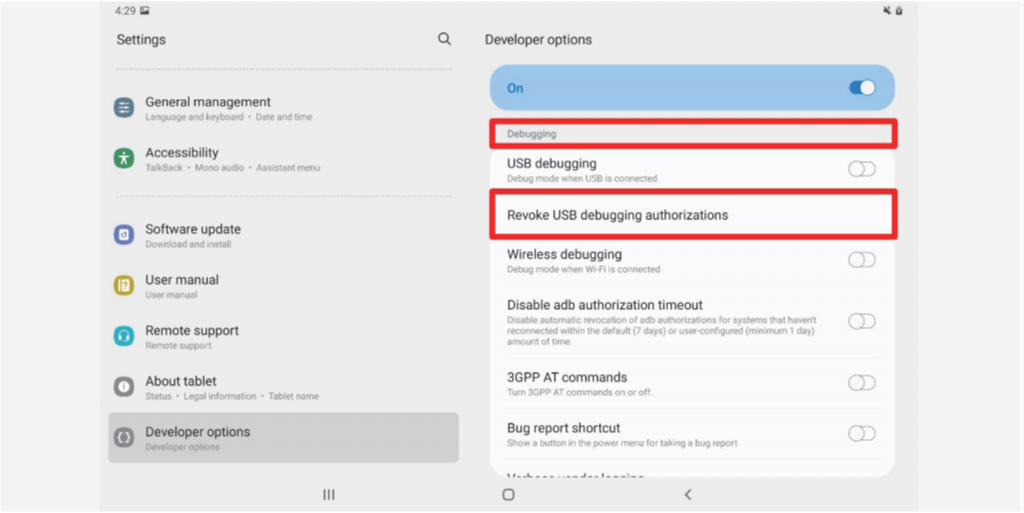
- Go to the debugging section at the bottom and select Revoke USB debugging authorizations.
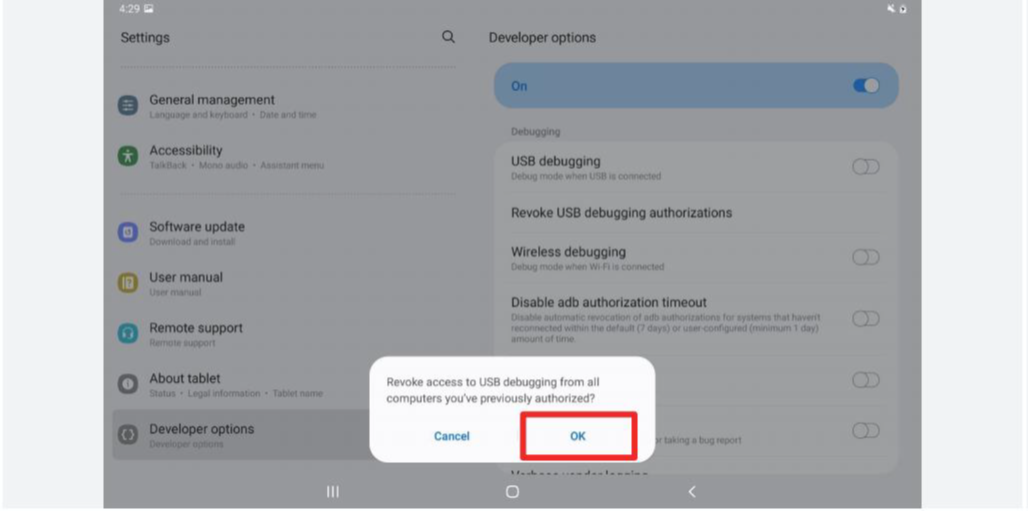
- Click the “OK” button.
- Turn on the USB debugging function again.
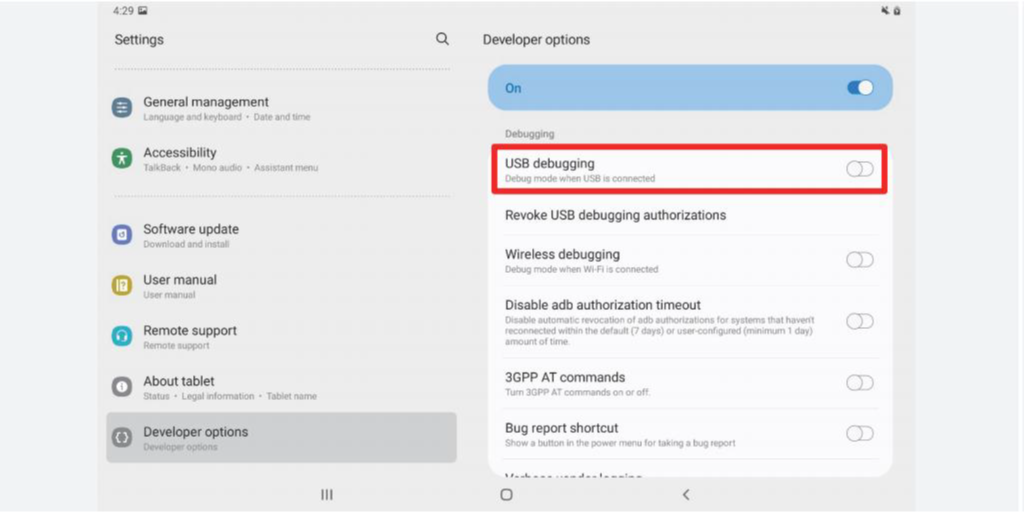
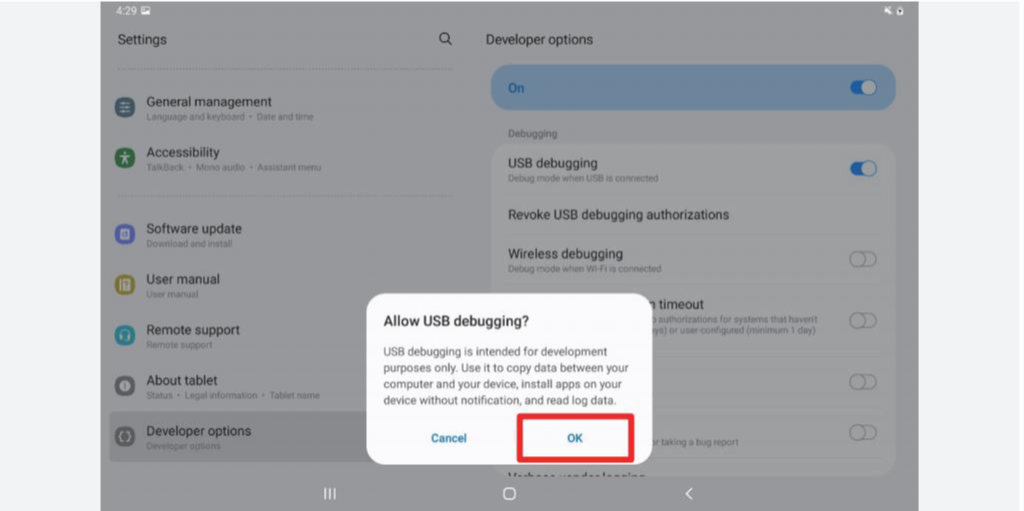
- Click the "OK" button and reconnect the USB-C type cab.
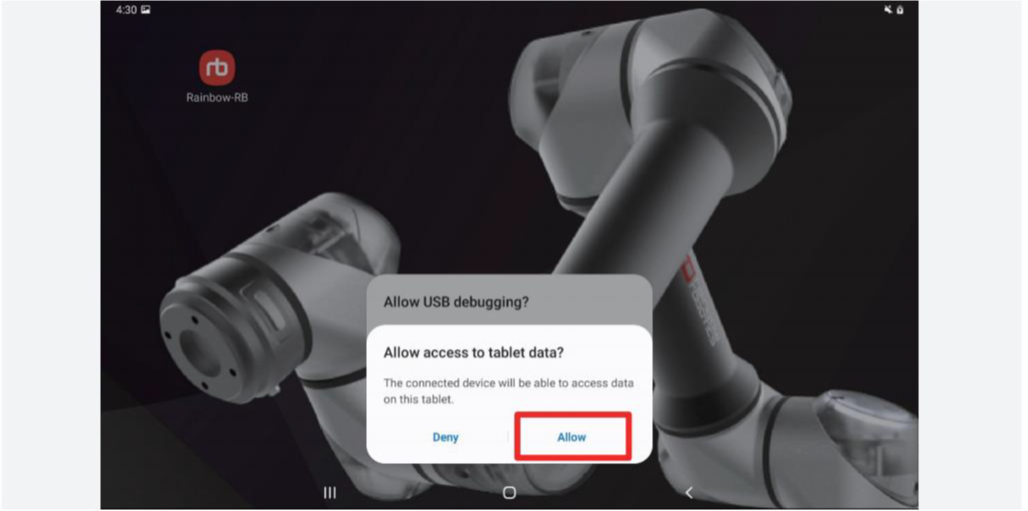
- Click the “Allow” button.
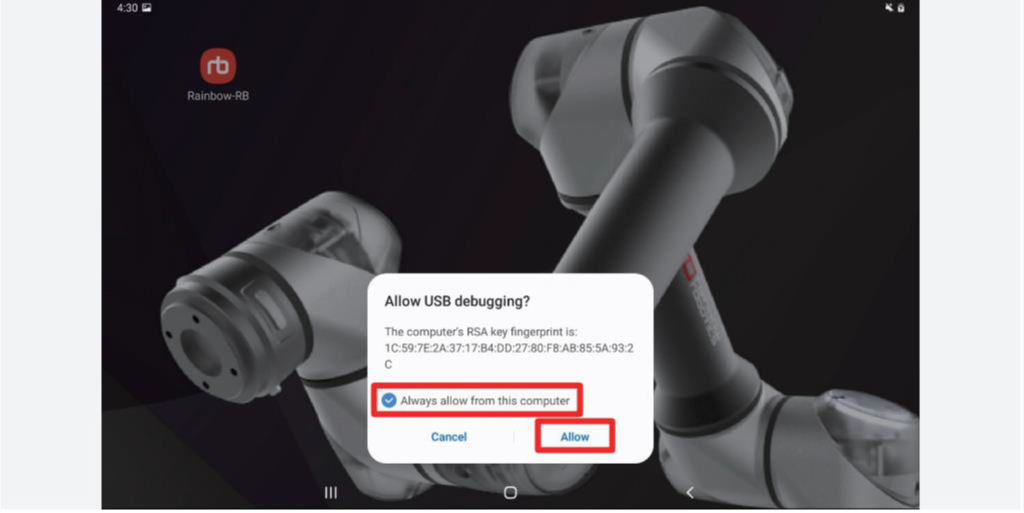
- Select the “Always allow from the computer” checkbox and click the “Allow” button.
- Unplug and reconnect the USB-C type cable connected to the tablet.
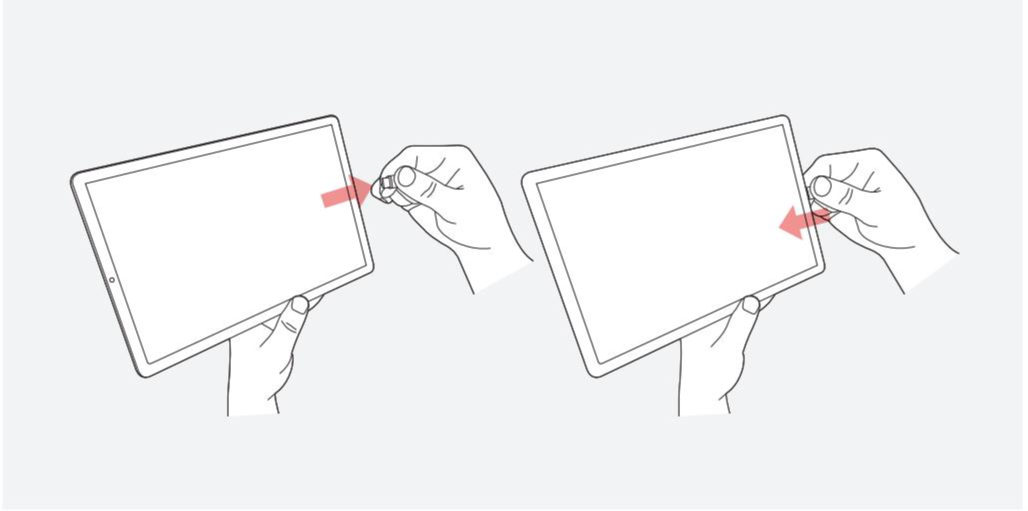
- Click the “Allow” button.
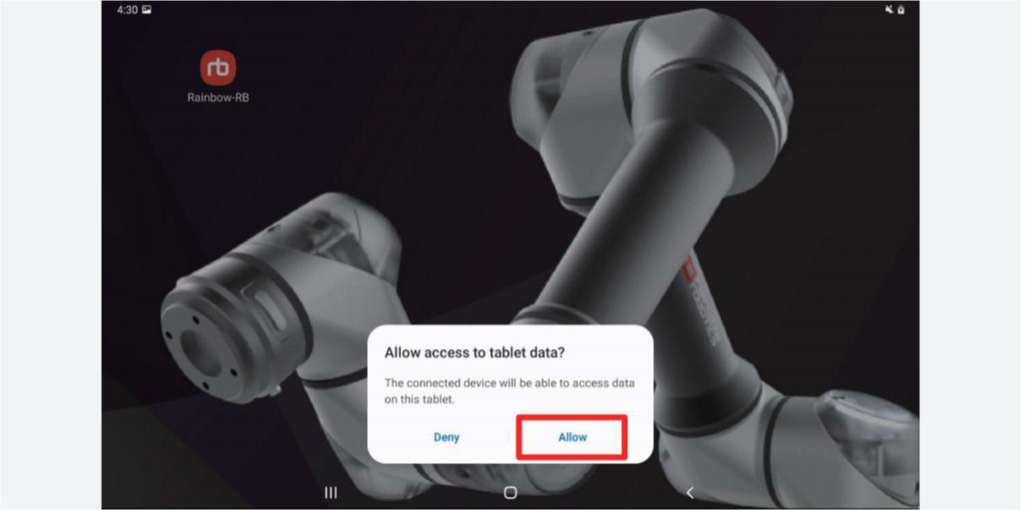
※ If the issue above persists, please get in touch with Rainbow Robotics.
B. Activation Issues
a. In case of Error code A2 problem
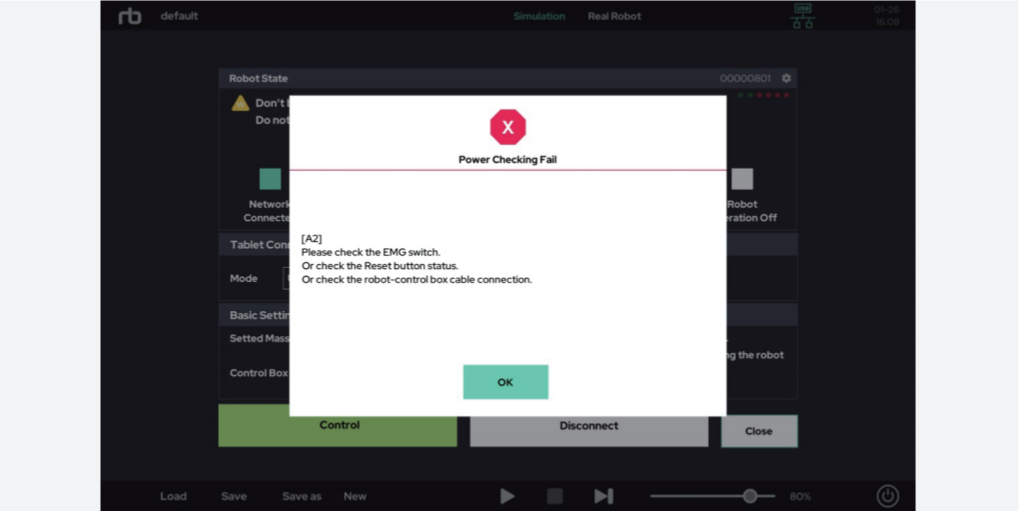
- Check whether the emergency stop/jog interface switch is pressed.
- Make sure that the robot and control box connection cables are plugged in properly.
b. In case of Error code A4 problem
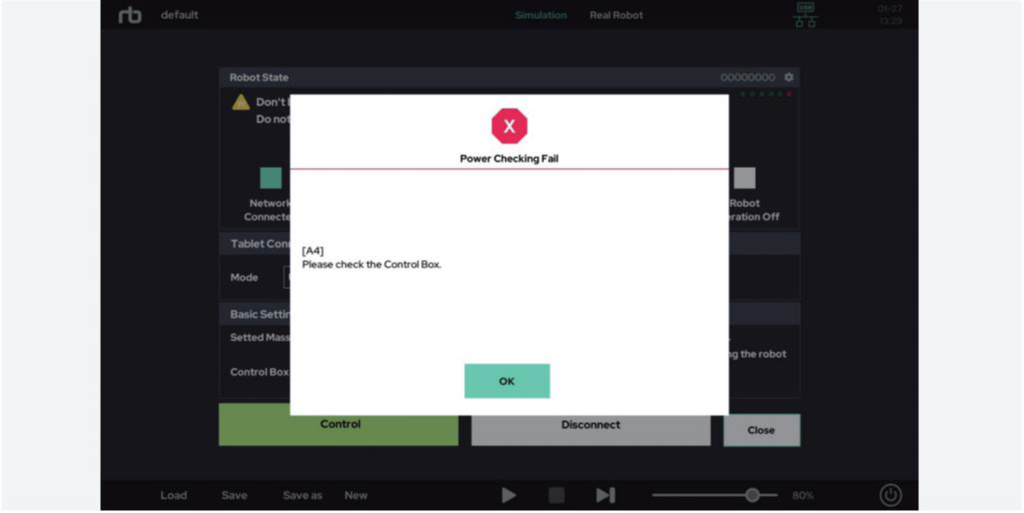
- Check whether the cable connecting the robot and the control box is properly connected.
c. In case of Error code A12 problem
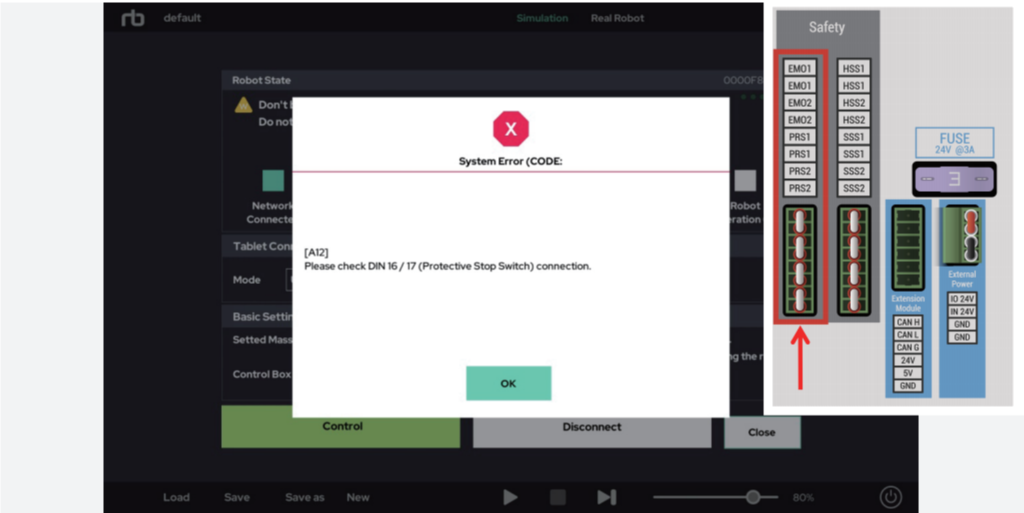
- Check whether the short bars are inserted into the EMO and PRS areas of the terminal block.
d. In case of Error code A53 problem
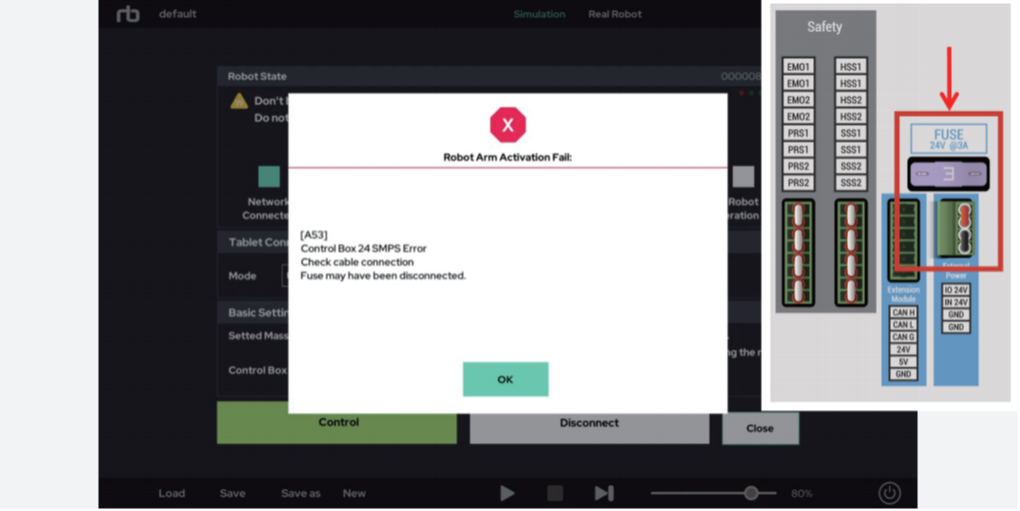
- Check whether the short bars are inserted into the fuse and external power area of the terminal block.
- Check whether the fuse is blown.
e. In case of Error code A93 problem
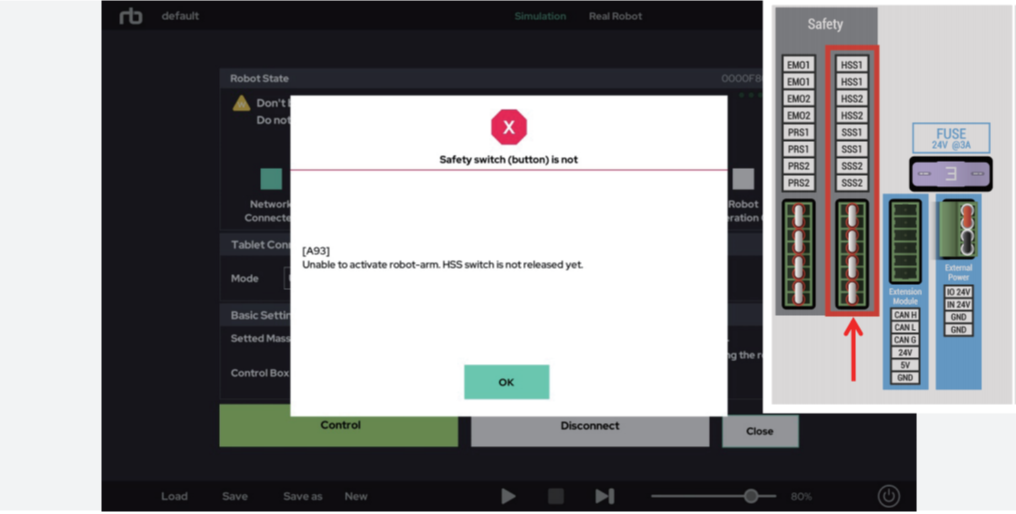
- Check whether the short bars are inserted into the HSS and SSS areas of the terminal block.
TIP
※ If the problem above persists, please contact Rainbow Robotics Inc.
※ If any other error code occurs, please refer to this user guide.
 Rainbow Robotics