Skip to content

External Port Information ​

Overall External Port Panel ​

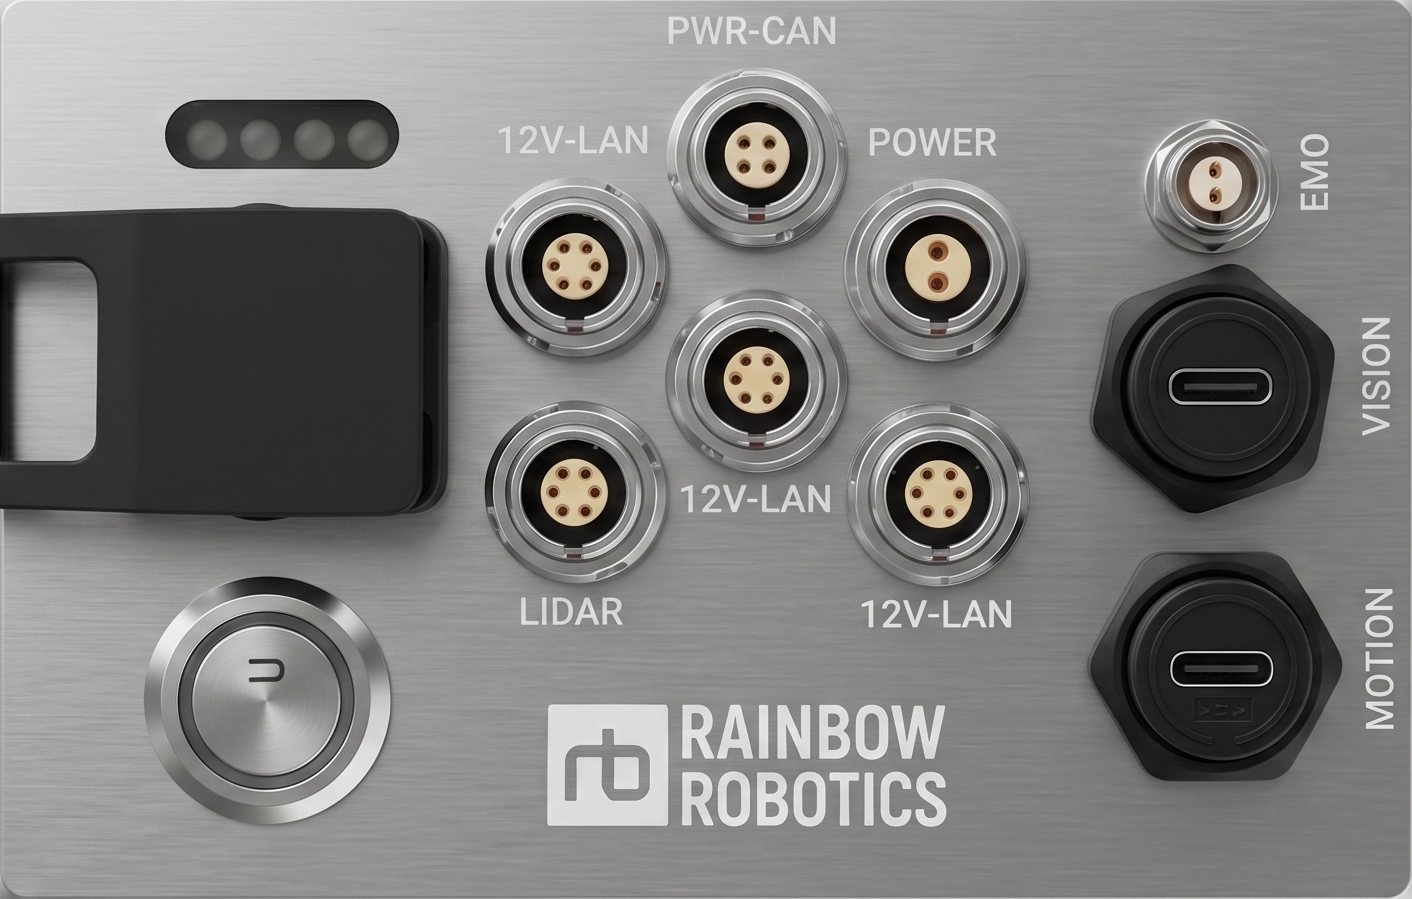
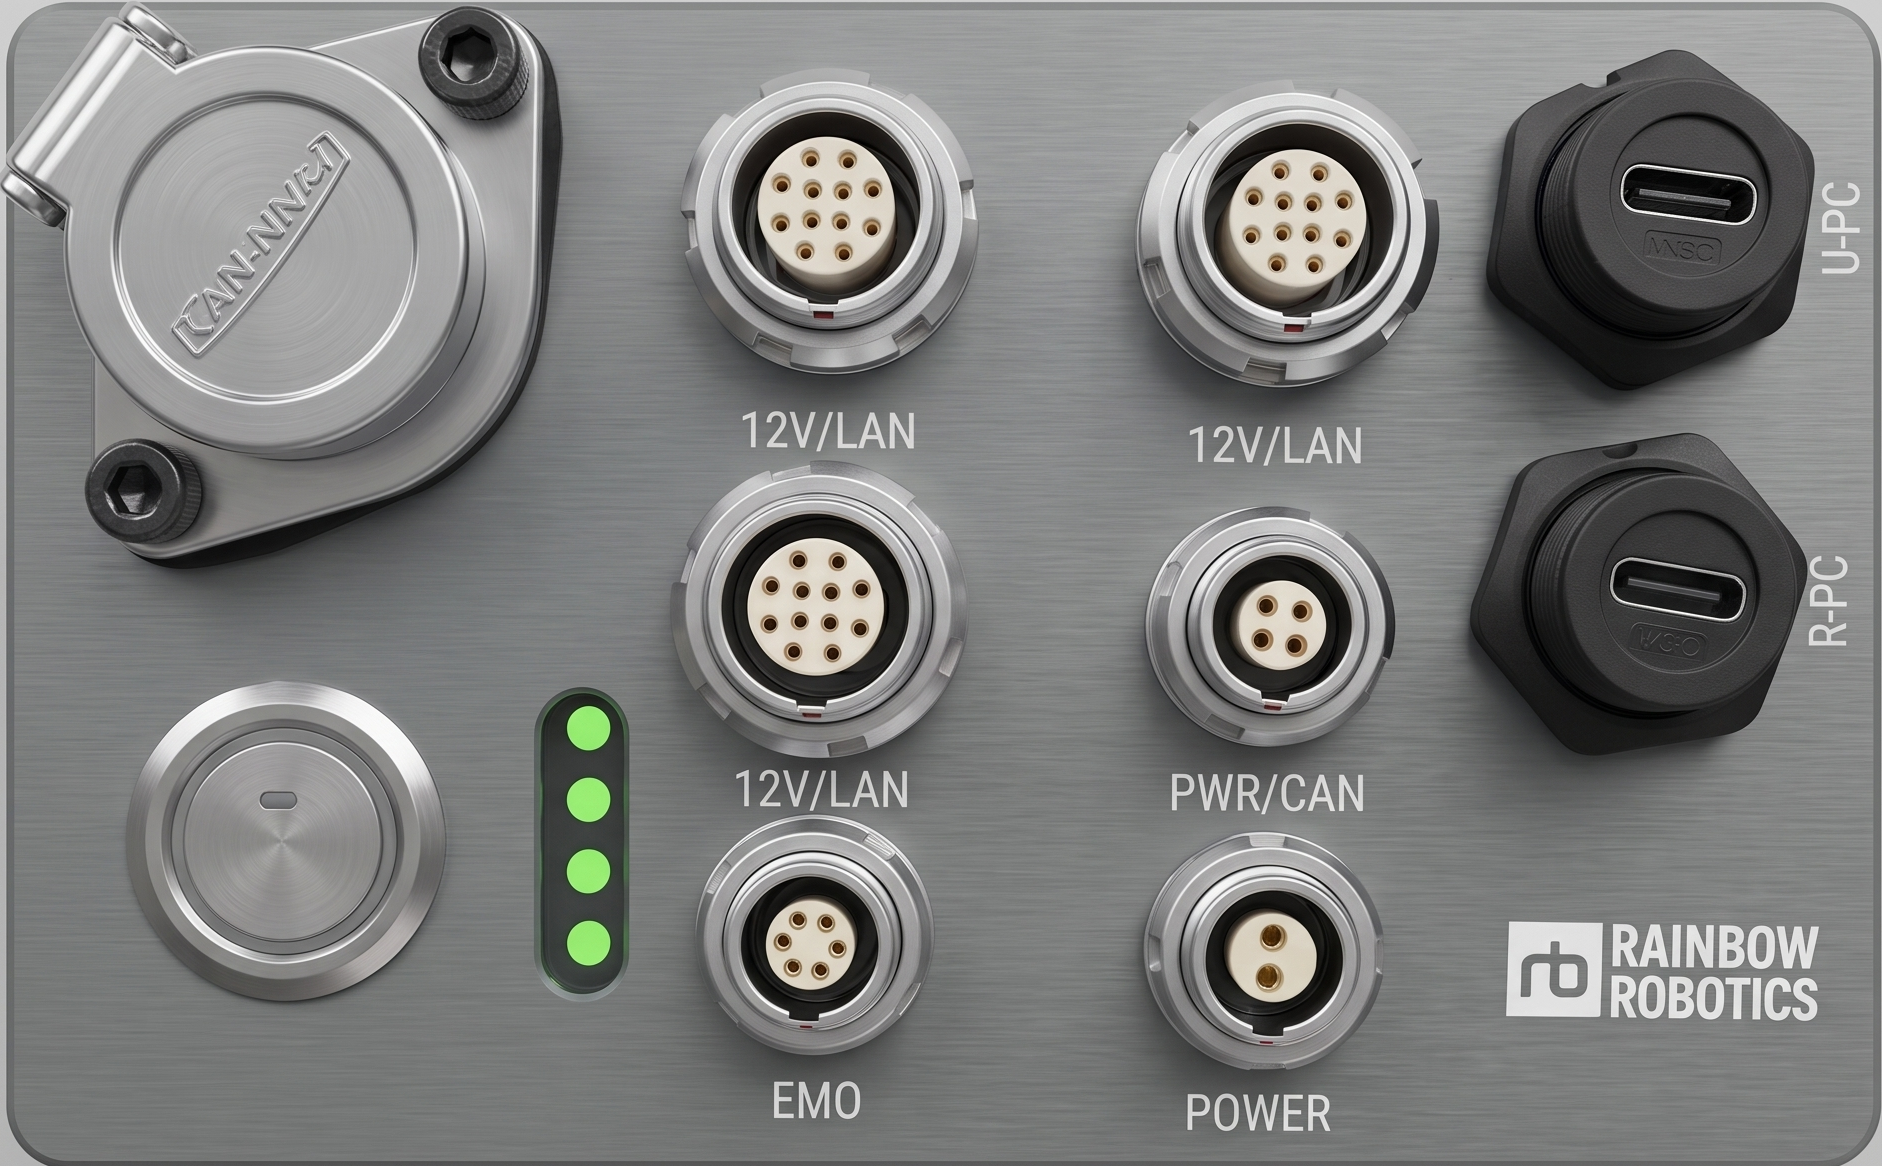
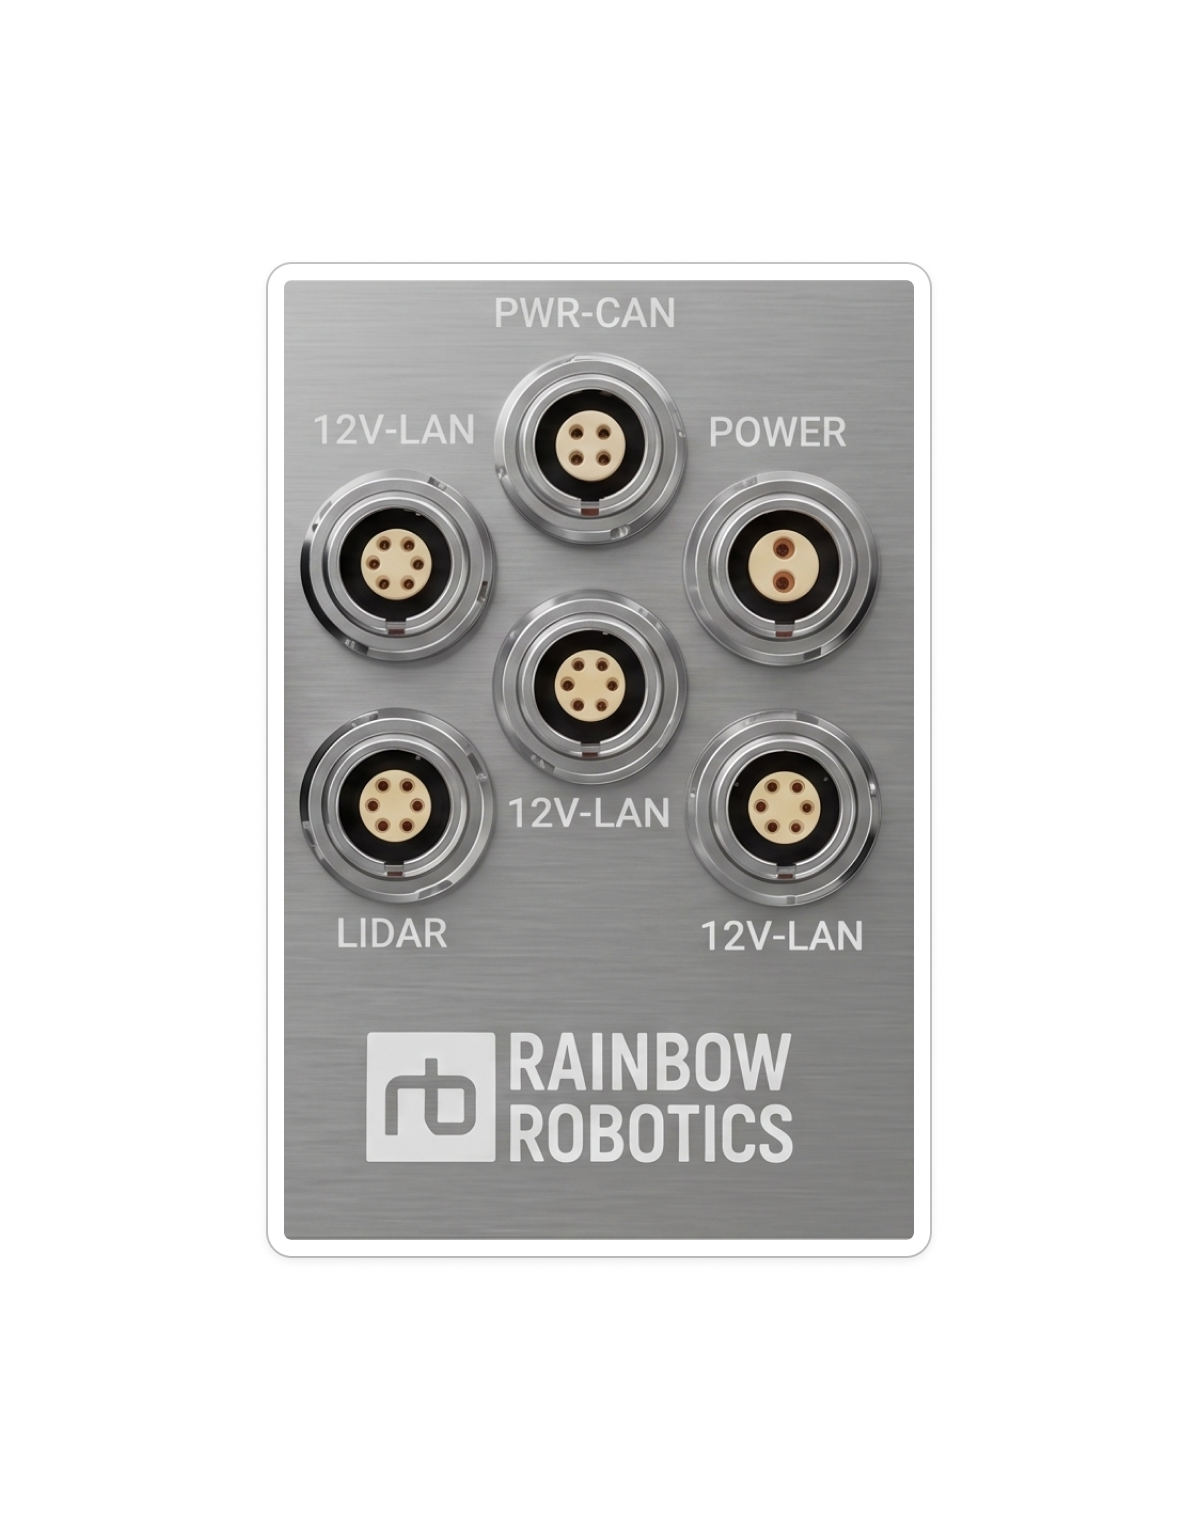
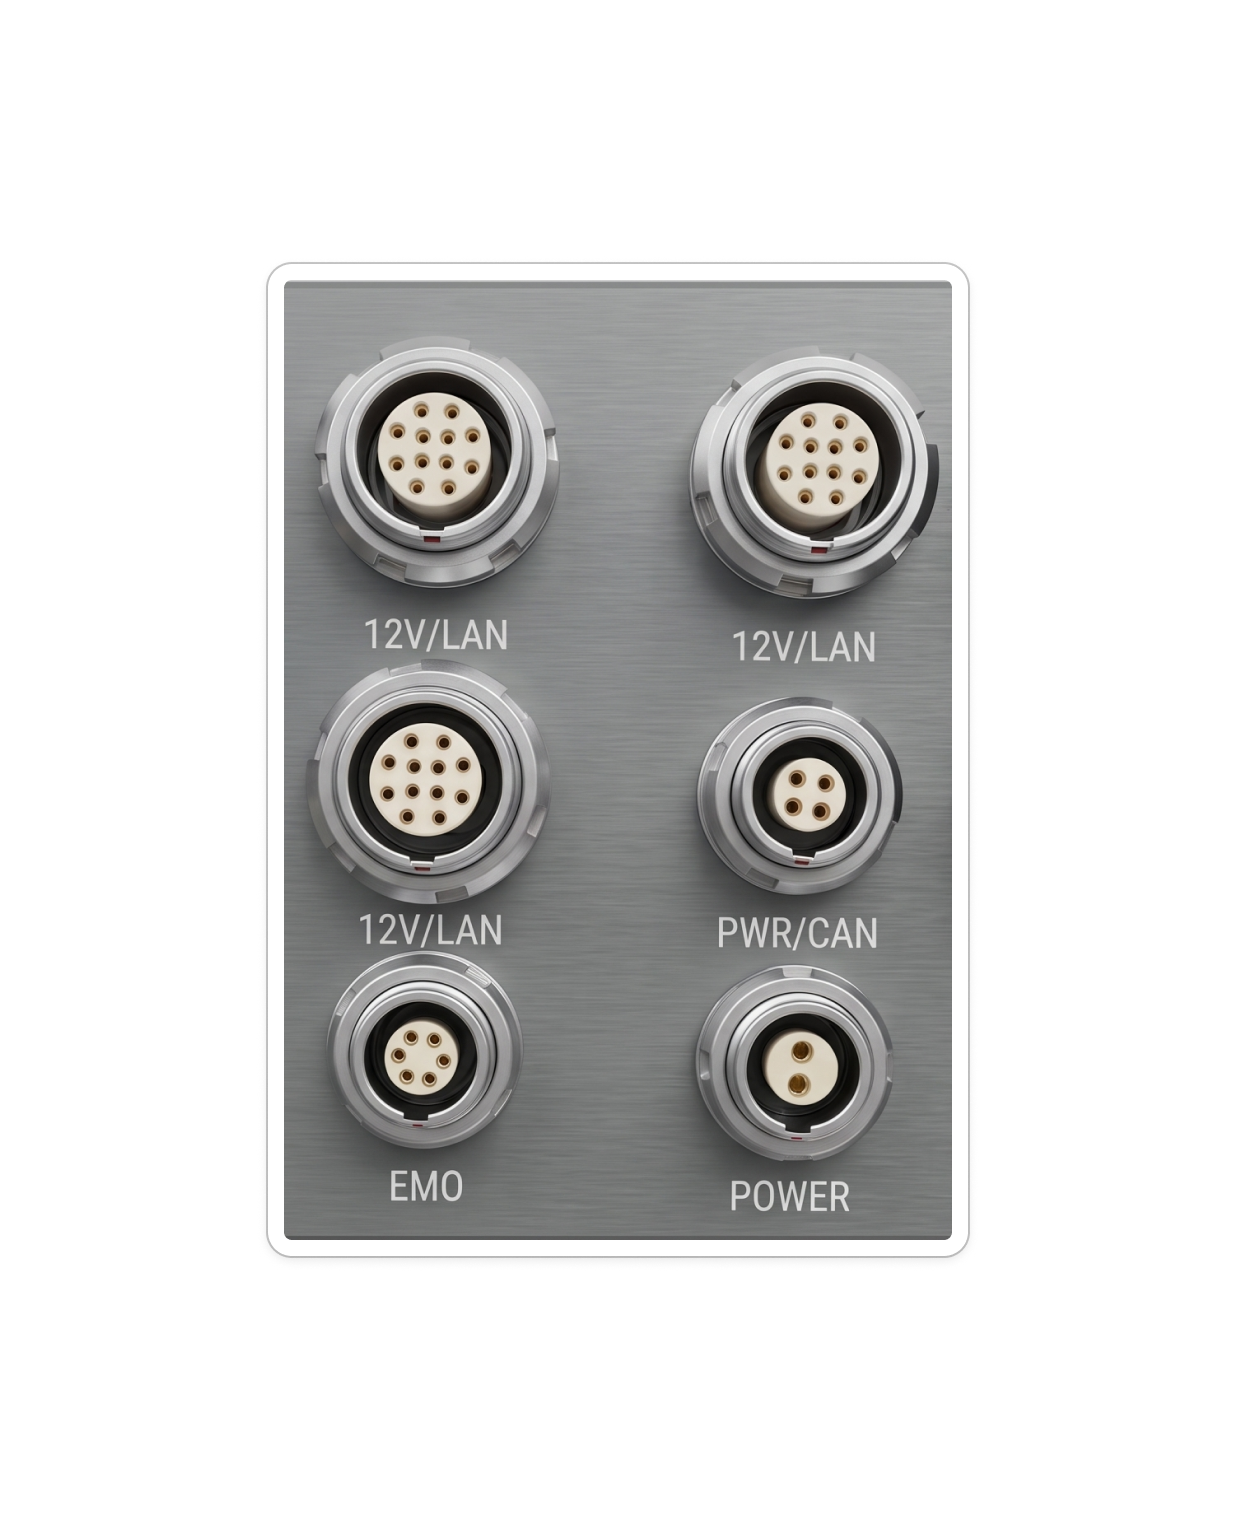
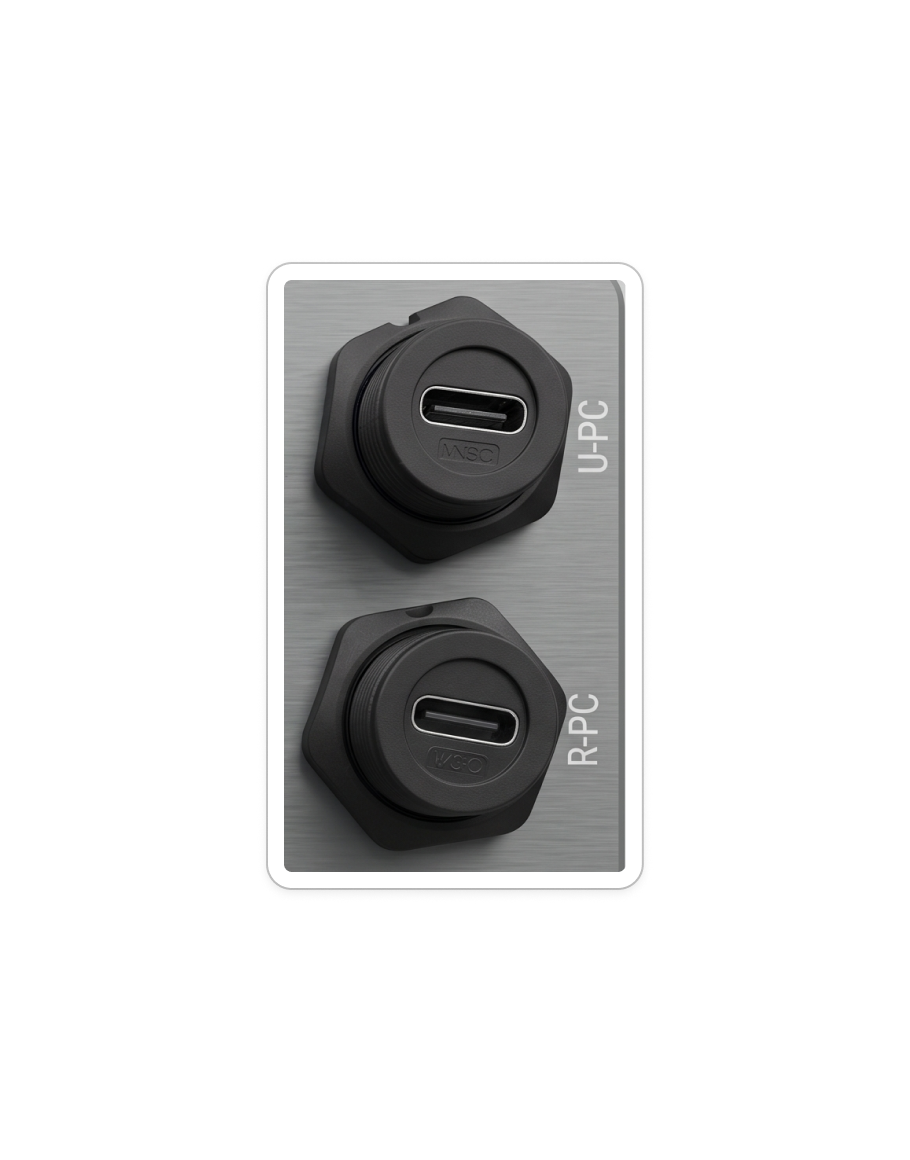
There are two panel layouts — version 1 and version 2 — and which one your robot has depends on the robot. The quickest way to tell them apart is the pair of USB-C ports on the right edge: version 1 labels them VISION / MOTION, version 2 labels them U-PC / R-PC. They are the same two ports — version 2 names the PC each one reaches instead of its role.

NOTE

The panel layout can differ between versions. Please contact us if you are unsure which one your robot has.

External port panel, version 1
Version 1
External port panel, version 2
Version 2

Ports by version ​

PortVersion 1Version 2
PowerPOWERPOWER
Power · CANPWR-CANPWR/CAN
Power · LAN12V-LAN ×312V/LAN ×3
LiDARLiDARNo dedicated port — use 12V/LAN
Emergency stopEMOEMO
USB-C (direct to PC)VISION, MOTIONU-PC, R-PC

CAN-FD robot panel ​

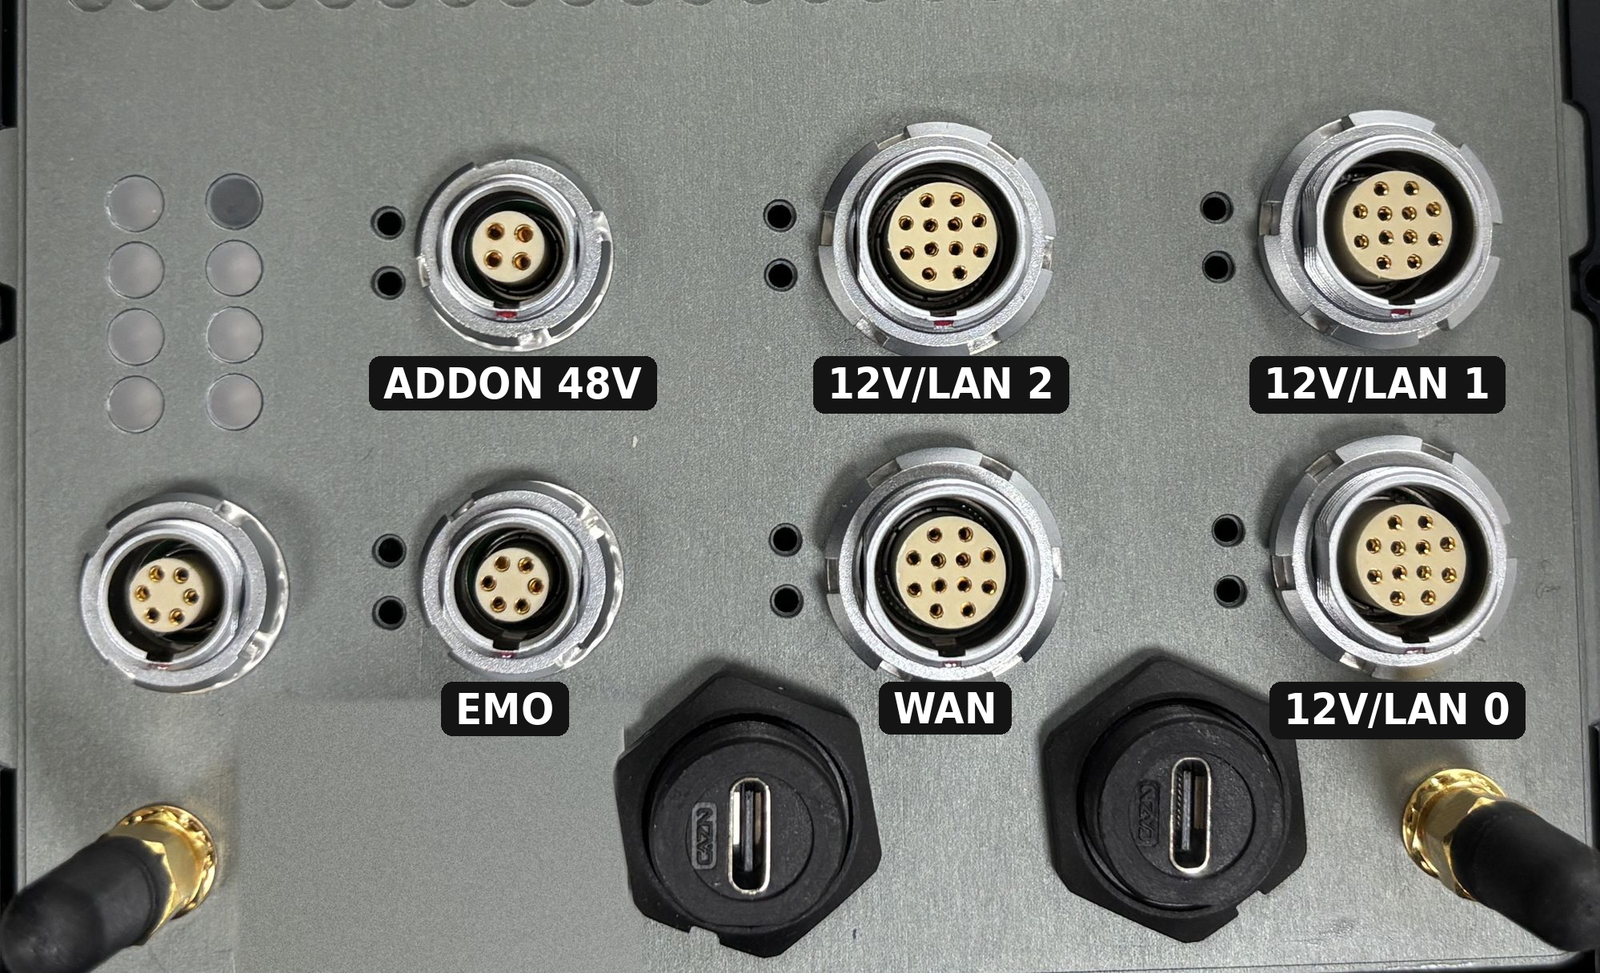
CAN-FD robots have a different panel from the two versions above. The ports carry no printed names, so tell them apart by position as shown below.

External port panel, CAN-FD robot
PositionPortConnector
Bottom right12V/LAN 012-pin
Top right12V/LAN 112-pin
Top middle12V/LAN 212-pin
Bottom middleWAN12-pin
Top leftADDON 48V4-pin
Bottom row, second from leftEMO6-pin

The four 12-pin ports use the same pin map as panel version 2 12V/LAN. ADDON 48V supplies battery voltage (48 V class) to the arm and add-on devices; switch it with ARM · ADDON (48V) in the app (Powering the external ports).

Charging & Power Switch ​

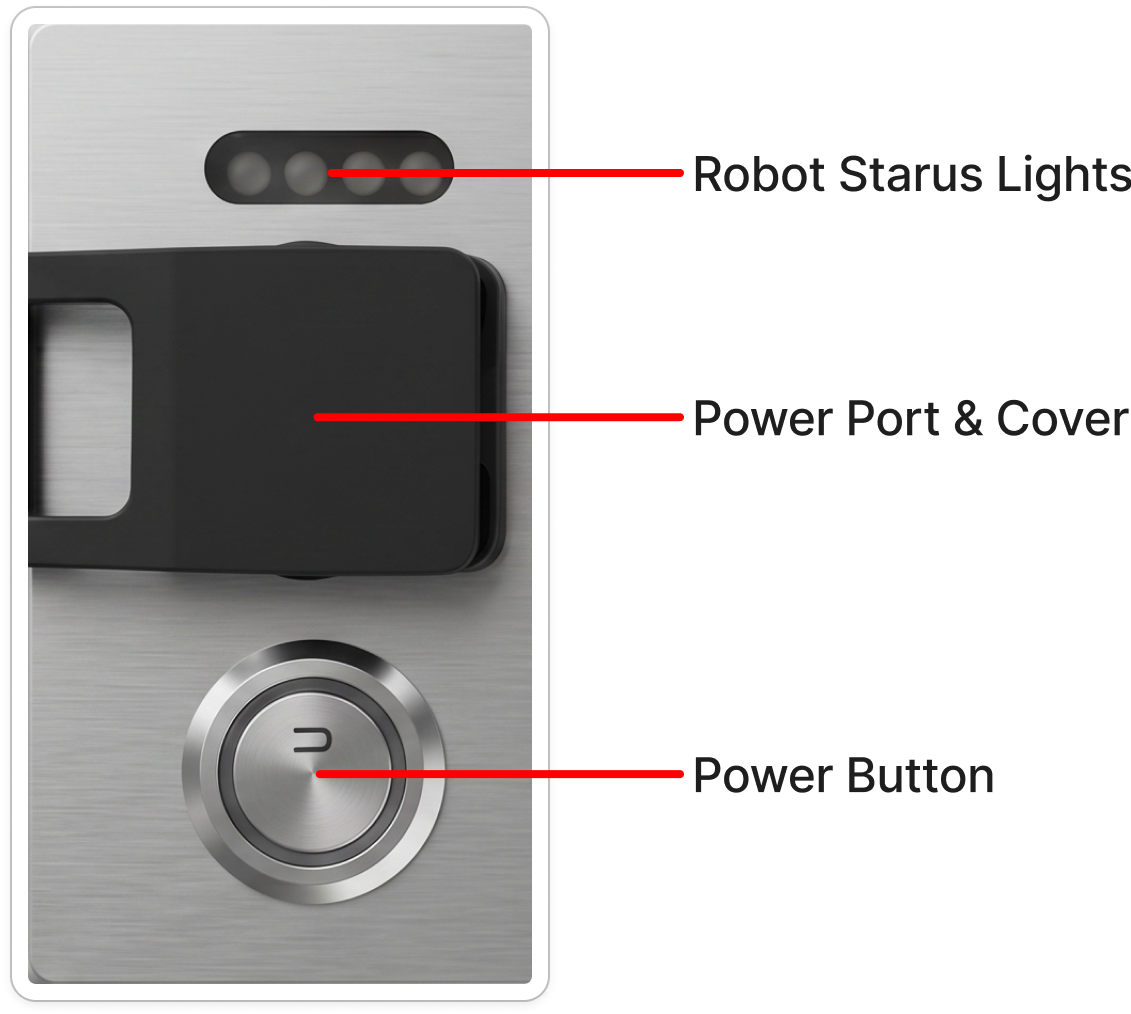
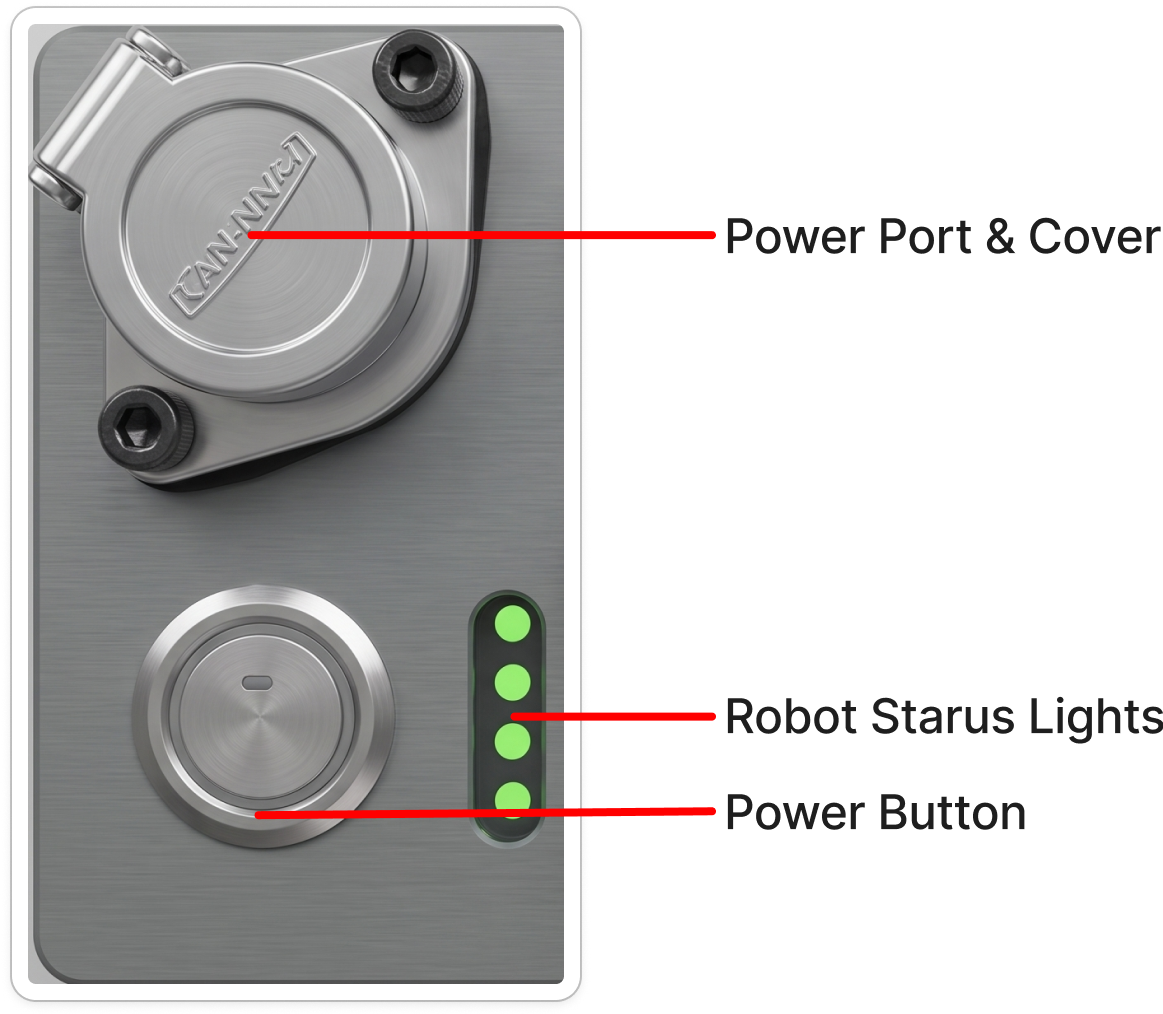
Both versions carry the same three elements — the power port with its cover, the power button, and the robot status lights — but lay them out differently.

Charging and power switch, version 1
Version 1
Charging and power switch, version 2
Version 2
ElementVersion 1Version 2
Power port coverHinged flip coverScrew-down round cover
Robot status lightsHorizontal strip above the power portVertical strip beside the power button
Power buttonBelow the power portBottom left, next to the status lights

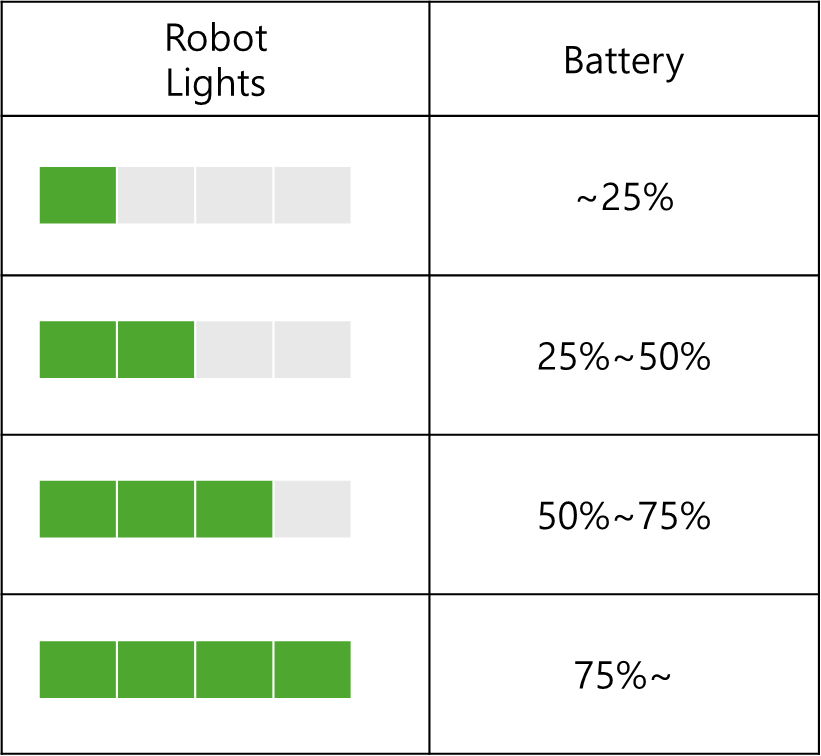
- Robot Battery Lights

Robot battery indicator lights

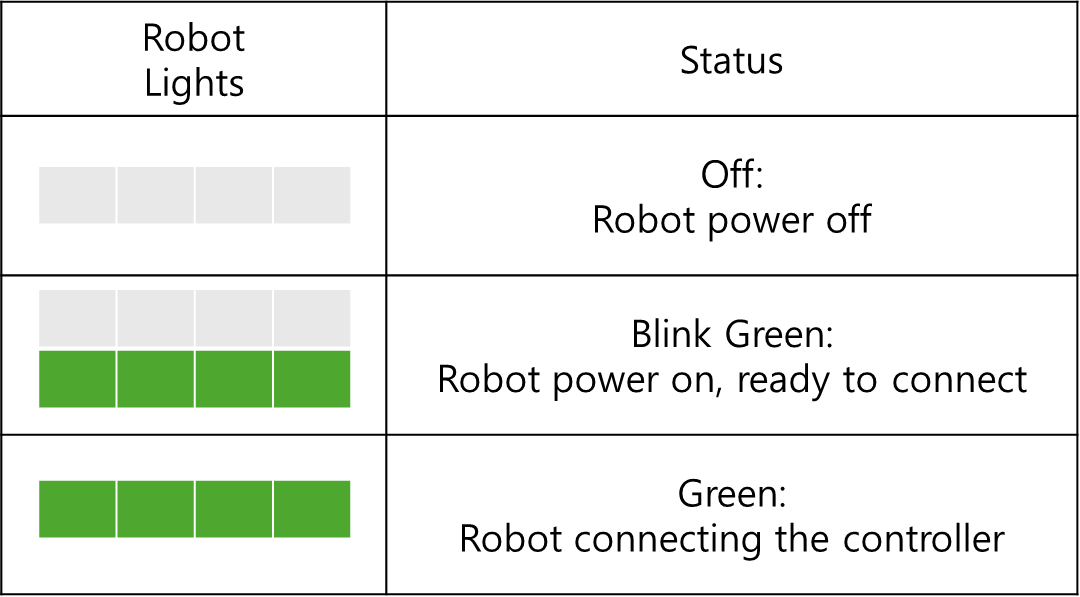
- Robot Status Lights (blinking)

Robot status indicator lights

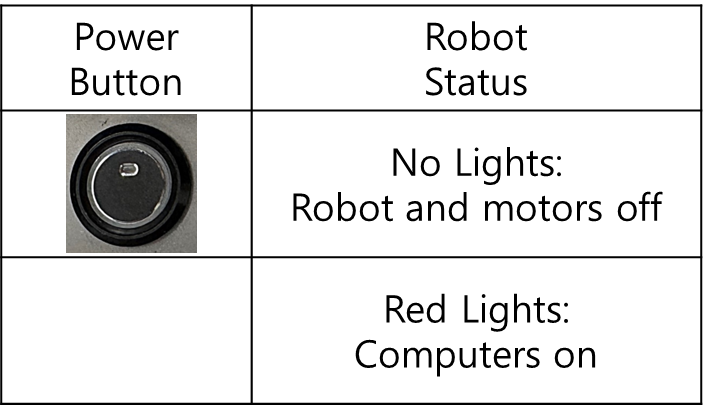
- Power Button Status

Power button status

User Port Pin Map ​

The user ports differ between versions — see Ports by version for the full comparison. Pin maps for each port type follow below.

A port only carries power once you switch it on in the app — start with Powering the external ports.

User ports, version 1
Version 1
User ports, version 2
Version 2

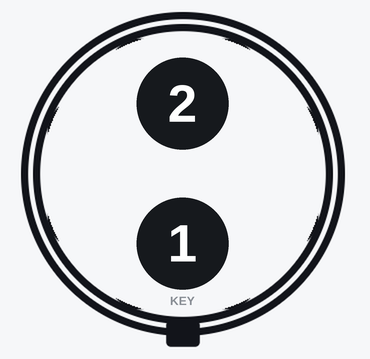
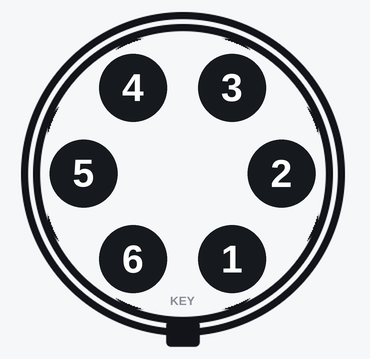
POWER ​

User port POWER pin map
PinFunctionColor
1VCCRed
2GNDBlack
  • VCC: 42.0 ~ 58.4V (Battery Power)
  • Max. Current: 5A


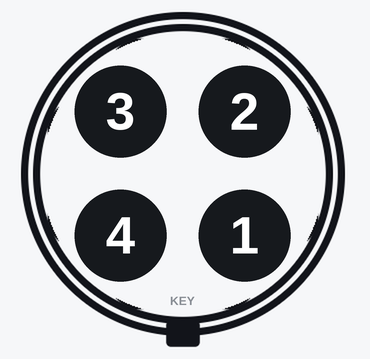
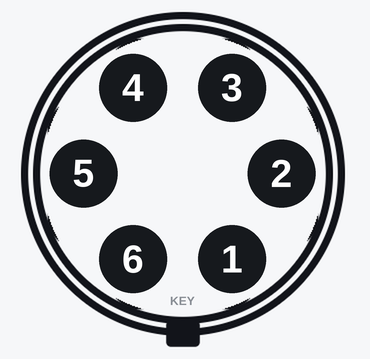
PWR-CAN ​

User port PWR-CAN pin map
PinFunctionColor
1VCCRed
2GNDBlack
3CAN HighWhite
4CAN LowBlue
  • VCC: 42.0 ~ 58.4V (Battery Power)
  • Max. Current: 10A
  • Can Communication is Connected to the Robot PC


12V-LAN ​

Panel version 1 — 12V-LAN ​

User port 12V-LAN pin map
PinFunctionColor
1VCCRed
2GNDBlack
3LAN TX+White/Green
4LAN TX-Green
5LAN RX+White/Orange
6LAN RX-Orange
  • VCC: 12V
  • Max. Current: 2A
  • Network Switch Speeds: Fast Ethernet (100Mbps)
  • Lan Communication is Connected to the switching hub

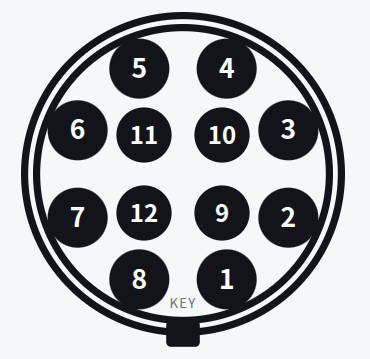
Panel version 2 — 12V/LAN (Gigabit) ​

A 12-pin connector providing four gigabit LAN pairs and 12V power. The four 12-pin ports on a CAN-FD robot use this pin map too.

User port 12V/LAN (panel version 2) pin map
PinNet nameTypePairNotes
1MDI_A+Giga LANPair ATwisted with pin 2
2MDI_A-Giga LANPair ATwisted with pin 1
3MDI_B+Giga LANPair BTwisted with pin 4
4MDI_B-Giga LANPair BTwisted with pin 3
5MDI_C+Giga LANPair CTwisted with pin 6
6MDI_C-Giga LANPair CTwisted with pin 5
7MDI_D+Giga LANPair DTwisted with pin 8
8MDI_D-Giga LANPair DTwisted with pin 7
9RESERVEReserve—Not used (spare, not wired)
10GNDGround—Power return / ground
11RESERVEReserve—Not used (spare, not wired)
12+12VPower—Camera power, 2–3A


LiDAR ​

Present on panel version 1 only. On version 2, LiDAR connects through a 12V/LAN port.

User port LiDAR pin map
PinFunctionColor
1VCCRed
2GNDBlack
3LAN TX+White/Green
4LAN TX-Green
5LAN RX+White/Orange
6LAN RX-Orange
  • VCC: 12V
  • Max. Current: 2A
  • Network Switch Speeds: Fast Ethernet (100Mbps)
  • Lan Communication is Connected to the User PC

Direct PC Port ​

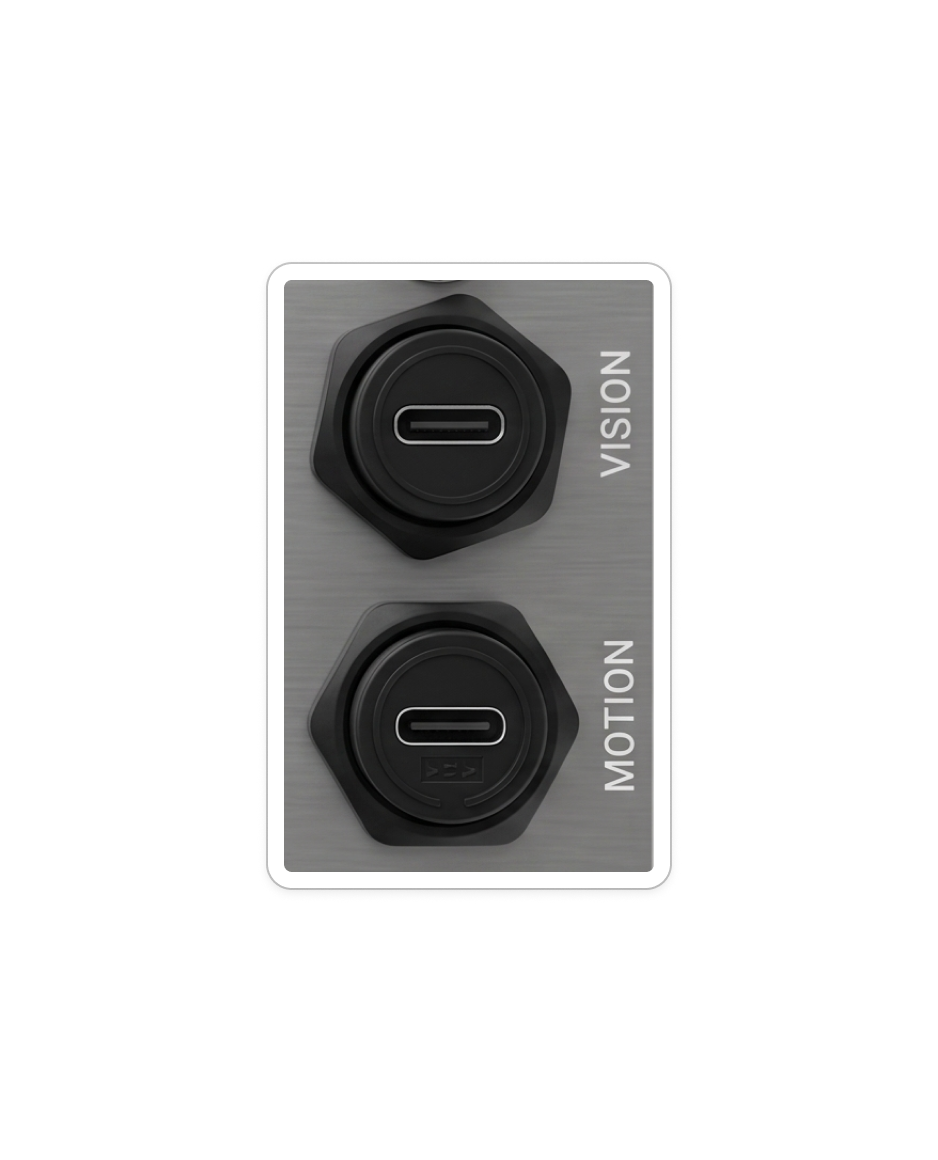
Two USB-C ports connect straight to the onboard PCs. They are the same two ports on both versions; only the labels changed.

Direct PC ports, version 1
Version 1
Direct PC ports, version 2
Version 2
Connects toVersion 1Version 2
User PCVISIONU-PC
Robot PCMOTIONR-PC

This user manual is intended for RBQ users.