Skip to content

Control home ​

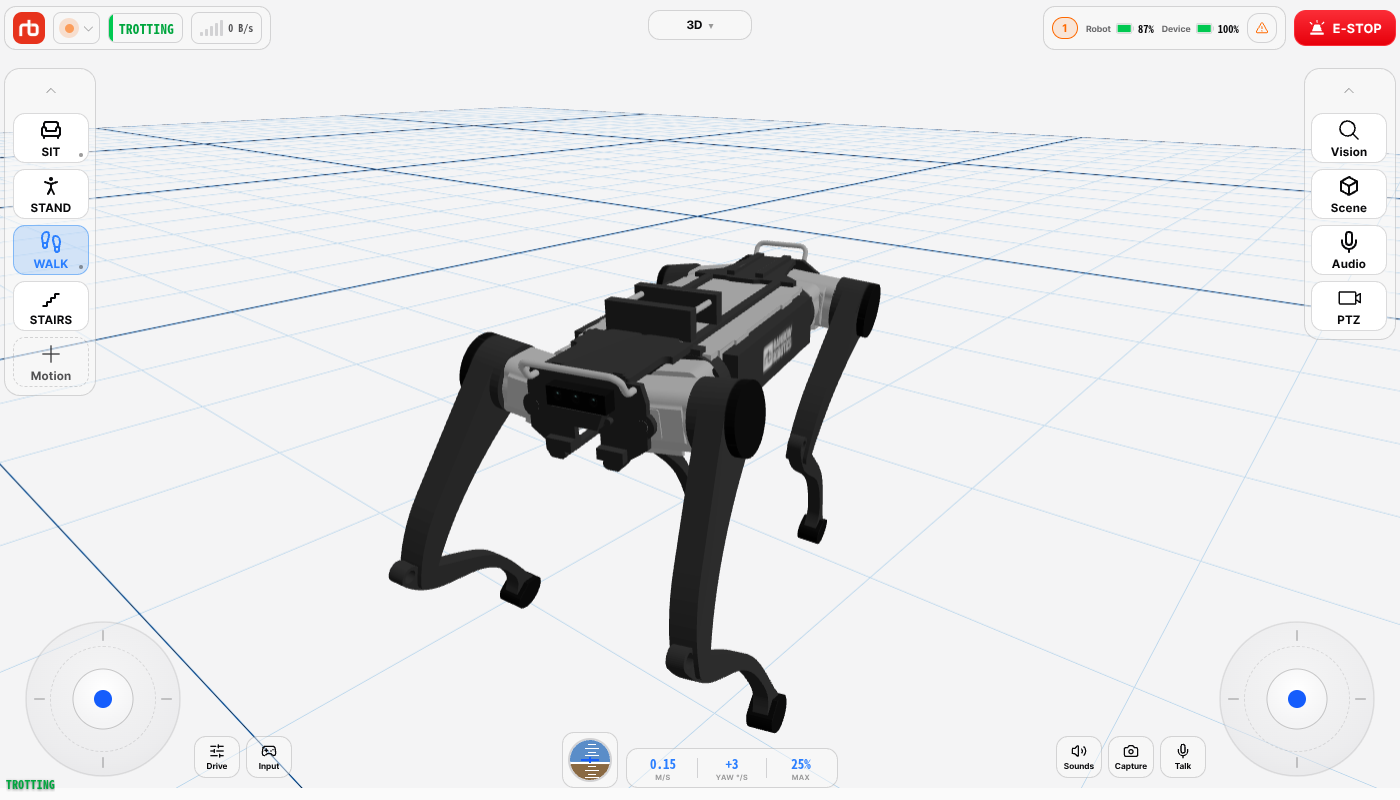
The control home is the screen you drive the robot from. Open it with Control on the Hub. The whole screen is the viewport — a camera feed or the 3D view — with a motion card on the left, an OBSERVE card on the right, and two virtual joysticks in the lower corners when no gamepad is connected.

Control home

DANGER

Every motion button on this screen moves the real robot. Keep people, animals, and obstacles at least 2 m clear of the robot whenever it is operating. Check your surroundings before you press anything, and keep a hand near E-STOP.

Top bar ​

The top bar floats over the video in two groups. From left to right:

ElementWhat it shows / does
LogoGoes to the Hub. The robot stops where it is and stays connected
Status lightA green, amber, or red light that pulses slowly — fast when something is critical, and a steady red while not connected. Tap it for Overall system status (see Connection)
Gait chipThe robot's current gait name, such as STANDING, colored by state. Hidden while not connected
SLAM chipAppears only while external control (SLAM or SDK) is active. Tap it to hand control back to the app
Signal barsWiFi signal strength, and how fast data is moving over the robot link
Log badgeUnread log alerts
Robot battery, device batteryThe robot pack's charge, with a charging mark while it charges, and your own device's battery
E-STOPEmergency stop — see below
QuitDesktop build only. Asks Quit the app? first, then closes the app. The robot keeps running

If the robot drops off and does not come back within 8 seconds, the app takes you to the Hub on its own, because that is where you reconnect. It also goes back to the Hub the moment the connected robot changes, so you never end up driving a robot you did not pick.

E-STOP ​

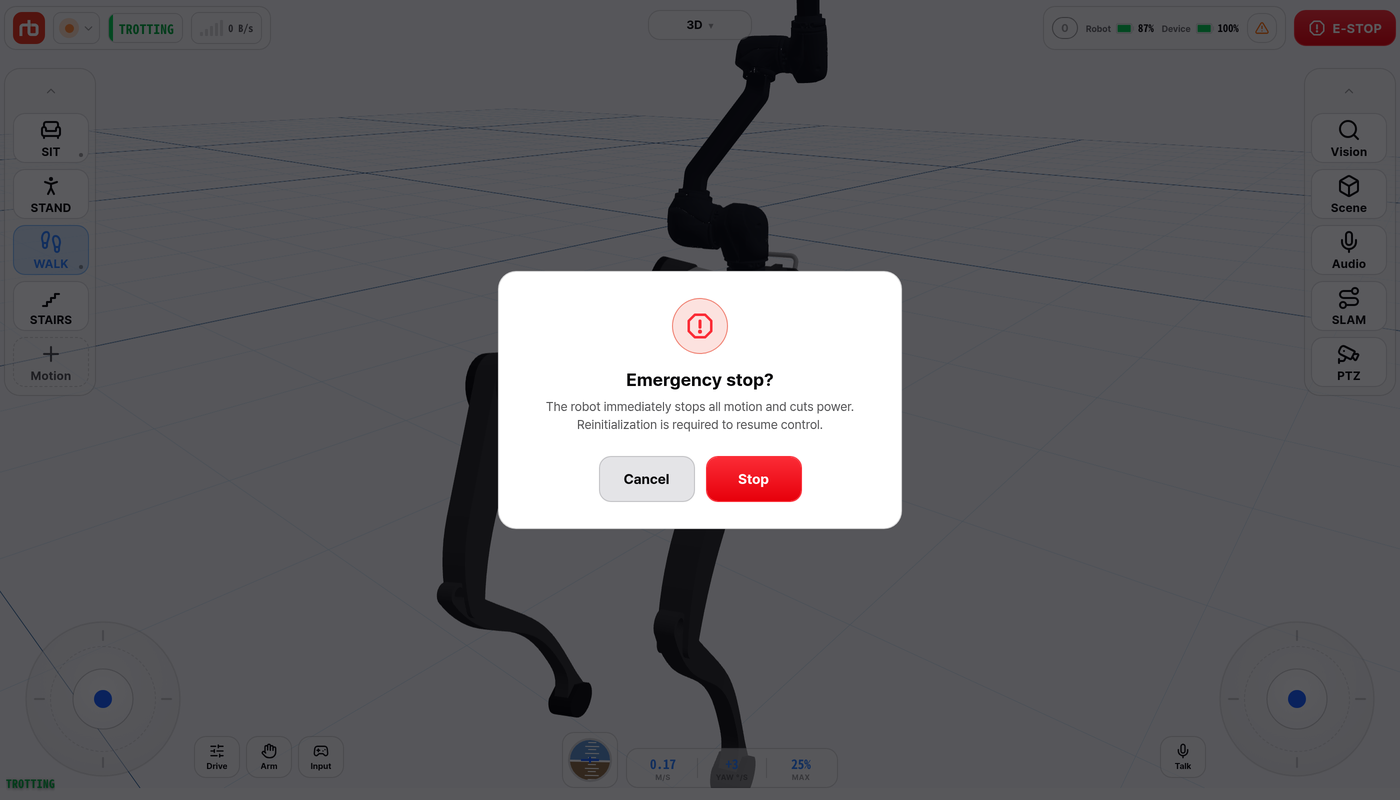
E-STOP never fires on a single tap. Pressing it opens the confirmation Emergency stop?, which warns that The robot immediately stops all motion and cuts power. Reinitialization is required to resume control. Press Stop to go ahead or Cancel to back out. The button behaves the same way on every screen, even with a menu open.

E-STOP confirmation

WARNING

After an emergency stop the robot has no motor power. Bring it back with Auto Start (below) before it can move again. The step chips show you where the sequence stopped.

Ownership ​

Only one device controls the robot at a time. When another device holds control, the status light turns amber and the Ownership row in Overall system status reads Take ▸ — tap it to take control back. While a SLAM or SDK program is driving, you get the SLAM chip instead.

While another device holds control, this device spectates: the screen stays visible, the controls below the top bar are locked, and Spectating at the top offers to take control. See Spectating.

Auto Start ​

Until the robot's motor control is running, a green Auto Start pill sits at the bottom center of the viewport, grayed out while not connected. Tap it to open the Auto Start dialog. The dialog always stays centered on the screen: when the screen is short, only the Startup sequence list inside it scrolls and the buttons stay visible. On a short screen such as a phone in landscape, each step shows as one line — tap it to open or close its details. The running step and any failed or warning step open by themselves.

  1. Read the instruction — Place the robot on a flat floor, and make sure all feet and knees contact the ground.
  2. Five step chips lay out the sequence: POWER, CAN-BUS, HOMING, IMU-CHECK, START. Tap an unfinished CAN-BUS or HOMING chip to run just that step.
  3. Press Auto Start. The dialog stays open and the Startup sequence panel below the chips fills in step by step — Pre-check, Leg Power, Joint comms, Motor parameters, Home position, IMU, Control active — marking each one Passed / Failed / Warning / Running.
  4. If a step fails, the panel names the cause and the fix. For example: The robot is already standing — Sit the robot down, then start again. Take care of it and press Start again.
  5. Press Close once the sequence reports Done. When a run you watched here clears the last step, Start again disappears and only Close remains, so you cannot start the sequence twice by accident.

You can also start the same sequence from the status light: Overall system status › ▶ Auto start (full sequence).

Viewport and source selector ​

The dropdown at the top center of the viewport picks what you see. 3D, a live model of the robot, is always there. Camera sources show up only when the robot reports having that camera: Front, Rear, Left, Right, Stairs, Quad, Panorama, CCTV, Thermal, PTZ Mix, and SLAM on LiDAR robots. Tap outside the list to close it without changing the source.

Pick a PTZ-type source and the pan/tilt/zoom panel appears over the video. Drag it by its handle to move it.

While docking runs, the selector reads Dock and will not open — the viewport belongs to Dock View until you close it.

Left card — Motion ​

Everything that makes the robot move lives on the left.

  • Card: folded, it is a round glass button with a walking-person icon. Tap it and the circle grows into the card; tap the card's top row to fold it back. The app remembers whether each card is open, and both start open.
  • Body: the fixed motion buttons SIT, STAND, WALK, STAIRS, and DOCKING (only while docking is available), plus Motion, the dashed button that opens the full motion grid. Whichever button matches the robot's current gait is highlighted. See Motion commands.
  • Tool buttons: a row of small buttons outside the card, just right of the left joystick — at the left edge in gamepad mode. Each one opens its panel above the row:
    • Drive — speed, body height, and tilt sliders (Drive parameters).
    • Arm — only on robots with a manipulator.
    • Input — the input mode Auto / Virtual / Pad and the live gamepad map. Auto switches to a physical gamepad whenever one is connected. A green dot means external control is doing the driving.
  • When the card is taller than the screen, a ▾ at the bottom tells you it scrolls.

Right card — OBSERVE ​

Everything about what you see and hear lives on the right.

  • Card: folded, it is a round glass button, and it opens and folds like the left card.
  • Body:
    • Vision — the vision toggles, including P2G (Point-to-Go), which is available only while Front is the source. With P2G on, tapping a spot on the floor in the video sends the robot walking there.
    • Scene — 3D view settings, shown only while 3D is the source.
    • Audio — listen to the robot, volume, and devices. A green dot means listening is on.
    • SLAM — LiDAR robots only.
    • PTZ — robots with a PTZ camera only. Switches the view to the PTZ camera; tap again to go back to the source you were on.
  • Talk: the button at the bottom right, just left of the right joystick, or at the right edge in gamepad mode. Hold it to talk through the robot's speaker. It reads Talking for as long as you hold it, and it is grayed out while the speaker amplifier is off.
  • Sounds · Capture: the two buttons just left of Talk. Sounds picks a sound and plays it on a loop on the robot. Capture asks whether you want a Photo or a Recording; while recording, the button shows the elapsed time in red and tapping it again stops. When the screen is too narrow to fit them beside the center gauges, the two buttons stack above Talk. See Media.
  • Gyro and Speed HUD sit side by side at the bottom center of the video. Tap the gyro to enlarge it. You can turn both off in App settings.
  • In the simulator there are no side cards and the 3D view fills the screen. The robot is always walking, and the tool row at the bottom holds Drive, Level and Reset. Pick the view from the drop-down at the top center; progress is shown below it. See the simulator notes in Connection for levels and views.

WARNING

With P2G on, the whole video area is a command surface — every tap on the floor moves the robot. Turn it off when you are done.

Joysticks and input modes ​

  • Without a gamepad, on touch devices and PCs, the screen shows two virtual joysticks. What the axes do depends on the current motion — see the axis tables in Motion commands.
  • With a gamepad, whether a physical pad or a Steam Deck, the virtual joysticks disappear and you drive with the pad's sticks. Fold the cards to see more of the video.
  • One-stick mode in Settings › Gamepad swaps the left and right stick roles so you can drive one-handed.

Driving from the keyboard — on a PC with no gamepad, the keyboard works alongside the virtual joysticks. It works only on this screen: the same keys do nothing on the Hub or in settings.

KeyWhat it does
W A S DLeft stick — forward/back and sideways
Q ERight stick left / right — turn left / right
↑ ↓ ← →Right stick

The robot moves while you hold a key and stops when you let go. The keyboard has no emergency-stop key — E-STOP is the button at the top right of the screen.

While connected, the bottom-left corner shows the current gait name as a small HUD.

Compact layout ​

On short screens — phones, or a window less than 500 px tall — the layout stays the same and only the pieces get smaller. The joysticks, tool buttons, and walkie-talkie tuck into the corners, and the left card takes only the space above them and scrolls. On narrow screens the cards get narrower too. Nothing is taken away.

On very small screens — less than 720 px wide, such as a small phone in landscape — the screen shows less. The tool buttons at the bottom and the buttons beside Talk show icons only, E-STOP at the top right shows only its emergency icon, and the signal bars in the transfer-rate chip and the gyro at the center shrink or go away. Everything still works the same.

What developer mode adds here is collected on Developer mode.

This user manual is intended for RBQ users.