Skip to content

Connection ​

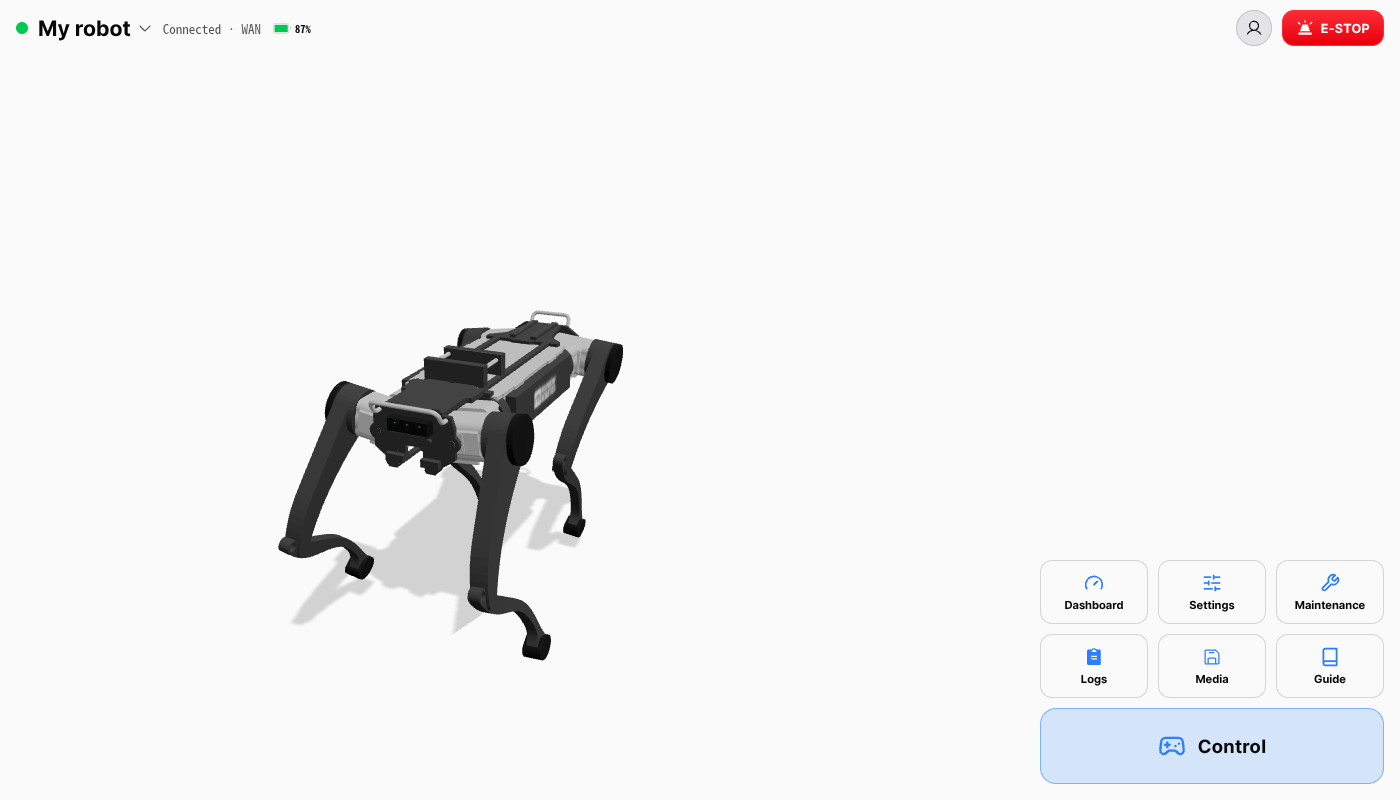
The hub decides which robot the app talks to. It is the first screen you see after startup. The robot name and connection state sit at the top left, and the Control button at the bottom right opens the control home once the robot is connected — before that it reads Opens once connected. Nothing on these screens is sent to the robot itself.

On the very first start — no saved robot and no account — the app opens the Access code screen instead. Press Skip to go straight to the hub, and the app starts looking for a robot on the robot's network on its own.

Status line ​

The hub status line

The robot name has a colored dot in front and the state after it:

TextMeaning
Connect to the robot's WiFiNo robot is saved yet
Not connectedA robot is selected but not connected
Connecting…A connection attempt is in progress
Connected · routeThe app is talking to the robot — the route is local network, WAN, or remote, and the battery follows
Connection failed · reasonThe attempt failed — press Reconnect
Not on the robot's WiFiThe robot is on its own network, but this device is on another one
Remote — access code neededA remote robot is selected but the access code is not stored — press Enter code

When the device is on the wrong network the line names the robot's WiFi if the app knows it (Robot WiFi(SSID) — please switch to it). On Linux desktop and Steam Deck, the Switch WiFi button next to it joins that network directly, or opens the network list. On Android, WiFi settings opens the system Wi-Fi screen.

Selecting a robot ​

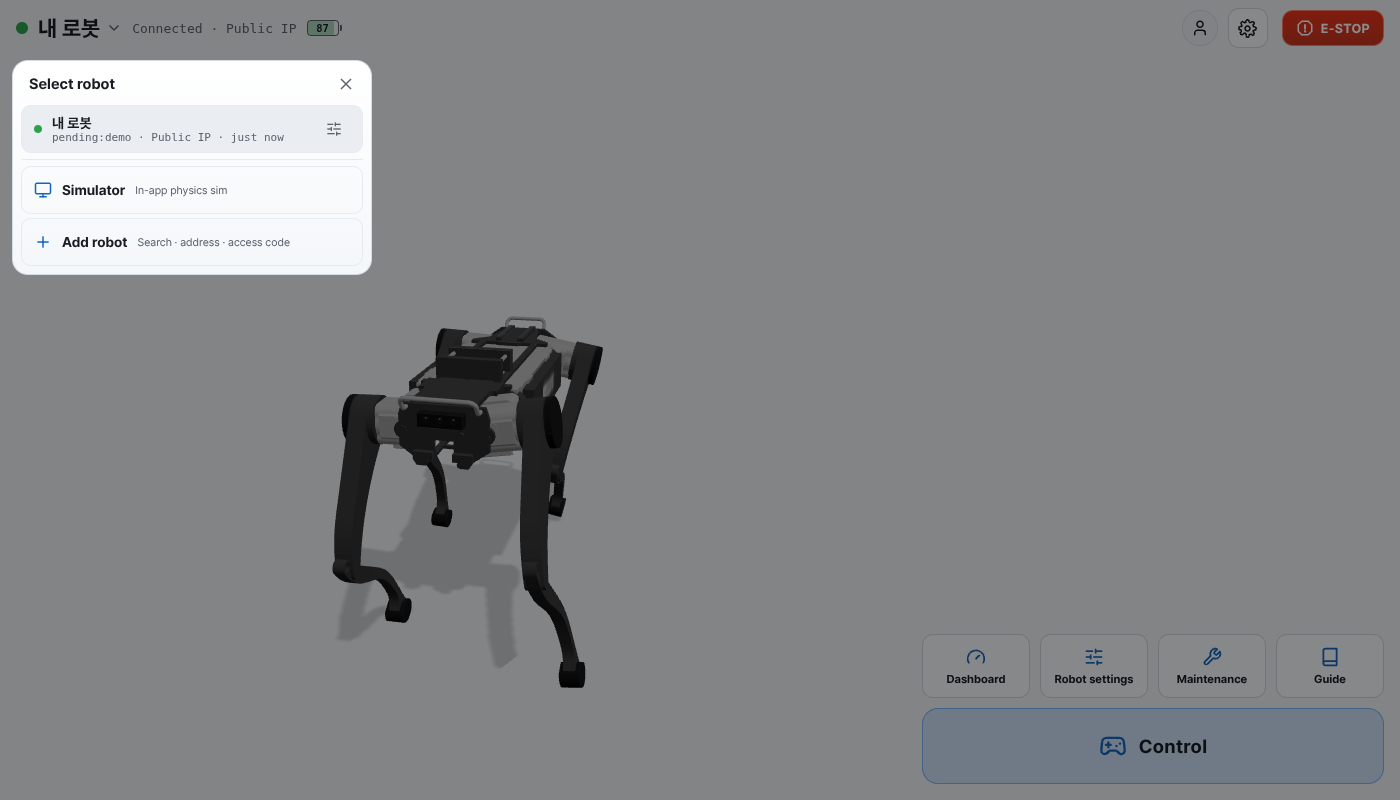
Select robot

Tap the robot name (▾) to open Select robot. It lists the robots saved on this device, plus the robots assigned to your account while you are logged in. A robot that is both appears once, matched by serial number. Each row shows the serial, the route (local network with the WiFi name, WAN, or remote), and when you last used it. Tap a row to connect.

The dot on each row shows the robot's state: green = connected, blue = on (its WiFi is in range), gray = off or unknown.

  • Linux desktop / Steam Deck: the list scans nearby WiFi every time it opens, and Refresh scans again; while the scan runs the dots stay gray rather than showing the previous result (a scan can take up to 15 seconds). Tapping a robot whose WiFi is not in range does not connect — the row reads No signal from the robot's WiFi. If the robot's WiFi is saved on the device and in range, the app switches to it before connecting, and the status line names the network it is switching to. If it cannot switch, a dialog says why (Can't find the robot's WiFi, WiFi password needed, Couldn't switch to the robot's WiFi) and the previous robot stays selected. A network whose password was never entered cannot be joined this way — join it once with Select WiFi.
  • Android / iOS: the app cannot read or change Wi-Fi, so the dot is only green or gray. Switch in the system settings; the status line tells you which network to pick.
  • A robot that is also assigned to your account connects directly if it answers on its local network, and remotely if it does not.

The slider icon on a row opens that robot's profile, where you can change its Name or delete it with the trash icon. Deleting removes the robot from this device only — server assignments are handled in the dashboard. Remote-only robots have no profile to edit.

At the bottom, Simulator (In-app physics sim) opens the control home with the in-app simulator instead of a robot, and Add robot opens the screen below.

The simulator has ten courses set on construction sites and mountains. Tap Level in the tool row at the bottom to open the Sim levels list; cleared levels show ✓ and your best time. Courses float in the air — if the robot falls, it restarts at the last gate it passed. Pass every gate in order — the next one is shown brighter and the top of the screen counts them — then stand on the finish pad to clear the level. A teal gate only counts if the robot passes it sideways while facing the arrow. The robot is always walking, so just push the joystick; set how fast with the maximum speed in Drive. Pick the view from the drop-down at the top center: Third person, First person · front, First person · rear or Stairs view. The first-person views look from the robot's front or rear, and Stairs view combines the front, rear and belly cameras with the joint pose, as on the robot. Reset restarts the level from the beginning.

Adding a robot ​

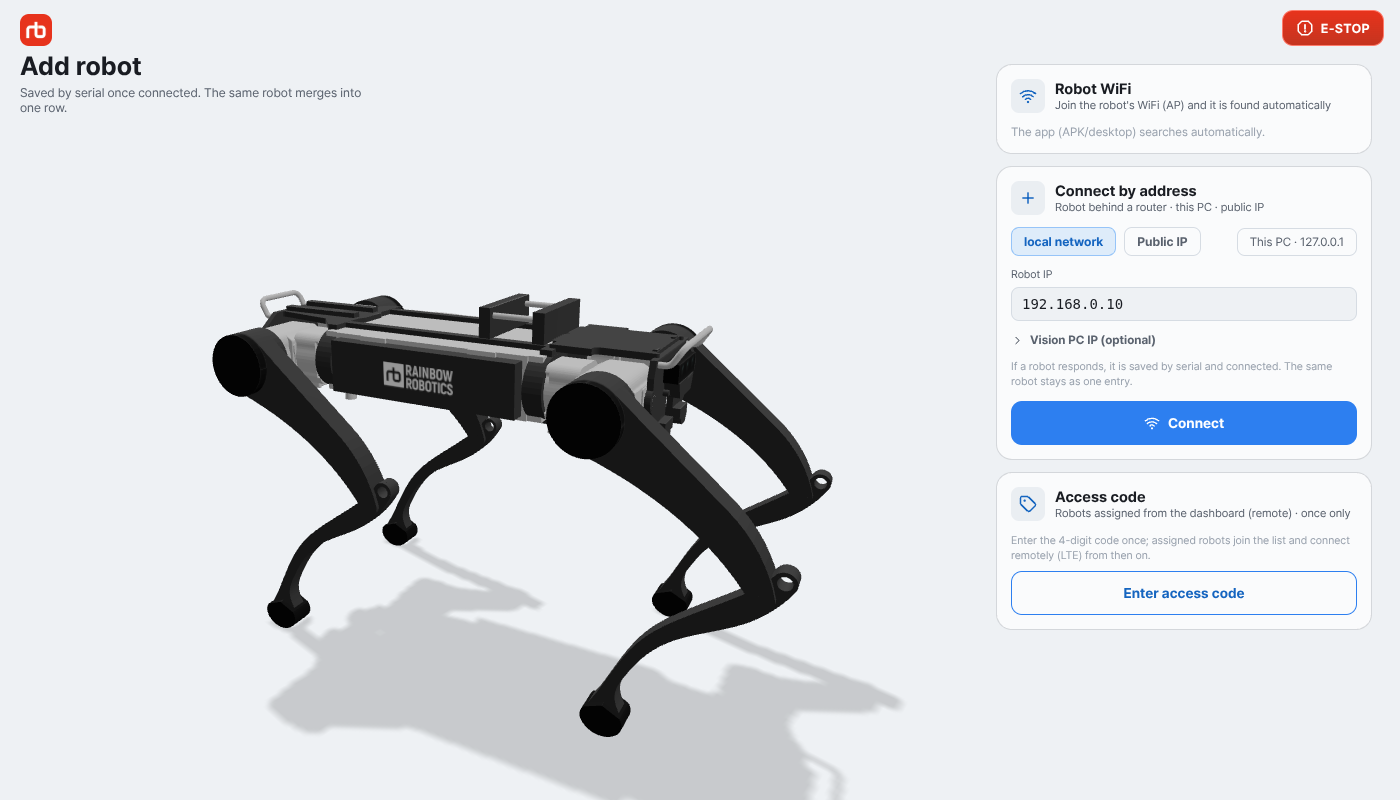
Add robot

Add robot offers the ways to reach a robot. Once a robot answers, it is saved by its serial number and the app returns to the hub.

Robot WiFi ​

Join the robot's WiFi (AP) and the app finds it — on its own network the robot always sits at 192.168.0.10. The check runs when the screen opens (unless a robot is already connected) and again with Check again. A new robot is named after the WiFi it was found on; rename it from its profile.

  • Select WiFi (Linux desktop / Steam Deck) opens the in-app network list. The app checks for the robot again when you close it. A saved network shows a spinner and Connecting… on its row while it joins.
  • WiFi settings (Android) opens the system Wi-Fi screen.
  • If nothing answers: No robot answered — check the robot's power and that this device is on the robot's AP.
  • If the robot found is the one already connected, the app says so instead of adding it again — switch to the other robot's WiFi and check again.

In the browser (web) build, this card just says The app (APK/desktop) searches automatically.

Connect by address ​

The browser (web) build, the desktop app and Steam Deck also offer Connect by address, for a robot behind a router, the simulator on this PC, or a robot with a public IP.

  • local network — enter the Robot IP (preset to 192.168.0.10). Connect first checks that a robot answers at that address. If none does, nothing is saved (No robot responded at this address — check the IP and robot power).
  • Local — connects to the simulator running on this PC (127.0.0.1). It is checked and saved the same way as local network, so start the simulator first. Steam Deck, which cannot run the simulator, does not show it.
  • WAN — enter the Public IP or domain. If the robot has a WebRTC token set, enter the same value in WebRTC token (only if set on the robot). Ports 8080 and 8081 must be reachable from your network.

The address takes effect only if you opened the page at localhost on the PC that runs the proxy. From another device the app shows The proxy could not switch the target — check that you opened this page via localhost on this PC. — restart the proxy with --robot <new IP> instead.

Access code ​

Enter access code opens the keypad. Enter the 4-digit code from the dashboard one time, and the robots assigned to your account show up in Select robot and connect remotely over LTE from then on. The robot does not need a public IP.

The Profile button at the top right shows the account and the number of assigned robots. Log out drops the account's remote robots from the list. Robots saved on this device stay.

WARNING

The access code is a credential. Do not share it, and use Log out on a shared device.

Automatic connection ​

The app connects on its own in these cases:

  • Start-up — the app checks the robot's network first. If a robot answers, it is added (or updated) and connected, and the app skips the hub and opens the control home. If none answers, the desktop app — not Steam Deck — connects to a MuJoCo simulator running on the same PC, and if there is no simulator either, it selects the robot you used most recently.
  • Network change — when the device joins a robot's WiFi, the app checks the robot's serial number and connects to it, adding it to the list if it is new. This also moves a remote connection to the direct one when you come within range.

A robot without a serial number is still saved and listed. The app tells those robots apart by their WiFi name.

My device WiFi ​

The WiFi chip in the control home's top bar shows the signal strength. Tap it to see My device WiFi — the network your device is on and whether it is the robot's network.

  • The badge reads Robot network in green when your device address is in the same subnet as the robot IP. Otherwise it reads Not robot network in amber, with a warning that you cannot reach the robot until you join the robot AP. Both are hidden while you are connected remotely, since a remote connection does not use the robot's network.
  • Linux desktop / Steam Deck: Select WiFi opens an in-app list of networks to join. System settings opens the OS network settings instead.
  • Android: Android does not allow in-app scanning, so System WiFi settings opens the device's Wi-Fi settings screen. Pick the robot AP from the list, then press back to return to the app. The app needs location permission to show the SSID — tap the hint line to grant it. If you have already granted it and the name still does not appear, device location is off; tap the hint line to turn it on.
  • iOS and web builds show a note to connect from the system settings instead.

Connection status in the top bar ​

In the control home's top bar, the status light next to the logo summarizes the connection:

LightMeaning
GreenEverything is normal
AmberConnected, but something needs attention — vision stream down, or another device holds control
Red, blinking fastThe robot reports a fault
RedNo connection to the robot

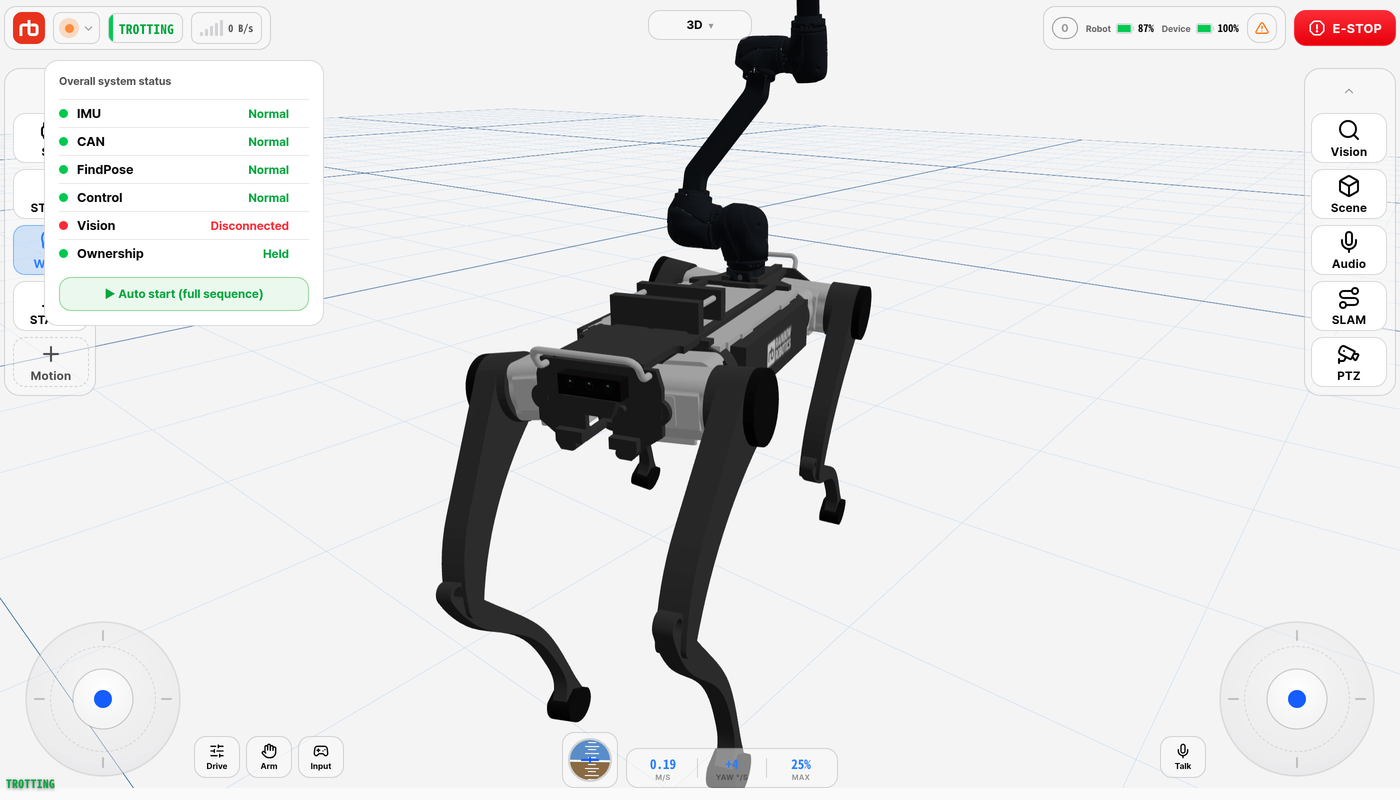
Tap the light to open Overall system status. It lists IMU, CAN, FindPose, Control, Vision, and Ownership, each with a green or amber dot. Tap a row marked Run ▸ to retry that step. Ownership · Take ▸ takes control back when another device is holding it.

The control home has no disconnected banner: if the robot drops and does not come back within 8 seconds, the app returns to the Hub, which is where the status line, Reconnect, and Switch WiFi live. It also returns to the Hub the moment the connected robot changes — turning a robot off frees its WiFi, and the app may find a different robot on the robot network and connect to that one.

Overall system status

What developer mode adds here is collected on Developer mode.

This user manual is intended for RBQ users.