Skip to content

Powering the external ports ​

If a payload wired into an external port does nothing, the usual reason is that the port's power is off. Plugging the connector in does not energise the port — you switch it on in the app.

Wiring and pin assignments are in External ports; the cables are listed under Accessories.

Where to switch it on ​

ScreenAccessWhat lives there
Settings → PowerEveryoneThe auxiliary power you switch during everyday operation
Maintenance → Power / Systemdeveloper mode (level 2 or higher)The above, plus rails that cut the connection or the robot's stance

For an ordinary payload, Settings → Power is all you need.

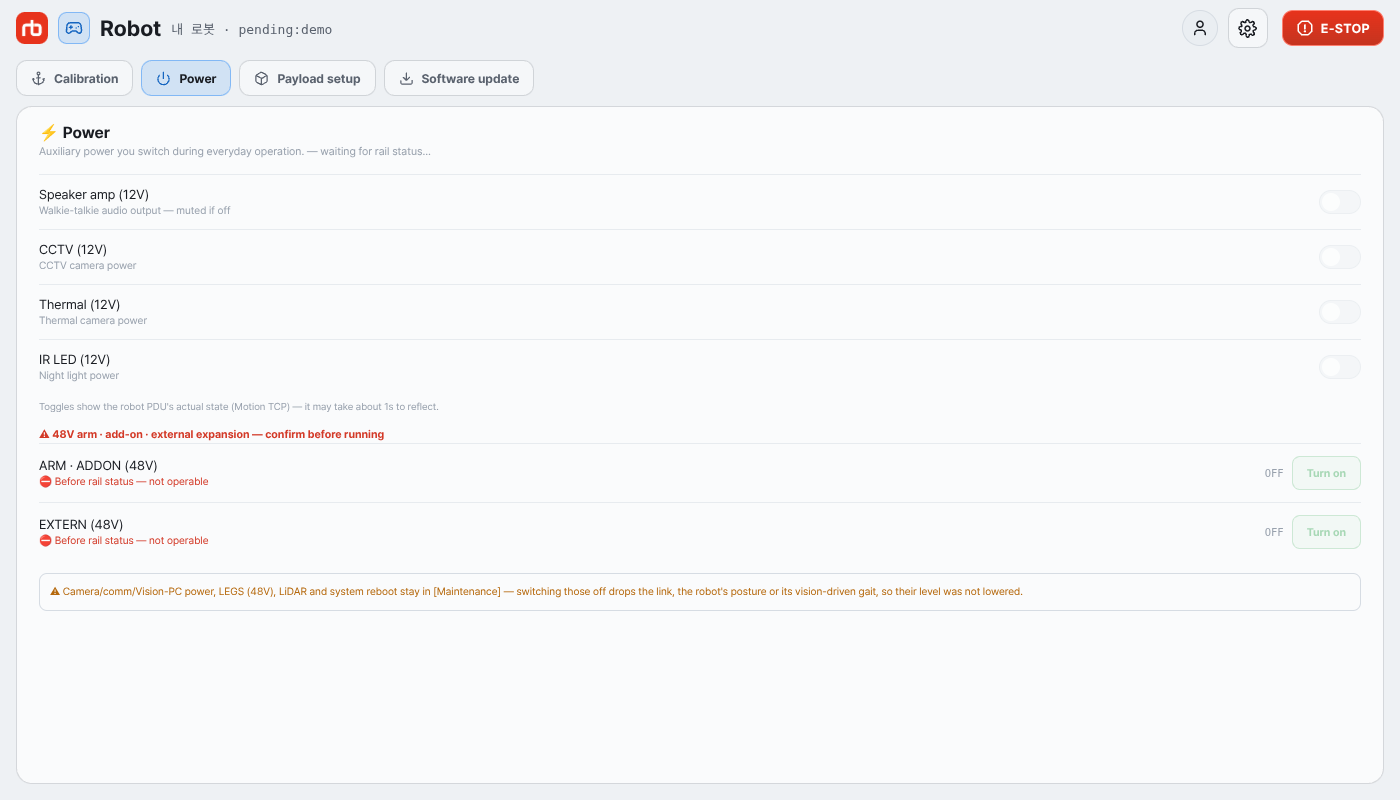
Settings → Power

Switching on a 48 V port ​

Ports that carry raw battery voltage — POWER (2-pin) and PWR-CAN (4-pin) — sit on the 48 V rails.

  1. Open Settings → Power.
  2. Press Turn on on the EXTERN (48V) row — the power that goes out to the external expansion ports.
  3. Confirm with Turn on in the Turn this on? dialog.
  4. Check that the live voltage on that row comes up.

If your add-on sits on ARM · ADDON (48V), switch that row instead.

CAUTION

ARM · ADDON (48V) is one PDU port shared by the arm and the add-on. Turning this rail off also cuts arm power, so make sure the arm is stopped before you switch it.

The 48 V rails put out raw battery voltage, which moves between 42.0 V and 58.4 V with the state of charge. Add your own converter if the payload needs a regulated supply.

Switching on a 12 V device ​

Devices that run on 12 V — cameras and lighting — have a per-device toggle; one tap switches it.

ToggleWhat it powers
Speaker amp (12V)Walkie-talkie audio output — silent while off
CCTV (12V)The color camera of the PTZ unit
Thermal (12V)The thermal camera of the PTZ unit
IR LED (12V)Night illumination

LiDAR (12V), Cameras (5V), Audio · USB hub (5V), Vision PC (12V) and Comms (12V) cut driving, video or the connection itself, so they live under Maintenance → Power / System (developer mode).

It is on but still does not work ​

  • The toggle is grayed out and will not press — the rail state has not arrived yet. Check the robot connection first (Connection).
  • It does not flip immediately — the toggle shows the actual state the robot's PDU reports, and that takes about a second to come back.
  • The voltage does not come up — check that the connector is seated and the cable is intact (Connector handling).
  • Power is present but the device stays off — check you are within the per-port current limit: POWER 5 A, PWR-CAN 10 A, 12V/LAN 2–3 A (pin map).

Still stuck ​

Tell us which port you wired what into, and the voltage shown on the power screen.

→ Support

This user manual is intended for RBQ users.