Skip to content

Requesting support (C/S · A/S) ​

How to file a request with Rainbow Robotics' official support desks. The page runs in order: check it yourself → what to prepare → how to produce logs → where to send it. The submission links are at the bottom — a request that arrives complete is resolved far faster than one that starts a round of questions.

⚠ If safety is involved, stop first

Fire, smoke, abnormal motion or risk of injury — carry out Emergency stop and recovery before reading any further.

1. Check it yourself first ​

Many symptoms already have an answer. Five minutes covers it.

None of that effort is wasted: write what you checked into the "already tried" section of the request below.

Ask the AI first ​

This documentation site has a button that opens an AI grounded in the complete manual. Press Ask AI at the left of the top bar — it is on every page.

What it doesPrepares a question that points the assistant at the full manual (llms-full.txt) and opens it in Claude or ChatGPT
Your optionsOpen in Claude · Open in ChatGPT · Copy prompt for AI (to paste into another assistant)
CostYou need an account with that AI service

It suits questions like — "what is the center of mass measured from?", "what is the difference between STAIRS mode and the Stairs motion?", "what does this setting change?" — anything the manual already answers. It is especially quick when the answer is spread across several pages.

⚠ Do not take AI answers at face value

An AI can state a wrong answer convincingly. Always confirm the following against the manual itself or with support:

  • Safety and maintenance procedures — emergency stop, battery handling, disassembly
  • Anything that actually moves the robot — read the source page before entering values
  • Fault diagnosis — the AI cannot see your robot. File real faults through the steps below
  • Recent changes — it does not know what has not reached the documentation yet

2. What goes into the request ​

The CS and A/S forms use the same fields.

Product details ​

FieldWhat to enterWhere to find it
Product typeRBQ Series—
Product nameRBQ10—
Serial numberThe robot's unique numberUnder the robot's name in the hub's robot list and in the Settings title, or the label on the robot
Installation dateYYYY.MM.DDDelivery / installation record
RegionWhere the robot is—
SellerThe dealer or contact you bought fromPurchase record
Software in useYes / NoYes if you drive the robot from the SDK or your own program

📝 Finding the serial number in the app

Dashboard → the Robot S/N row at the top of the System card. The robot reports it, so it is read-only, and it only appears while connected. It is also under the robot's name in the hub's robot list and in the Settings title.

The payload you have fitted ​

Always state what is mounted on the robot. Unstable walking and repeated falls most often come from payload mass and center-of-mass values that do not match reality. Without this, it is the first thing support has to ask for.

Three things to write down:

ItemExample
What is fittedPTZ camera, Livox LiDAR ×2, LTE/5G module
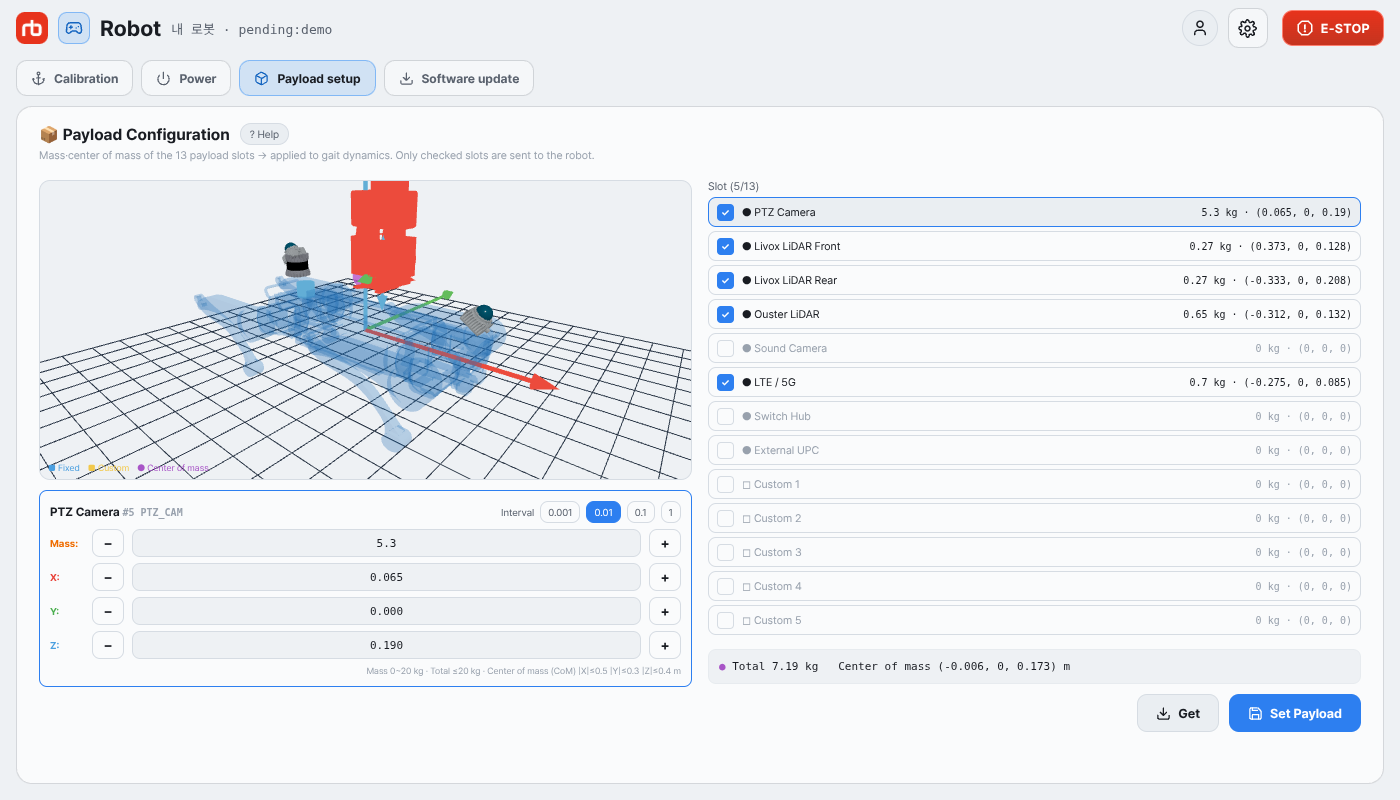
Values entered in the appMounted slots 5 / 13 · total mass 7.19 kg · CoM (-0.006, 0, 0.173) m
Do they match the hardwareWhether you measured them, or left the defaults

Where to read the values ​

Settings › Payload setup shows which of the 13 slots are ticked and what each one holds. The total under the list is the overall mass and center of mass.

Settings › Payload setup — slots and total
[ Capture the ticked slots with their values, plus the total below ]

The Dashboard › Config card summarizes the same values — Mounted slots, Total mass and CoM X · Y · Z. Either way, a screenshot carries all of it with no transcription.

⚠ Check nothing is still ticked after removing a load

Removing equipment means unticking its slot as well. A slot left ticked makes the robot account for mass that is not there, and walking becomes unstable — a genuinely common cause. Entering values is covered in Settings › Payload setup.

If you have just fitted or changed a payload, say whether you ran the ZMP calibration (ZMP Calibration). If not, doing that first may be the quicker route.

Writing the description ​

"It doesn't work" guarantees one extra round of email. Filling in the blocks below usually gets the cause narrowed down in the first reply. Copy the template as-is.

text
[Symptom]
One line on what happens. (e.g. Switching to WALK, the robot collapses after 3 seconds)

[How to reproduce]
1. Robot on level ground, auto start completed
2. STAND → WALK
3. Push the left joystick forward; it collapses ~3 s later

[When and how often]
Since around 2026-09-01 14:30. 8 times out of 10.

[Software versions]
App: 1.2609.0   Robot: 1.2609.0   (Maintenance › Software update)

[Payload fitted]
PTZ camera + Livox LiDAR ×2 + LTE/5G · slots 5/13 · 7.19 kg total
CoM (-0.006, 0, 0.173) m · measured values entered · ZMP calibration done

[Already tried]
- Rebooted the robot → unchanged
- Re-entered payload values → unchanged
- Ran the manual's "If the robot falls" procedure → recovers, but recurs

The two version numbers (app and robot) are the ones most often left out, and a mismatch between them genuinely causes symptoms — it is the first thing support checks. Copy the Version values of This app (GUI) and Current robot straight from Maintenance › Software update.

Attachments ​

The form takes one file, and only certain formats.

Accepted.jpg · .jpeg · .png · .pdf · .zip

⚠ Log files cannot be uploaded as-is

.log, .txt and .csv are rejected. Wrap them in a .zip. Put everything in one zip when you have more than one file to send.

What is worth attaching, in order of usefulness:

  1. The Black Box zip — attitude and numeric recording from around the incident. The single most useful attachment.
  2. A screenshot of the payload configuration — see Where to read the values.
  3. A screenshot showing the symptom — the error message, or abnormal values on the Dashboard.
  4. Video — if it is large, host it and put the link in the description instead.

Contact details and consent ​

FieldNote
Company · department · name—
Phone—
EmailThis is where the reply goes. A typo means no answer
How you found usSearch · News · Exhibition · SNS · Referral · Other
Privacy consentRequired — the form will not submit without it

3. Producing the logs to attach ​

Logs come from the Logs screen of the RBQ app. It has no menu entry — open it by tapping a red ERROR / FATAL toast, or a row in the alert badge popover in the control home's top bar. The screen itself is documented in Logs and Black Box.

Black Box zip — do this first ​

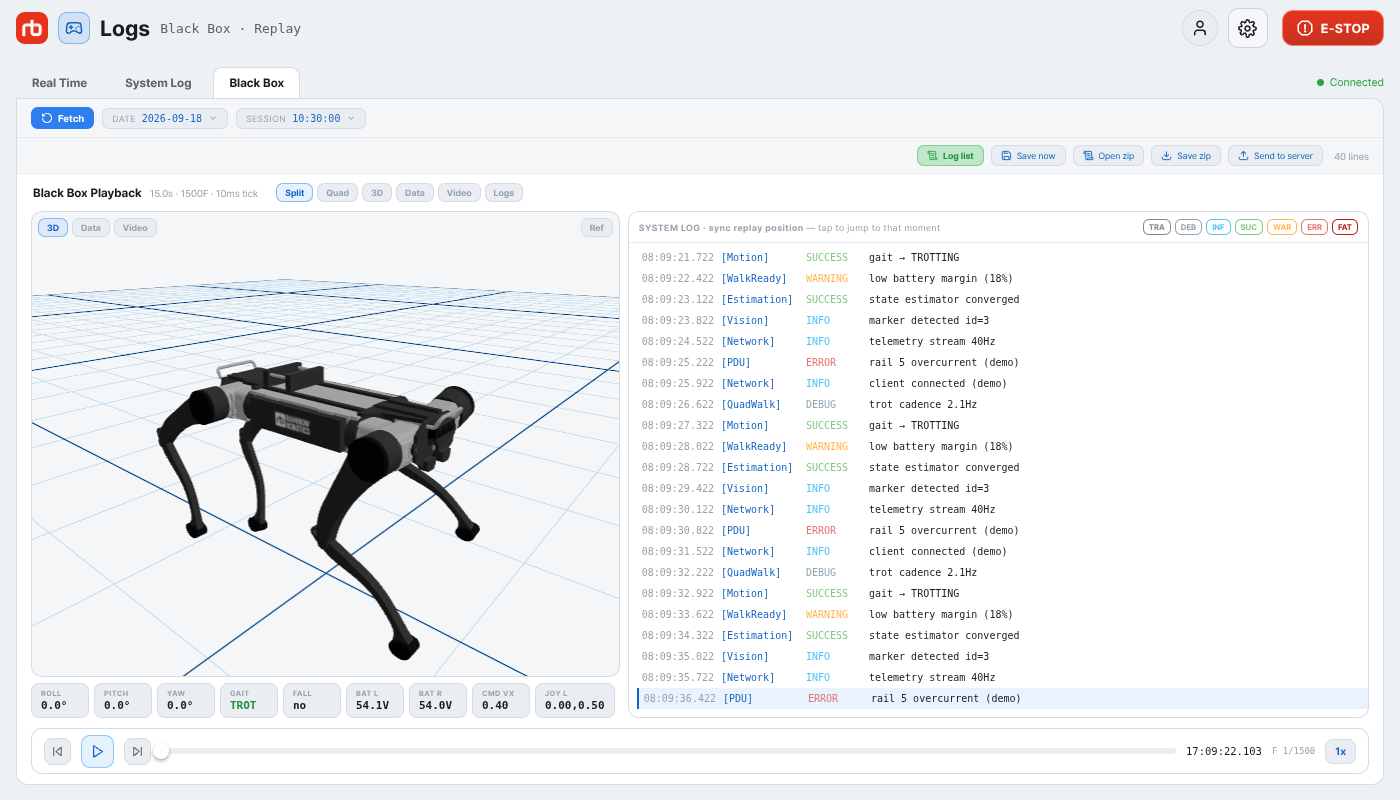
For anything momentary — a fall, a fault — this one file is the most useful thing you can send. It carries the attitude, voltage and joint values from that instant alongside the log.

  1. Open Log → Black Box.
  2. Choose the date and time window under DATE and SESSION.
  3. Press Fetch to load the recording.
  4. Scrub the transport bar to confirm it is the right window.
  5. Press Save zip — attach that file as it is.
Black Box replay screen
[ Black Box — choose DATE and SESSION, then Save zip ]

System log ​

Use this to send past logs by date.

  1. In Log → System Log, pick a day under DATE and press Fetch.
  2. Leaving only WARNING, ERROR and FATAL in the level filter cuts the noise sharply.
  3. Press Save to download the file.
  4. Zip the downloaded file before attaching it.

Screenshot ​

If you can make the symptom happen again, this is the quickest route.

  1. Open Log → Real Time.
  2. Reproduce the symptom once.
  3. Screenshot the messages that appeared at that moment. Narrowing the level and process filters first makes it much easier to read.

📝 When it will not reproduce

Pick the day in System Log and capture around the time it happened. If you do not know the exact time, the rough window is enough.

Bundling several files ​

Only one attachment is accepted, so combine them.

bash
# Linux · macOS — after gathering the files in one folder
zip -r rbq-support-2026-09-01.zip folder-to-send/

On Windows, right-click the folder and choose Compress to ZIP file. Putting the date and serial number in the filename makes it easier for support to find later.

4. Filing it ​

With everything prepared, choose the desk below. There are two, and picking the wrong one delays the reply while it is handed to the right team.

SituationDesk
A question about usage, features, settings or specificationsFile a CS support request
A fault or error that needs inspection or repairFile an A/S support request

The dividing line is simple — if the robot has to be shipped or someone has to visit, it is A/S; if an answer settles it, it is CS. When in doubt, file with CS; it gets routed internally.

There are developer-facing channels as well.

ChannelFor
GitHub IssuesReproducible software bugs
GitHub DiscussionsQuestions and feature requests
rbq.support@rainbow-robotics.comPrivate, business or licensing matters

5. After filing ​

  • The reply goes to the email address you entered. Check the spam folder too.
  • Reply in the same email thread when following up. Filing again splits the history.
  • If more logs are requested, repeat Producing the logs to attach and send them.
  • If the robot has to be shipped, follow the Packing procedure.

See also ​

This user manual is intended for RBQ users.